Christmas Project #1: Details
Tags:Here's a closer look at some of the cards: the whole idea is to keep it simple (embossing and gloss can be simple once you get the hang of it) + playful + to use bits and pieces of pattern and product.
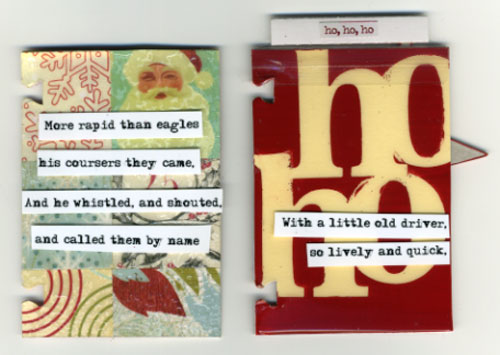
These two cards both have glossy surfaces. The first is the result of using UTEE (ultra thick embossing enamel) and the second with Diamond Glaze (you could also use Glossy Accents - tips on Rangers website for using that can be found here).
For the first card I used a Fiskars square punch for the patterned papers + covered the entire card with Versamark + then covered with UTEE (ultra thick embossing enamel). Then I tapped off the excess and used my heat gun to melt the UTEE. I think my UTEE may be old - I did not get the same sort of smooth coverage I have gotten in the past.
The "ho ho" card was used by painting over top of a Heidi Swapp alphabet mask (my favorite red is cranberry from Making Memories). After the paint dried I peeled off the mask letters and then used Diamond Glaze all over the top of the card to create the "seal" layer (it goes on cloudy and then dries clear - you can read a basic tutorial about using this here). You can just use your fingers to smooth it around the card. I let it dry over-night.
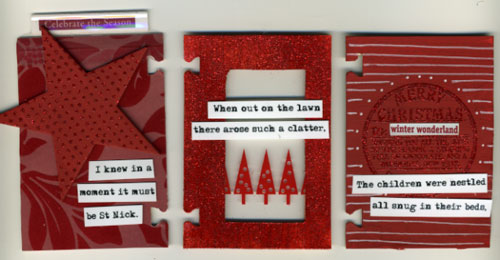
Each of the above cards include red Embossing Tinsel from Ranger - essentially embossing glitter. For these I stamped or rubber with Versamark (embossing ink), then sprinkled the tinsel, and used a heat gun to set the glitter. If you want to learn more about embossing, Ranger has some great tips near the bottom of this page. (Merry Christmas stamp is from Catslife Press)
The middle frame was created by cutting out the center of two cards (using an xacto knife), embossing the outside of both with the tinsel, and placing a transparency between the two (Red Hambly Rub Ons were used for the red trees on the transparency).
The white pen used on the third card is the Sharpie Poster Paint Pen.
Some of the other products used:
Anna Griffin Dorothy Epoxy Stickers
Anna Griffin Elegant Embellishment Stickers
K & Company Wild Saffron Fabric Brads
Also, lots of stuff fromMaking Memories St. Nick holiday collection.
Edited: Candi asked how I punched the cards after covering with paper - I used a craft knife to cut out the space (using another card as a template on top).


Comments
Sign in or sign up to comment.
33 comments
Well...all I can say is wow! You never cease to amaze and inspire me with your creativity.
I am going to try this project but think I will use pictures from Christmas through my life and my children's lives along with other holiday-ish things.
Thanks for sharing your talents!!
Beth
Replies
Sign in or sign up to reply.
Fabulous as ever! I just got those great Hambly Christmas rubons in pink and green - a very *bright* holiday awaits!
A (hopefully) quick question for you: I'm curious about the cards themselves. The look pretty sturdy. Did you do this on top of playing cards?
Thanks!
Replies
Sign in or sign up to reply.
Oops - just saw the answer to my question in your first post about the cards. :)
Replies
Sign in or sign up to reply.
thanks for the up close shots of those cute cards :)
have fun @ sharin memories this weekend and give my girl carole a hug for me!!!!
Replies
Sign in or sign up to reply.
i did forget to ask u something about those cards...{might be a dumb ?} if the cards come punched....after you embellished the cards w/your patterned paper how did you re-punch those cards??? did you use a roledex punch???
THANKS!!!!
canditardio@aol.com
Replies
Sign in or sign up to reply.
Darling cards!!
I love that cranberry red from MM too. It's the perfect shade. Even though I won't be able to get a holder, am going to use lots of red and green moss flocking on my Christmas cards and w/ a lil' bit of extra details, they should come out darling too.
Thanks for sharing the little details too Ali! Love how you let us know how to achieve this & that...Now that's what I call Sharing the Creative Flow:)
Replies
Sign in or sign up to reply.
I have a question. On the card with the square-punched cutouts. I was wondering...when you heat the UTEE doesn't the glue you used to adhere the squares heat as well and then release from the card? If it does, how do you counteract that? I want to try the UTEE technique but if there is something special I need to do when embossing on top of already glued down images I want to be prepared.
Also, what tool did you use to get the correct holes on the side of the card to put it on the spinner? Is there something special that comes with the spinner?
Thanks Ali! Love your project!
Jen
Replies
Sign in or sign up to reply.
very cool stuff - love seeing the process.
Replies
Sign in or sign up to reply.
oooh..oooh...oooh!!! I love this project! Especially loving seeing all that red!!
Replies
Sign in or sign up to reply.
SOOOOOOO LOVELY! sigh. you're amazing!
Replies
Sign in or sign up to reply.
Good question Candi - hugs to you !!! ALi, this is so darling I am loving it & LOVE the MM red color - thank you for sharing your talent with us - you are inspiring !! See you Saturday ~
Replies
Sign in or sign up to reply.
you totally have me wanting to do this project now. Thanks a lot.
Replies
Sign in or sign up to reply.
Amazing! These are so gorgeous. I want to do it!
Another question - did you UTEE over the text strips or before adhering them?
Thank you for sharing!
Kristi
Replies
Sign in or sign up to reply.
Thank you for the close up photos- they are so beautiful!
I just got some UTEE and wasn't sure how to start to use it so thanks for the info & inspiration!
My dear daughter & I are going to make something similar for the holidays- this is so wonderful!
Replies
Sign in or sign up to reply.
Ali
Another question about the ATC holder, how many cards in all do you have on there?
Replies
Sign in or sign up to reply.
I have found that with UTEE that you need a really juicy pad of embossing ink or it will look "pebbly" on the first coat. I also typically do 2 or 3 coats of UTEE.
Replies
Sign in or sign up to reply.
I got one of these last Sat. and didn't know what I wanted to do with it---now I know! Thanks.
Replies
Sign in or sign up to reply.
I just had to tell you that I really enjoy your blog. I love seeing the projects you're working on and I really appreciate that you show so many 'close-up' pictures of each project. It's also good to be reminded that the hobby of scrapbooking is really meant to be fun and playful. As a reader, I've enjoyed comparing notes with your reviews on the "good reads" website. We've got similar reading taste and have loved several of the same books. And as the mother of a special daughter, I can appreciate the challenges and the joys you face with your son. (My daughter is 6). I think what I've enjoyed the most about your blog is that you're really focused on your son but you haven't forgotten yourself. You still have projects and dreams and goals for yourself. It's so hard to remember that sometimes. Thanks for the inspiration.
Replies
Sign in or sign up to reply.
LOVE LOVE LOVE!!!!!! Bustin' out my stuff now. It's soooooo time to play :)
Thanks for sharing with us honey,
-Karla
Replies
Sign in or sign up to reply.
so classy!
such great ideas...
catherine
Replies
Sign in or sign up to reply.