weekend creative : photo type case
Tags: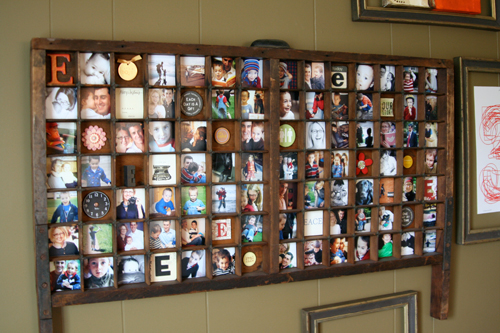
[ project featured in my book Life Artist ]
This project is right up there at the top of my all-time favorite projects list. It has photos + words + re-purposes something old giving it a new life. Lovely.
Here's the really simple how-to:
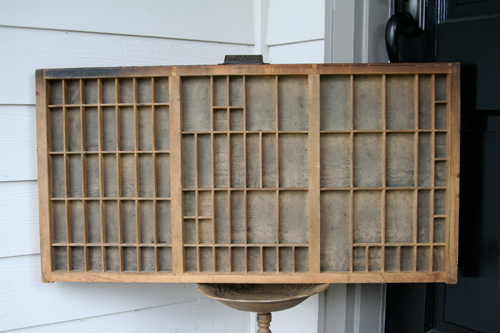
1. Find an old type case.
I purchased both of mine from antique stores/tag sales
for between $20 and $40 depending on quality and size. This one above
was $30. Both of the cases I have measure right around 32 inches x 16.5 inches. I would also recommend checking ebay or simply google "type drawers" or "type cases" (while looking up some sources I found that they are actually called cases rather than drawers).
I did a renegade cleaning of mine by spraying it with the hose on a hot summer day to loosen the dirt and grime that had accumulated. I am guessing it was probably not the best way to clean old wood, but it worked. After it dried I was ready to play.
2. Fill it with stuff.
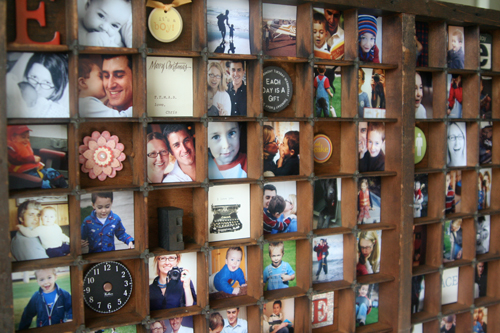
The case above was filled with photos and embellishments. I measured the squares (this one had even sized squares vs. the empty one above has a variety of different sized rectangles) and they ended up being pretty much 2 inches x 2 inches. I re-sized a bunch of our favorite photos in Photoshop, printed them here at home, and trimmed them down to fit.
To adhere the photos and embellishments onto the wood I went with 3D foam squares. If you are wondering about the sticking power, this entire thing was wrapped + shipped to Utah to be photographed for the book and made it back in one piece and has been hanging on our wall ever since.
For variety and depth, I added more than one foam square behind some of the photos. This means that some of them stick out farther within the squares than others.
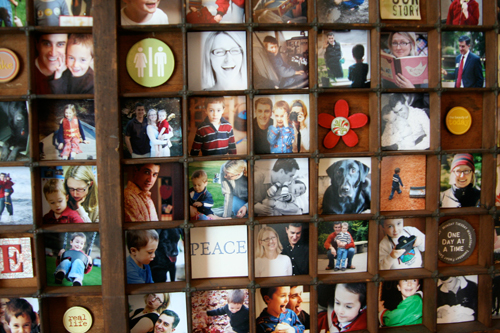
As for additional embellishments I pretty much went through my stash and grabbed elements that had a bit of meaning and were just waiting to be used in something (don't we all have those things that you are just waiting to use on the "perfect" project). I also tended towards circle embellishments for a nice break from all those square photos.
These Scenic Route chipboard circles would work great. As would these Love, Elsie Soft Charms or these stacked layer stickers from K&Company or those classic Making Memories metal charmed quotes.
The compartments are also a nice place to store personal mementos. My Mom has a drawer hanging in the house I grew up in that is filled not with photos but little bits and pieces of things she has collected along her journey. Many of those little things relate to this or that event and are significant to us as a family. It is a treasure.
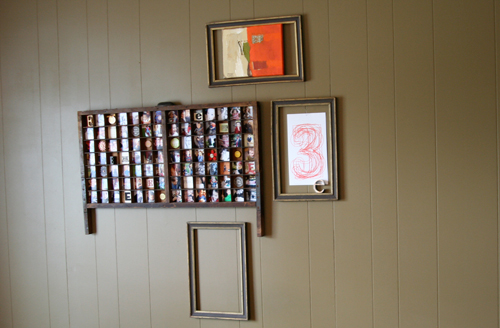
3. Display.
Our case hangs on a wall in our dining room. I hung it with picture-hanging wire and screws screwed into the sides of the wood. They would also look great on a bureau or dresser.

The prompt for the weekend is this: What can you do to "live with" your photos other than having them inside your computer, in boxes under the bed, hidden away in photo albums, or placed among decorations in your scrapbooks? Maybe a type case or shadow box is in your future...


Comments
Sign in or sign up to comment.
132 comments
Ali, when I received your book right after it released, I went CRAZY for this project. I went to the flea market two weeks later and was able to nab one for $15! I haven't put pictures in it yet, as we are expecting a baby soon and I want him to be a part of it, but I LOVE this project. So glad you posted it to your blog.
Replies
Sign in or sign up to reply.
I have the exact same tray with the odd sizes as the empty one you showed. I remembered seeing this project in your book, but I think the compartments are just too small for photos. What else might you suggest? I really want to do something special with it.
Replies
Sign in or sign up to reply.
What a great project!!! It is awesome! as are you!
Replies
Sign in or sign up to reply.
Best project I have seen in ages, thank you!! I am definitely inspired to make my own, I love the antique look in my home.
Replies
Sign in or sign up to reply.
This is fabulous! Have you filled the one with a variety of shapes that is pictured? I would love to see what you came up with...
Thanks so much for sharing your creativity!
Replies
Sign in or sign up to reply.
my dad just bought me a whole type case cabinet and i don't have enough little tidbits to fill the drawers (I only fill about 3 of the 17) so I think I might be taking one and making something like yours. (Mine are the uneven sized kind too)
Replies
Sign in or sign up to reply.
ali edwards, this is the coolest photo display ever! i can't wait to do this. my mom is going to love this, too. forwarding to her now...
xox
Replies
Sign in or sign up to reply.
Cool Project!
Replies
Sign in or sign up to reply.
Dang! I gave my type case away years ago after having it around and never doing anything creative with it.
I have to admit when I first glanced at the opening picture, I thought, "OMG, Ali has scrapped herself a head board for her bed!" Thank goodness you had other frames nearby for scale. But it makes me wonder if a person actually could put several type cases together and make a twin-size headboard for a kids' bed--something that would just be attached to the wall over the bed and not actually attached to the bed itself. You could put all the child's most favorite people and things in the little boxes, and they would never have to be afraid of falling asleep alone again!
Replies
Sign in or sign up to reply.
I adore this project, and will begin my search for a "type case" imediately!!! I really love your style, and your blog has always been a fav! recently it has been even more awesome. I love all the projects, and practical help!
Replies
Sign in or sign up to reply.
Hi there!
I remember being so inspired by this project when I was reading your book. I was thrilled to see it again this morning.
Ebay has a seller who had more than 2000 type drawers and he's selling them for $12.50...I'm ordering 2! This is the address...
http://stores.ebay.com/Daves-Merchandise
Happy Weekend!
Replies
Sign in or sign up to reply.
My mum has an old stamp drawer filled with 'bits' too. i just bought one for myself last weekend in Portobello Road (London), and it's an antique stamp drawer from Fleet Street. i'm filling it with all my 'a' stamps. i just know that i'll eventually end up with a few of them all filled with different stuff!
Replies
Sign in or sign up to reply.
Gorgeous project.
Your web site and the spirit of your creativity just totally inspire the heck out of me, daily.
Replies
Sign in or sign up to reply.
once again, I love everything about this!
Replies
Sign in or sign up to reply.
Thank you, thank you, thank you! This will make the perfect birthday present for my mom - I think they're getting tired of my hybrid albums, so this will be a nice change!! :)
Replies
Sign in or sign up to reply.
This is so cute!! I wish I had the patience for it!
Replies
Sign in or sign up to reply.
OH Ali, that is so cute!! I LOVE LOVE LOVE that idea! I am going to have to do this one. Thank you for this idea!!
Replies
Sign in or sign up to reply.
Love this - I have a tray like this and keep rubber stamps in it. Not so much a repurpose, eh ?? As we are about to move house. I may change it...
Replies
Sign in or sign up to reply.
WOW...just wow. :)
Replies
Sign in or sign up to reply.
I have something like this that I bought a year ago and have waited to do something with it. Now I know. Thanks a bunch! You are so awesome!
Replies
Sign in or sign up to reply.