Week in the Life : Formula + Supplies
Tags:DESIGN BASICS (and how that relates to supplies)
One of my biggest tips for putting together an album is to develop a formula and stick with it for each day. Formulas are key to making this a manageable project. By formula I mean setting up a basic design and repeating it for each day of the album. Don't reinvent the wheel from one spread to the next. Keep it simple. One of the goals of this project, along with celebrating everyday life, is to actually finish an album.
So what are you going to use to hold all this stuff together? First decide what size you want to do: 12x12, 8.5x11, mixed up sizes, 8x8, etc. Will it be paper or digital or a combination? Album or photobook?
There are tons of different ways this can come together.
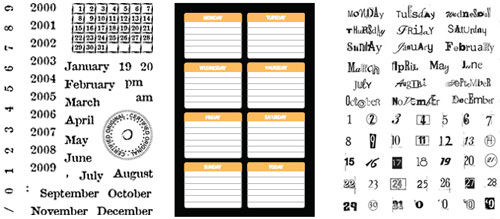
1. Use a photo album. Maybe something like this. This is a great option if you are sticking with just words + photos. Slide the photos in, add a couple journaling cards (4x6) and call it good. You could print out these Days + Months journaling cards to use in this project. You can take this idea one step further and add in a bit more craftiness by embellishing/decorating those printed journaling cards. Consider paint, patterned paper, etc.
2. The square-punch/collage route. This is one of my go-to techniques when I am working with large quantities of photos. You could choose to simply create a collage of square punched photos for each day. This is a great way to showcase an overall sense of pieces of the whole. One side of your two-page spread could have a favorite shot (or two) and the other page could have a bunch of square-punched photos. The end result of this project does not need to be complicated.
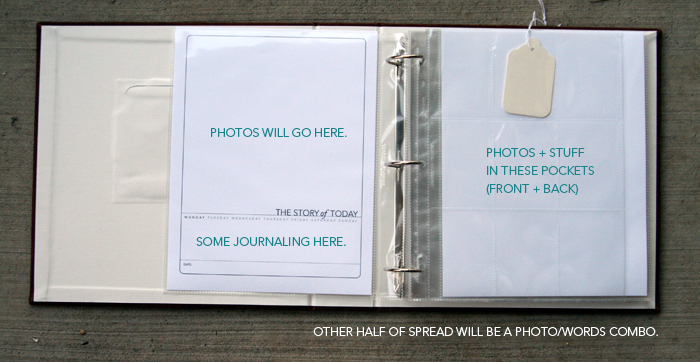
3. The mixed-up, 3-ring album.I am going to go with an 8.5x11 Amercian Crafts Courdory album and potentially use a variety of different page sizes (depending on the amount of content). For page protectors I will be using a combination of Avery Trading Card pocket pages sandwiched between the page protectors that come with the American Crafts album (I will have one of the trading card pocket pages for each day as well as the 2-page spread). I may add in some others as well.
I am considering doing an enlargement of my favorite photo from the day for the second page of the spread. I think it would be cool to contrast that with the smaller photos. That first page of the spread will likely include a collage of photos - some square punched and others cropped.
One of the reasons I like going with a 3-ring album is that if you end up with tons of content (words + photos + stuff) you can always add in more page protectors or pages in different sizes. So much of this will depend on how much you have to work with at the end of the week. Additional divided page protector resources: Fancy Pants, We Are Memory Keepers (2-up, 4x6, 8.5x11), We Are Memory Keepers (6-up, 4x6, 12x12), see other We Are Memory Keeper options here, or you could go with an album + page protector system from Scrapworks (this is the album I used in the beginning when teaching this project).
PRODUCTS TO CONSIDER
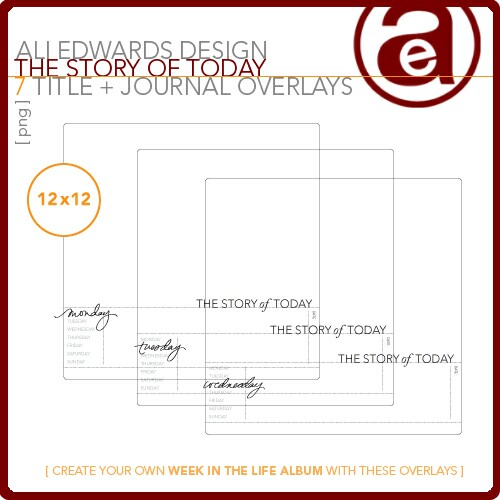
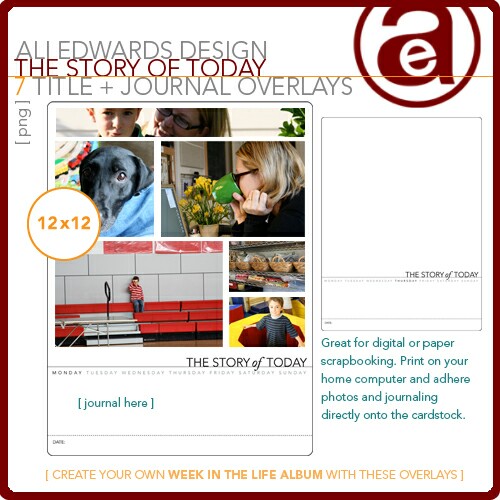
Story of Today Overlays: these can be used digitally (created to work with these layered templates - you can buy them together here) or printed out and worked on/added to with other traditional embellishments. This is going to be the first page of each of my spreads. I released a new set of these in 8.5x11 format at Designer Digitals this past weekend (much easier to print if you don't have an oversized printer). The layered templates would be great for use in a photobook.
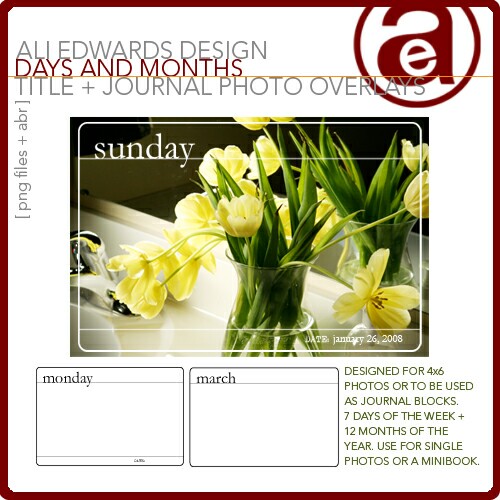
Days + Months Title + Journal Photo Overlays (see image above under #1): one of the cool things about these overlays is that they can be used on top of photos or as journaling blocks. You could download these and use them for your journaling for each day of the week (a cool way to use a digital product in a traditional album).
For this sort of project, and for much of my work, I look for products that are universal which can be used on more than just this creative adventure. The ones below all have to do with "everyday" themes, three of which are stamps that can be used again and again.
Technique Tuesday A Day To Remember Clear Stamps
Heidi Swapp Days of the Week Journaling Spots (adhesive backed weekday labels)
Rhonna Farrer Messy Date Stamps
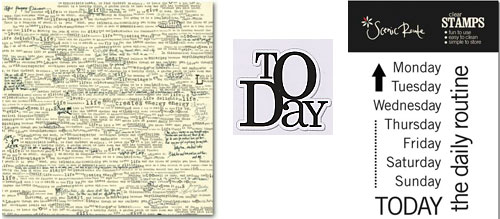
7gypsies Life Creme Patterned Paper (could be my favorite paper)
Scenic Route Days of the Week Stamps

Hoping the above ideas will give you a jumping off point for creating with photos + words + stuff. Remember, this is a project that has many, many different solutions. Trust your own instincts and allow your content to guide you as you begin thinking about how you want to put this together.
Keep it simple. Let the content be the star.

A complete list of posts related to the week in the life project can be found here.


Comments
Sign in or sign up to comment.
64 comments
Having so much fun with this project...I'm sure onlookers thought I was crazy as I took pics of my kids in a Target buggy!
Replies
Sign in or sign up to reply.
Caryl - you do not have to use Photoshop for the overlays. I just tried it in Word and they work in there (as well as other photo programs I assume). If you were going to use Word you will definitely need to adjust your margins and adjust the template to fit.
Replies
Sign in or sign up to reply.
Hm, I was thinking of doing this as a mini-book, but I'm beginning to think there's too much for that. I'm realizing it might make a lot more sense to wait until the end of the week and see just what I have and how it might best be put together, but, wah, I had my heart set on a mini-book! :-) It feels a little narcissistic to do an actual full-size album of one week of my life, even though I know it will be a great document one day down the road. A mini-book felt like the right compromise between self-centered scrapbook and just-something-put-together for posterity!
Replies
Sign in or sign up to reply.
Oh my gosh! This project is so much fun!! A million thanks for doing this Ali! I am taking an on-line photography class right now with Karen Russell and posted the info. on this project for all of my classmates to see so they too can participate. Wonderful way to practice our photography, tell stories, and creative skills.
Replies
Sign in or sign up to reply.
Im so thrilled you are doing tis series. i forgot my camera this morning taking the kiddos to school and had a blowout! needed the camera for that for sure.
Anyways, I was interested in maybe taking the overlays route with this but I need to know if these work with photoshop elements or do you need the full blown version or another program in order to use the overlays you created??
Thanks a ton for your wonderful dose of creativity!!!
Kitty
Replies
Sign in or sign up to reply.
Kitty - they work in Elements just fine :).
Replies
Sign in or sign up to reply.
Ali
These overlays also work great in Microsoft Office Picture Manager - and when printing you can resize, once you select your printer and enter next - you have about 6 print options sizes!! Works great. Still trying to get mine figured out in photoshop - but slowly plugging away at that. Gathering pictures, emails & paraphenalia and having FUN!!!
Thanks again - truly enjoying this
Replies
Sign in or sign up to reply.
I'm on my 3rd day and going good. The first couple of days I don't have as many pictures, but I am doing good today. It's funny you don't realize how much you do all day until you try to take pictures of it.
Replies
Sign in or sign up to reply.
Took my camera to the hospital today and found a few things to get pictures of that don't violate patient confidentiality!!! Don't want to get fired putting together this book. Since my kids are gone, I sent a text to each and asked them to send me a picture of themselves as a px text. Still waiting to hear from my oldest--she is in Med school and so she is busy but I got pics of the other two girls--fun to include them too. Since I have less pictures than most I am still thinking small. Will have to wait and see what have at the end!! So far no pics of dh he hates to have is picture taken, but I do have some of the cat!!
Replies
Sign in or sign up to reply.
HI Ali, Will you be putting all this project info/instructions on a PDF, as it would make it so much easier to print out :)
Thank you
Replies
Sign in or sign up to reply.
I am loving this project! I just couldn't wait to start putting my pictures into the Hand Drawn Overlays that I bought last week. I had both Sunday and Monday almost finished during my kids naps. I am not a digital scrapbooker, but I really would love to head in that direction (I keep buying digital elements to do this), since my kids (4 and 2) love to trash my scrap space if the door is open for more than 30 seconds.
Thanks for motivating us to do this. I am sure I will look back on this crazy week of my life and laugh at all of the mundane, yet beautiful moments of our life together.
Replies
Sign in or sign up to reply.
*could* be your fave paper or.... IS your fave ?? ;) whenever i see it i pick up a sheet :) and we still order it for the store from time to time.... best paper ever :)
Replies
Sign in or sign up to reply.
I have a typepad blog, so was reading the typepad newsletter today on "how to make your blog better". On the sidebar there were links to some featured blogs, and I clicked on one called LoveLife and started reading. She was inspiring and also said in her bio that she was inspired by you. So I found your blog and started reading.
I am a scrapbooker, mom of 2 young kids, so found a lot to relate to, and am excited about this Week in the Life project even though I only discovered your blog 15 minutes ago. I'd love to do it -- need to re-organize my week to make it work!
Just want to say thanks. Serendipitous!
Replies
Sign in or sign up to reply.
ali - another thank you - this is so much fun! I have used the 4x6 overlays on another project and love them! and was leaning toward the day/month overlays for this project, but I think I have too much for "just" a photo album. so now I'm considering the 8.5x11 overlay...and wondering if you are releasing (or maybe the one that's out there has 12x12 and 8.5x11?) an 8.5x11 layered template, too? (like this http://www.designerdigitals.com/ecom/product_info.php/products_id/5449)
Replies
Sign in or sign up to reply.
thanks for the challenge ali.... i know we are only two days into this adventure - but - i am having a blast just posting this to my blog.
thanks again - cam
Replies
Sign in or sign up to reply.
Loved Monday, which I called, "Take your camera to work day." I took pix of my commute, my building, my office, view from my window, etc. It was lots of fun. Today I tried to focus on our evening at home routine, and tomorrow I'm going to do some pix of my kid-shuttling. Looking at these photos, I realize my house is a bit of a mess (I really need new carpets), I eat out way too much, and I spend much more time with the cat than I realized! LOL!
Rinda
Replies
Sign in or sign up to reply.
Ok, I am just trying to figure out what to do. I have not started taking photos, yet, we just go back from a trip. I will start tomorrow.
I would love to use some 4 x 6 photo albums that I have. NOt sure how to do that....or I love the idea of a 3 ring binder with different page protectors. I will have to check a store to see what I can find.
Question: how many photos should we include per day? I know you mentioned a collage and a two page spread. I have those Avery card pockets for Studio G stamps.
Replies
Sign in or sign up to reply.
Thank you for the inspiration. I just traveled to Italy and have been staring at the stack of stuff i collected, even an album i bought in florence. i tried to write down daily events and happenings, saved menus,etc. I believe the day in a life format will be perfect for this travel album as i took over 1000 photos. i do wish i had taken a daily self portrait. why is it we never take enough pictures of ourselves on vacation? so i'll be writing my random memories of the trip as i edit the photos this week. thank you again for the inspiration and motivation to just do it.
Replies
Sign in or sign up to reply.
I haven't had a chance to comment on this project yet. I think it is wonderful and I just started with it yesterday. I think I am going to go either either 8 1/2 x 11 or 8x8 for my album.
Also, I am not going to be participating in your flickr group because I am almost to the max of 200 photos in flickr. I just don't want to upgrade at this point. But I am keeping up with it on my blog.
Replies
Sign in or sign up to reply.
Ali, thank you SO much for all of the hard work that you are putting into this project! I am loving it. You have finally inspired me to do this! I have been wanting to do it for years, but you are doing it in steps and making it much more user-friendly and not overwhelming. Thanks again!! Susan
Replies
Sign in or sign up to reply.