December Daily® 2020 | Story Five
Tags: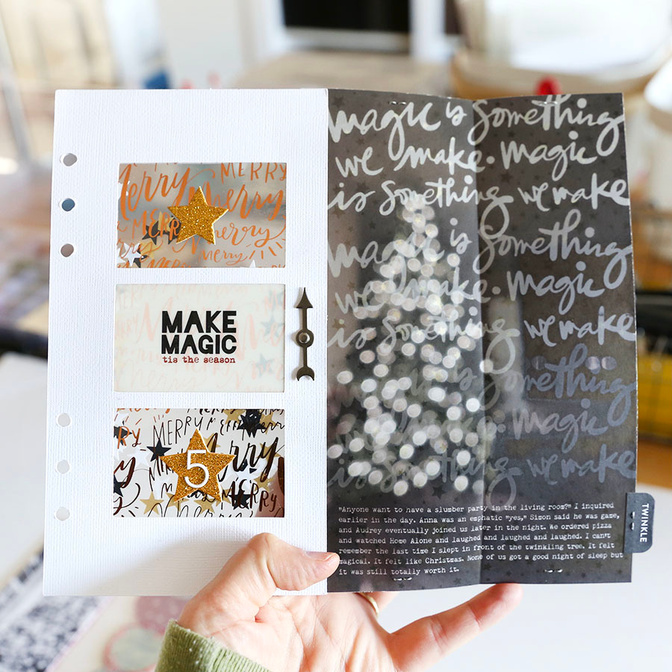
Welcome to December Daily® 2020 | Story Five.
Today's story is about making some magic + a slumber party in front of the tree in our living room. I had a ton of fun playing around with printing a photo + journaling on vellum and adding it into my album alongside a shaker pocket page I started in Product Play 4.
Let's start with the process video:
Now let's take a look at some images of the finished page:
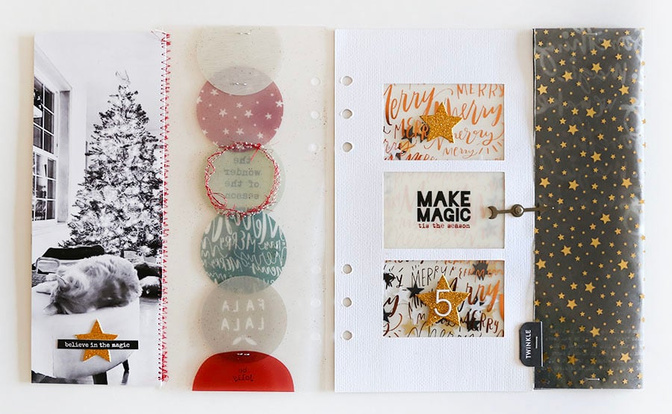
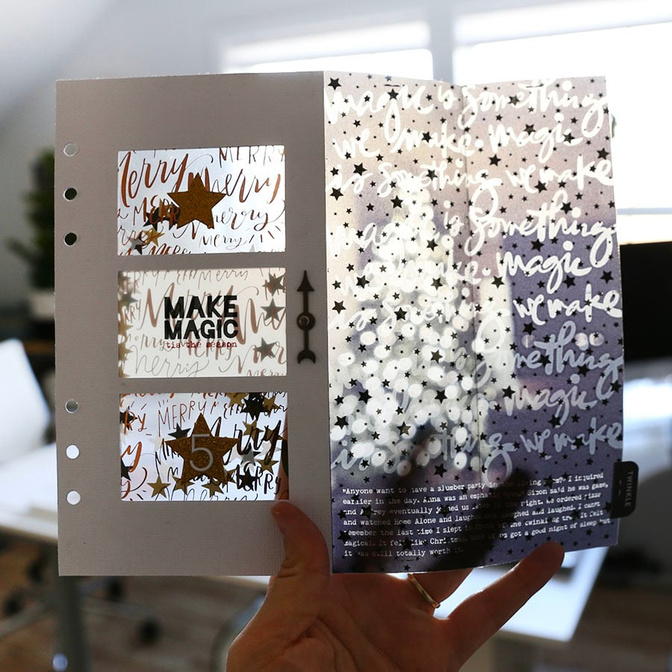
Today's page includes a 3x8 image adhered to the back of Story Four and a fold-out vellum print that's attached to my shaker pocket page.

The photo of the cat in front of the tree was printed in black + white and is related to the story I'm telling today about our living room slumber party (it was taken earlier in the evening).
On top of the 3x8 photo I added a gold star from the Main Kit and a word phrase sticker.
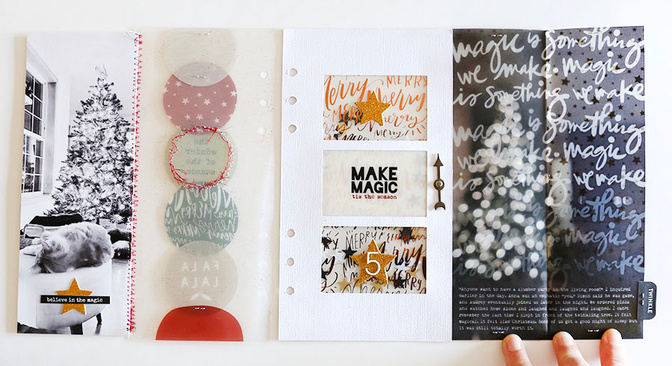
For this page I knew I wanted to attach something to the original shaker pocket page. As I thought through options one of the things I decided to try was printing a photo + journaling on printable ink jet vellum and folding it in half. You could also easily just print something half the size if you wanted to not have a folding element or print on photo paper and cover the back with pattern paper. My vellum page measures 5 inches x 8.25 inches with an extra 1/2 inch left along the edge that is adhered inside my original shaker pocket page (check out the video to see how I adhered it together).
Before printing on vellum I added word art x 3 to my photo and adjusted the opacity of each word art set in Photoshop in order to get the ombre effect. The first one was about 60%, then 45%, and the third one was around 20%. I've included the word art for you to download below.
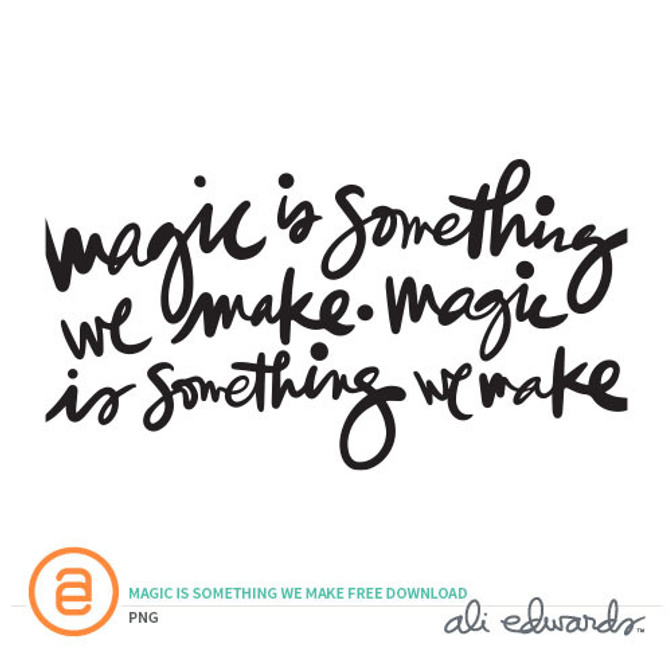
Download the "magic is something you make" word art here.
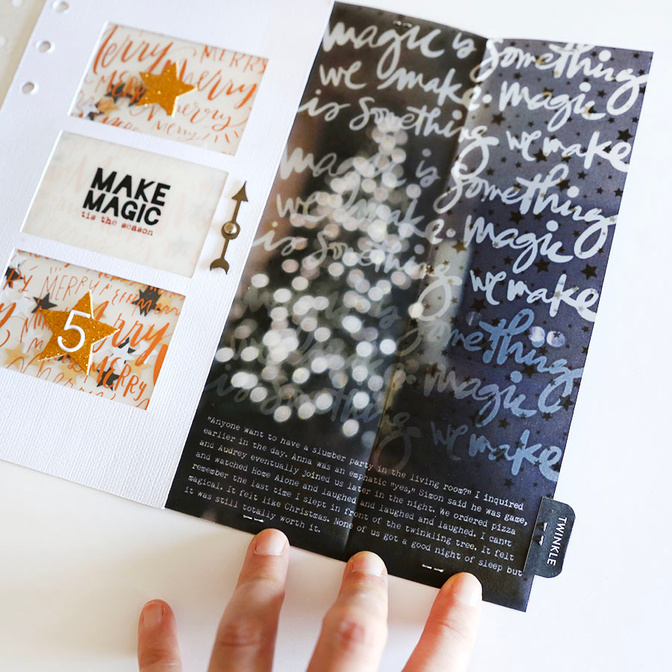
On the back side of the vellum I added two strips of star transparency (each one measured 2.5 inches x 8.25 inches). I did this rather than trying to fold the transparency. I both stapled and used a little bit of adhesive to hold those transparent strips in place. I love how the stars come up through the back of the vellum. To hold the folded portion down in my album I used a Tim Holtz Game Spinner. I also added a "twinkle" tab sticker to the bottom of the fold out.
This was really a fun one to play around with today! Hope you have a great weekend!
SUPPLIES
2020 December Daily® Main Kit: gold stars (digital version available here)
2020 December Daily® Tab Stickers
Magic Is Something We Make Free Word Art (available in this blog post)
2020 December Daily® Phrase Sticker Sheet Bundle
BASIC SUPPLIES USED IN MANY PROJECTS
Epson PictureMate PM400 Printer (5x7 and smaller)
Epson XP 15000 Printer (up to 13x19)
SHARE YOUR STORY #5
You are invited to leave a link in the comment section if you'd like to share your daily pages. As usual, please include a direct link to your blog post sharing your Day 5 vs. a general blog address link.


Comments
Sign in or sign up to comment.
14 comments
This story is just awesome!! Love the way you incorporated it into your album.
DD story 5 https://www.instagram.com/p/CIdZC7Egl5H/
Replies to virginiegoujon
Sign in or sign up to reply.
I love the vellum, so great! These glue sticks are good for vellum, they dry pretty clear.
https://www.amazon.com/Ranger-Dylusions-Creative-Dyary-Sticks/dp/B079N4QVB8/ref=sr_1_2?crid=13L4A5CRJ5Y2F&dchild=1&keywords=dylusions+glue+stick&qid=1607260245&sprefix=Delusions+glue+%2Caps%2C177&sr=8-2
Replies to ginny
Thank you! Need to try that!
Sign in or sign up to reply.
When I print on vellum it smears. Are you using an inkjet? Do you heat set it after? An pointers?
Replies to Joelaw
Hi! I'm using an ink jet printer (Epson XP15000) and ink jet vellum (specific supplies listed above). I use the "Coated Paper" setting. I let this one sit for a little bit (like an hour) before working with it but it was fairly dry coming out of the printer.
Sign in or sign up to reply.
Love this so much! Thank you so much for your generosity. I will definitely be using your gorgeous word art, and I’m going to work on planning a living room sleepover, too! Thank you!
Replies to MaggieR
Sign in or sign up to reply.
I absolutely love everything about this layout today!
Replies to sherry_eckblad
Sign in or sign up to reply.
Day 5
https://marie-pierresavard.blogspot.com/2020/12/dd-2020-5-decembre-les-cadeaux-aux.html
Replies to Pepierre
Sign in or sign up to reply.
For day 5, we had a Griswold moment! Check it out
http://scrapbookingmommy-mallory.blogspot.com/2020/12/december-daily-2020-day-five.html
Replies to Mpasquini12
Sign in or sign up to reply.
Hi Ali,
I've had problems feeding vellum through my Epson printer too. I learned that because vellum is transparent the printer has trouble seeing the top of the page. A trick I use is to either draw a dark line across the top of the page or add a thin strip of washi tape. Both give the printer the starting point of the edge of the paper.
Really enjoying all of your pages this season. Your creativity is boundless!
Pam
Replies to pamela123d
Genius! Thanks for sharing,
Sign in or sign up to reply.
This is so beautiful and creative. I miss making things like this with layers and different materials and movement. My December Daily this year is less creative than prior years and I'm happy the stories are being told, but I do miss and admire the creativity. Thank you for the inspiration.
Replies to soonermama
Sign in or sign up to reply.
Sharing my Day 5 YouTube video!:https://youtu.be/81yV_YUwyt8
Replies to adawson816
Sign in or sign up to reply.
Here is my Days 5 & 7
http://oopsadaisygirl.blogspot.com/2020/12/december-daily-days-5-7-favourite.html
Replies to ctmm4
Sign in or sign up to reply.