December Daily® 2024 | Special Guest Denine Zielinski
Tags:Hi everyone! This is Denine, and I am so excited to be here today on the blog stamping with you. One of the first stamp sets from this December Daily release that called my name was the Holiday Trees 6x8 Set. I love the three different stamps for the trees as well as the itty-bitty ornaments and lights!
I had absolutely no plan at all when I started stamping, so I just got after it. I picked a whole bunch of different green inks from my stash and decided to just play around. I generally use two different types of white paper for scrapbooking. One is a cardstock, and the other is a coverstock. The coverstock is significantly thicker, and I most often use it for the bases of my pages. I did a test stamp on each of them, and I ended up going with the coverstock for this post. I liked how it felt as well as how the images stamped.
VIDEO OVERVIEW
I will begin with a video of my entire process, which I feel has three parts. Here are the times of each part in case you want to just view a certain segment of my process.
Stamping – 0:00 – 11:29
Embellishing – 11:30 – 18:23
Creating a page – 11:25 – 22:22
As you saw in the video, I basically just played around with stamps + inks + embellishments. Some trees turned out better than others, and I was totally okay with that. I was having fun, and I did stamp an excess amount of trees for that purpose.
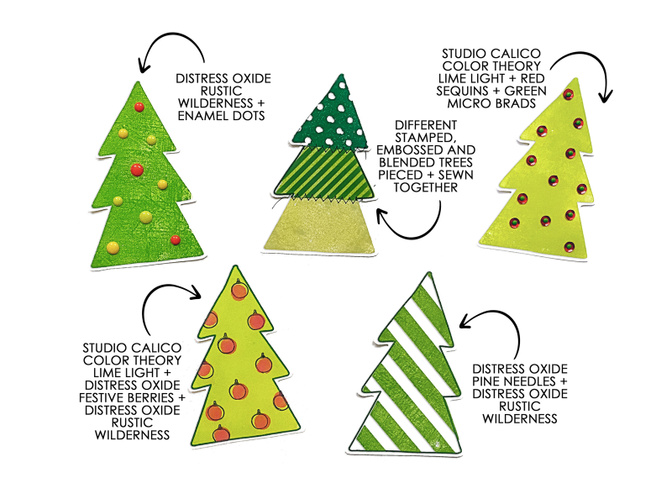
Here are a few of the trees that I stamped along with a little details about what inks and/or embellishments I used.
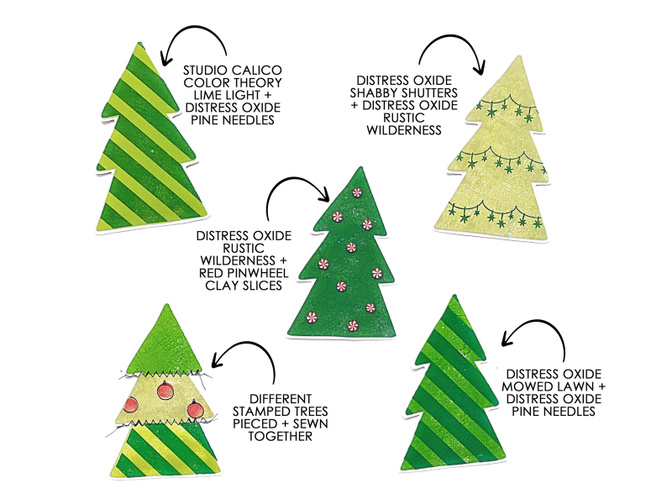
In the video you saw that I did stamp a tree with the cute little lights, but I cut it up and didn’t like how it looked. I will be re-stamping one of those. It was so fun + easy! I stamped the outlines of the lights first, and it was simple to line the insides up looking at the stamped outline through the acrylic block. Of course, if you would rather not stamp the insides, you can use marker, colored pencil, or even watercolors to color the bulbs.
I like some of the color combinations better than others, and I like some of the embellishments better than others.
 As usual, for me, my stamped images turned out better after stamping the first impression. Here’s a tip to get your stamped images to look better when you use stamps for the first time. Use Versamark Ink on your new stamp. Just ink it up and make your first impression on scrap paper. Then, use stamp cleaner on the stamp and dry it off. It really works. Unfortunately, this is something that I often forget to do because I am just excited to get going. It really does make a difference, though.

Another thing that I always seem to forget to do is use my Anti-Static Pouch on my paper prior to stamping + heat embossing. It’s always right on my desk, but again, I’m in a hurry. I did remember to use it this time (like once or twice), and I can definitely see the difference between when I used it and didn’t use it. So, now that I had a whole bunch of trees, what to do? I wanted to make something that I was going to add to my album, so I decided to make my Reason Why page here with you guys. Here is the finished page where I added five of my trees across the page. For the background paper, I modified the digital version of the 10x8 December Pattern Paper from the Main Kit. I tried the trees on some of the physical papers from the kit, and I just felt like the bold colors took the viewers eyes away from the trees. The joy of hybrid scrapbooking!
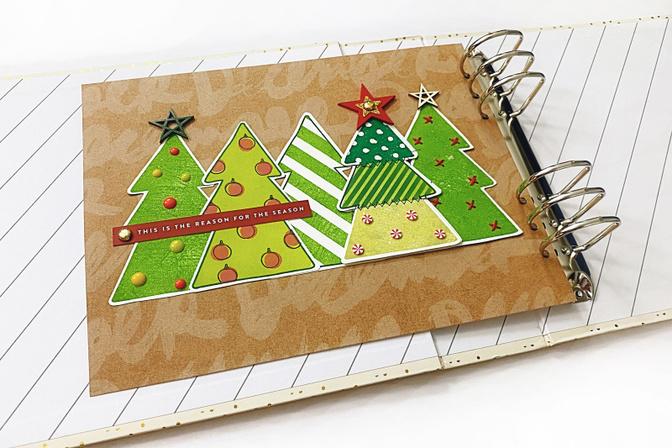
To embellish my stamped images and my page, I added a few things from the Main Kit including a red wooden star, a gold glitter star, and a die cut phrase strip. Some people may frown upon using the two different reds (the die cut + the star) on the same spread, but I am slowly becoming more open + flexible when it comes to that stuff. We all have our own ways, right? You do you…always! I also still have a bunch of the stars from last year’s release, so I ended up adding two of those, as well.
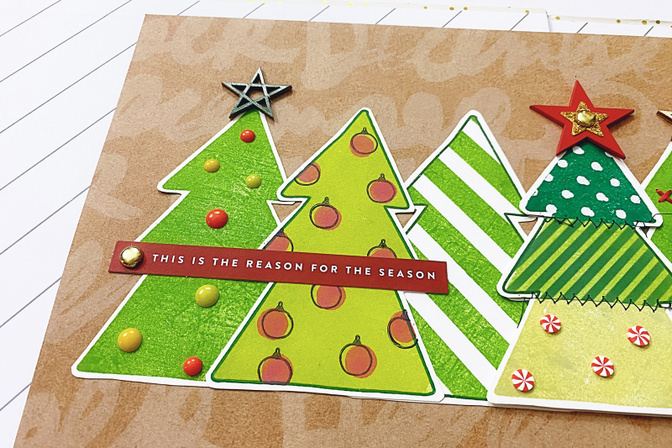
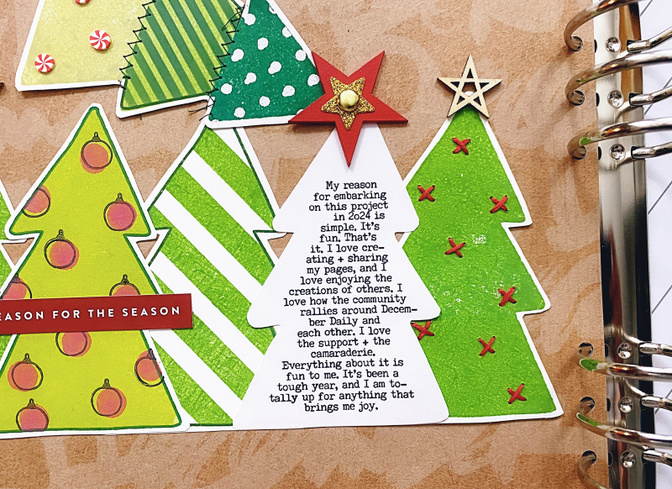
Below is how my page looks when you swing the tree over to reveal my reason why. I created a custom shape text box to have my words in the general shape of the tree. I have included it here in case anyone is interested. I used Photoshop to create it, but it can totally be opened and used with Photoshop Elements.
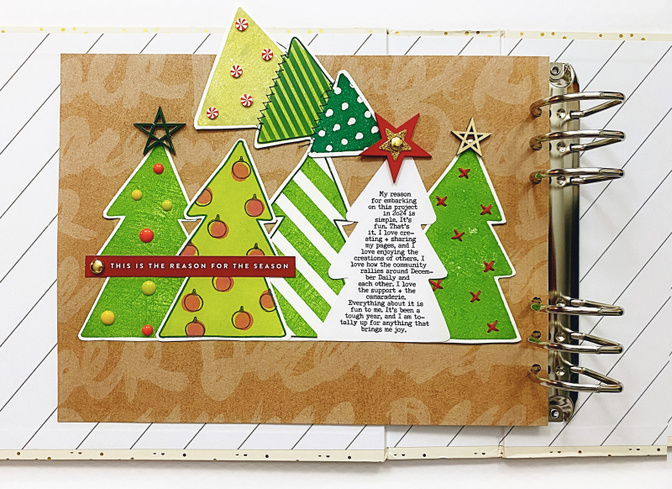
I printed my journaling out on white cardstock, laid one of my stamped trees on top of it, and outlined it with a pencil. Then, I fussy cut it out. If you want the tree with the journaling to be totally hidden, cut inside of the pencil line. Here is a close up of my reason why.
You can also see from my images + video that I cut some of the trees that I stamped into three parts – top, middle, and bottom. I then pieced different parts of different trees back together for a little bit of an eclectic look. I experimented with sewing on my machine for that. It was fun!

These trees are so simple + versatile.
You can add them to a page similar to how I did and have photos underneath or photos + journaling underneath.
You can add one in the center of a page with a simple die cut or chipboard phrase underneath.
You can add them to the front of a pocket.
You can back each tree with white cardstock + add your journaling to the back of each tree + then put them all into one pocket.
You can totally fill an entire page with them (some would be hanging off the edge which would be so fun).
You can fill a page with the trees like I said in the above bullet point + then also cut photos in the shape of the trees to add amongst the trees.
You can stamp them in the colors of the Main Kit for some super colorful fun!
I am sure there are many more ways to add them into your album. Those are the ones just off the top of my head.
Thank you so much for joining me here on the blog for some December Daily tree stamping. I hope you had as much fun as I did! I will be here again this month with more stamping. Yay! If you have any questions or would like to see me play with a certain stamp set, please feel free to comment below. You can also see more of my work onInstagram @denine2 and YouTube @Denine2. Happy Storytelling + Happy December Daily! See you all soon!
SHOP STAMPS NOW
Friendly reminder that we are following the same process as last year for securing your stamp orders. In order to meet the high demand for stamps this year, we are asking you to add the stamp sets you would like to receive in your box by 9/9 at 11:59pm ET to guarantee your order for shipping with your box in early October. We will be ordering a limited amount of each design in addition to stamps sets secured by customers that will be available after 9/9. If you do not secure the stamps you would like by 9/9 at 11:59pm we cannot guarantee we will have enough quantity to fulfill demand and they may sell out. Find them here.


Comments
Sign in or sign up to comment.
62 comments
Loved this!
Replies to rhondawilcox
Thank you so much!
Sign in or sign up to reply.
This is stunning! I love your ideas. Thanks, Denine! 😊
Replies to SarahGiles
Thanks so much!
Sign in or sign up to reply.
Love everything about your page and each and every one of your trees😊 so fun. I’m sure it’s in the lives, but what is the size of the tree stamp?
Replies to viki
Thank you! The base of the tree is about 2.75 inches wide + it is about 4.5 inches tall.
Sign in or sign up to reply.
This is so festive and wonderful!
Could you share a link for the coverstock?
Replies to RhondaN
Thank you so very much! I'm not sure if I can post the link here, but you can get it from Amazon. It's called Neenah Classic Crest Coverstock, 8.5" x 11", 80 lb, Smooth Finish, Solar White.
Sign in or sign up to reply.
Love it!!
Replies to Mrscarolynphillips
Thank you!!!!
Sign in or sign up to reply.
These are amazing Denine! They speak to my tree-loving heart :) Love how you incorporated the little message under the one tree and made it your introduction to your book. Thanks for sharing!
Replies to asackr01
Thank you so much for your kind words!
Sign in or sign up to reply.
love this. LOVE THE TREES!!
Replies to kategm47
Thanks so much!
Sign in or sign up to reply.
What is the size of the micro brads? In mm I think is what I'm asking.
Thanks for this fun idea!
Replies to felky58
You are very welcome. The micro brads are tiny at about 3 mm. To give you an idea of how tiny, mini brads are 6 mm, and regular brads are 8 mm. HTH.
The mini brads (6mm) do fit through the hole in the sequins.
Sign in or sign up to reply.
These all turned out great, Denine! Looks like you had fun stamping and playing. Love how your page turned out!
Replies to handkraftedbystephanie
Thank you! It was fun + my desk was a mess...but I loved it!
Sign in or sign up to reply.
Wonderfully done! Please do more videos before the 9th so I can be inspired to buy more stamps 🤩
Replies to dafolmar
Thank you! I'm working on more stamping content as we speak!
Sign in or sign up to reply.
Thank you for the ideas
Replies to Mikscrap1
You are so very welcome!
Sign in or sign up to reply.
This is so fun Denine! Thank you!
Replies to reneemc63
Thank you + you are very welcome!
Sign in or sign up to reply.
These are SO cute- great ideas! I had passed over the tree stamp and now I may have to add to my box. Very whimsical and fun- they fit right in with your reason why. :)
Replies to Julie_scraps
Thanks! The tree stamp is one of my faves this year!
Sign in or sign up to reply.
So fun Denine! What a wonderful way to kick off DD 2024 🥳
Replies to z0eK
Thank you my friend!
Sign in or sign up to reply.
I am not a stamper but I have found your blog post to still be so inspiring. I can see myself using up lots of scraps of green, red, white and gold papers to create trees with my Cricut. Just as you have - these then could be embellished, cut up, rearranged and sewn back together. I could use paint pens - really the possibilities are endless. Thank you for the inspiration!
Replies to louise_denton
Yes! Totally! Be a translator of ideas for sure!
Sign in or sign up to reply.
Loved all your trees and how your page turned out! Thanks for the inspiration!!
Replies to limarysmorales
Thank you + you are very welcome!
Sign in or sign up to reply.
What a beautiful page! So many great ideas!
Replies to Jeannew
Thank you my friend!
Sign in or sign up to reply.
Love them all! So fun!
Replies to yin100
Thank you so much!
Sign in or sign up to reply.
Nice and playful! Thank you for the text file, also.
Replies to Melsg
Thank you + you are welcome!
Sign in or sign up to reply.
So many beautiful trees! I really love the striped one and the white embossed ones. Thanks for the inspo Denine! 🖤
Replies to Jessanicolas
Thank you! I really love the striped ones, too!
Sign in or sign up to reply.