Week In The Life™ 2025 | Special Guest Jenn Chapman
Tags:Hi everyone! My name is Jenn Chapman- I’m a wife to hubby Matt, mom of 9-year old daughter Norah, and all around people-loving extrovert! I’m so excited to be a first-time guest contributor for Ali’s blog sharing my first Week in the Life notebook!
I’d love to share a few things about myself and background so you know a bit more about me. I am very open about the things that make me- me, so please allow me to dive a little deeper into “my why”. Memory keeping is SO much more than engaging in a creative project; it is literally healing and restorative for the parts of my past that I have no answers for. As a Korean-American relinquished person (I prefer to use this term rather than “adoptee”), I do not have a history of my own. Without going into a full-on autobiography, I wanted to share that snippet in order to give you more context so you can view the lens through which I document and why it is so important to me. I have one daughter, my first and only biological relative that I know of, so my practice and love of story telling is why I do this. I am able to create and play with all the products while leaving a legacy of family history for her (starting with me/us), while reclaiming my past and giving voice to my own narrative. Thank you for allowing me the space to share.
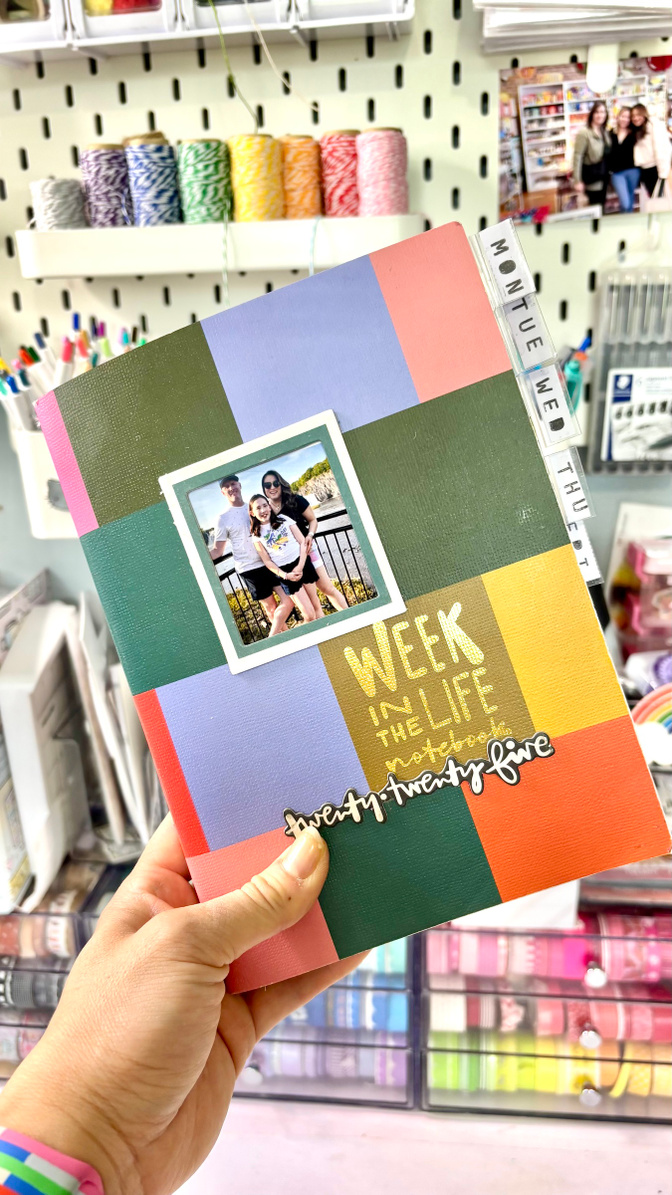
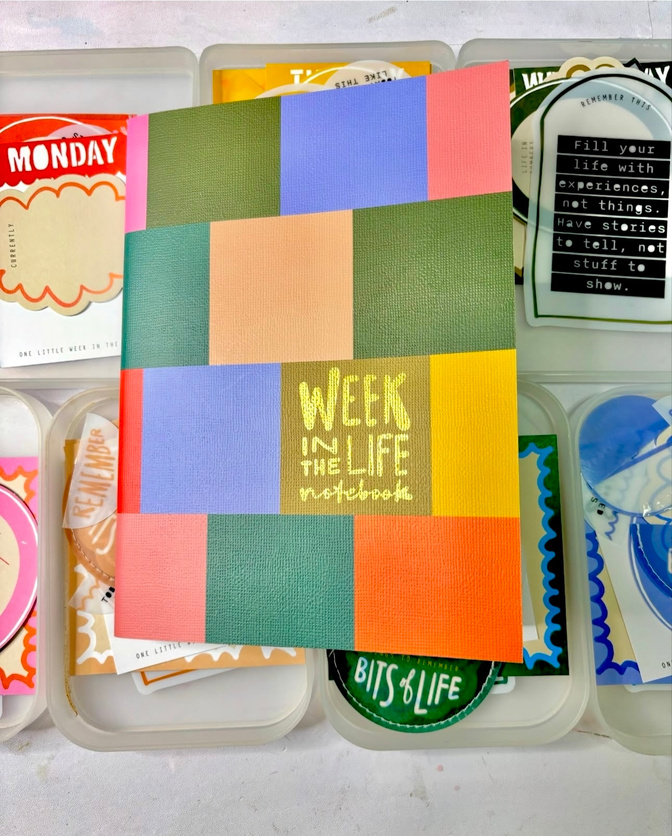
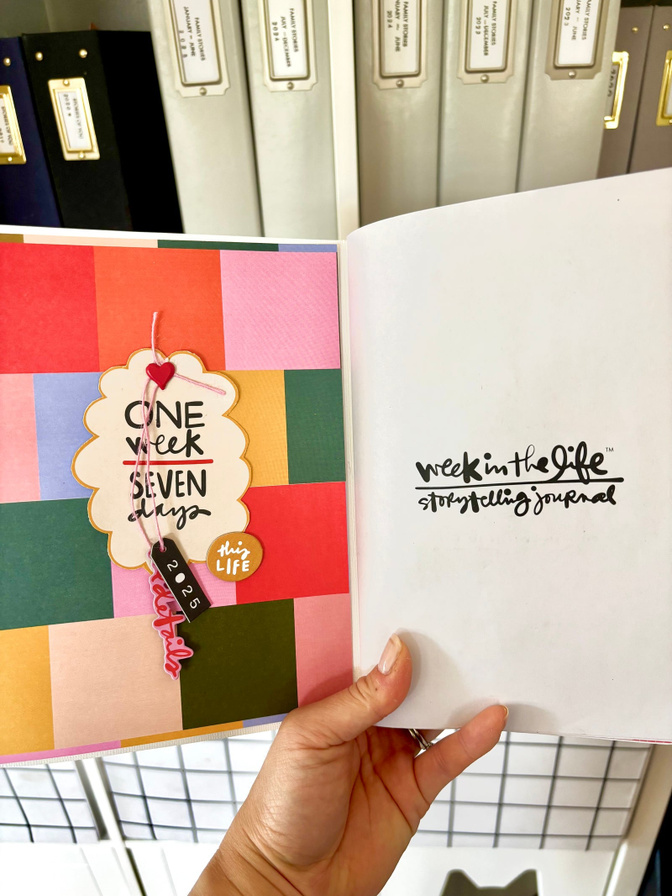
I (officially) entered the scrapbooking world in 2021, and about a year later found Ali’s projects, products, and style resonated with me. Fast-forward to 2025 after I had been using her various kits for my “scrappy projects”, and I decided this would be my first year participating in Week in the Life. I had no idea what I was going to do or how I was going to do it, but since this is a beloved community project I was able to find inspiration along the way! I knew I wanted to try this out in the notebook rather than the album for several reasons: a) I don’t have the space for albums since we have a small house and I already use two every year for December Daily, b) I thought that attempting this as a first-timer in an album might be more complicated than doing this in a notebook, c) I wanted the restrictions the notebook naturally gave me, and d) The notebook combined my favorite hobbies- scrapbooking and journaling. I hope this helps set the stage for my project!
Remember, I was starting this project as a total “noob” (newbie/first-timer) so I really didn’t know what I was going to do until I received the products. I purchased the By the Numbers Kit and notebook, plastic half circle die cut pack, main kit, and journaling card/papers pack. Seeing everything in person immediately helped me decide I was going to arrange my days using the colors as the common thread (i.e. red for Monday, yellow for Tuesday, etc.), so I arranged them into trays. I’m really glad I did that, because it helped me avoid feeling overwhelmed by decision fatigue. Since I didn’t want my notebook to get too bulky, I knew I would be doing lots of writing and stamping, so I swatched my inks in the back of my notebook on one of the blank pages and spent some time deciding which shades and brands I wanted to use.
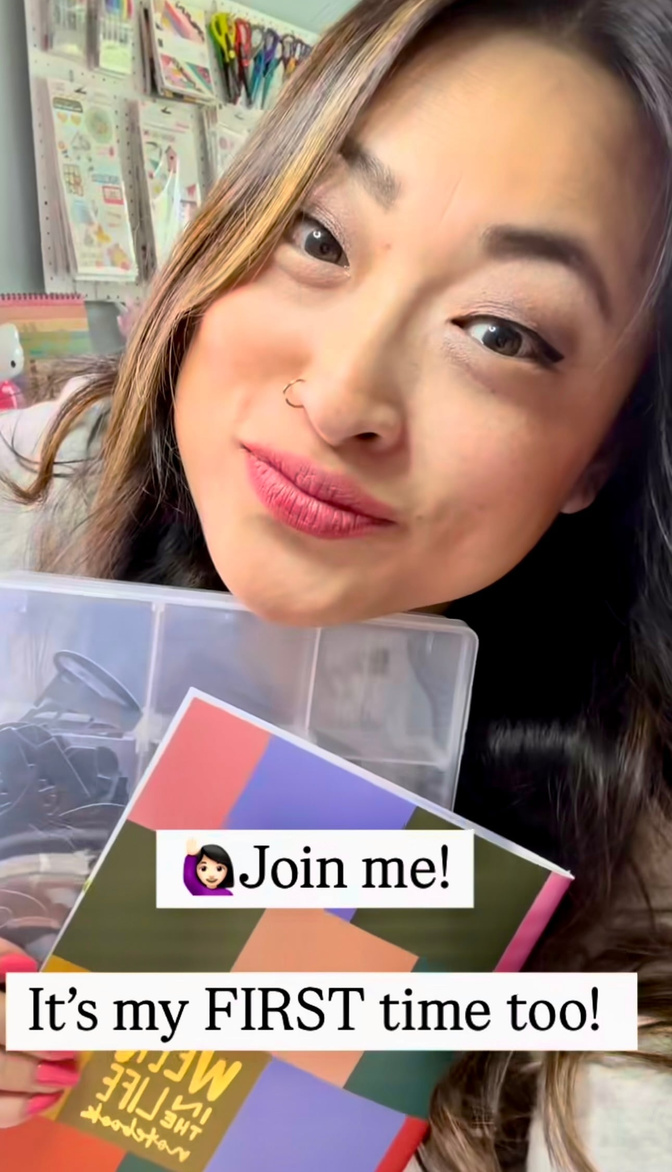
I should mention here that I’m also a YouTuber, and wanted to document this all since as a new participant myself, I noticed there wasn’t much video content of folks using the notebook as their main project. In doing this, I hoped to help others figure out the logistics for completing this project in the notebook. It was a little scary to film it and share, but I think it was worth it and I truly hope it helps inspire you! To give myself a little “head start” and practice, I completed Monday off camera so I could try to construct each page without the added task of filming and editing. I’m so glad I did that, because it took me way longer than I anticipated since I don’t consider myself to be technologically savvy. It also helped me discover my formula for each day.
Let’s talk a little bit about just that- my formula. I discovered that it was easier for me to leave the first page of the day (the timeline) for last, because that is where I would include other photos that weren’t used elsewhere. Therefore, the first page of documenting for me each day was the blank page to the left of the “more of the story” template. Here, I wanted to include a larger photo of my morning with some journaling (this could be lots of typed journaling, handwritten notes, or hidden journaling). I found washi tape that matched the color for each day, and used this to fill in white space here and there. I also used the scallop doodle stamp to do the same. Another way I added embellishments without too much bulk was by stamping on sticker paper and layering that over photos. Where I used chipboard, I peeled layers of it off the back to make it slightly thinner.
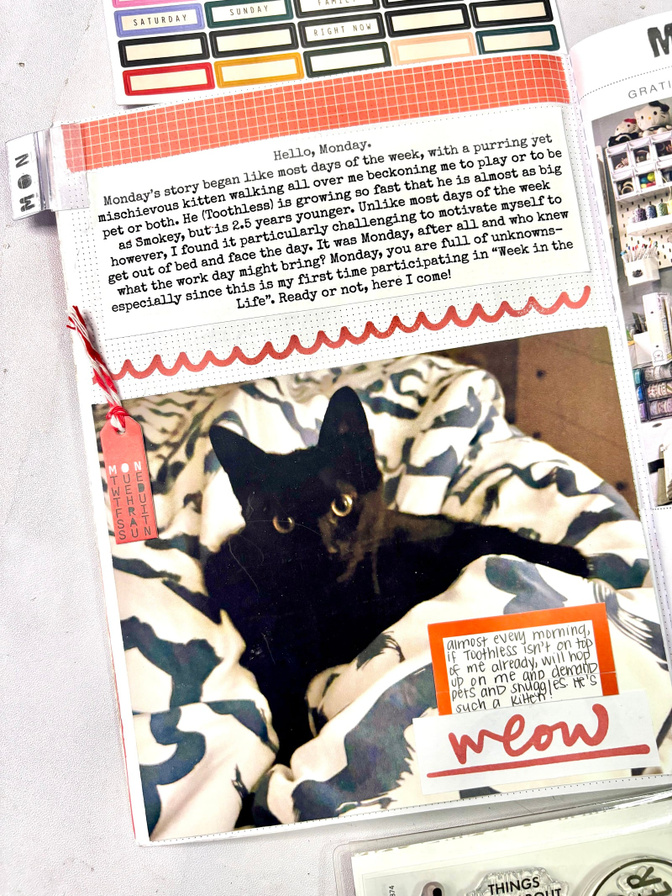
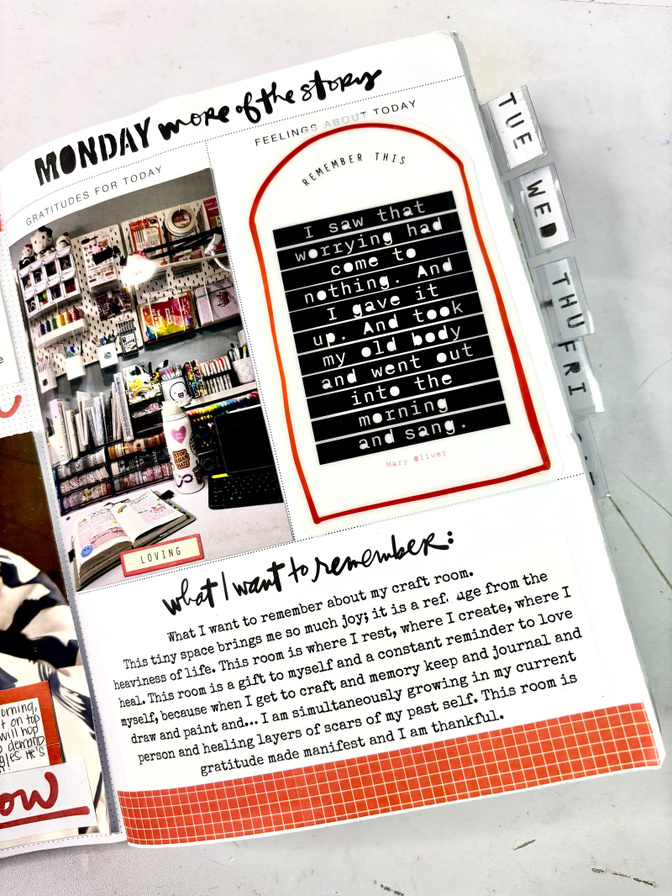
On the “more of the story” page, I added another photo from the first part of my day that I wanted to expand more about with journaling by utilizing the space that says “what I want to remember”. I also used some vellum word phrases (from my stash) or the little stickers with “ing” words to embellish the photos. In the “feelings about today” section, I used score tape to adhere the plastic quote in the coordinating color. I found that each of the quotes made sense and were appropriate sentiments to include in that spot. This would be my formula for every day going forward.
The next page served as a space to include more photos of “zoomed in” stories I wanted to tell. For example, Monday I created a grid of several photos that I wanted featured (I use the Diptic app and then print to size app). Then, I decided to include journaling by taking the 4x4 card from the paper pack, cutting it in half, and hiding it underneath the photos. I simply cut a slit in the photo paper where I wanted the journaling to hide behind, tucked it in, and added a tab (from my stash) using my tiny attacher. I thought this was a clever way to include more private thoughts while adding a little fun!
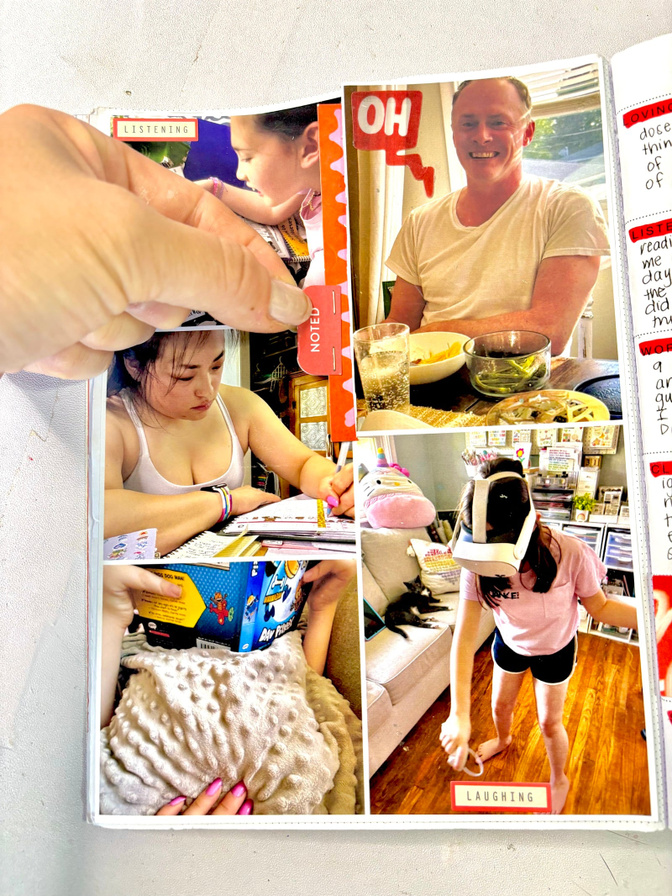
I had a lot of fun using the “-ing words” page! For this, I sorted through my photos to select even more “zoomed in” pieces or moments of the day. Based on what photos I took, I then placed them in the section that made the most sense to me. For example, a photo of my daily medications was the “loving” section, a photo of my skincare items on the counter was the “cleaning” section, etc. You can see this page was also a great space to include ephemera; here, I have included a piece of the wrapper from a new protein bar I was trying (verdict- it was okay).
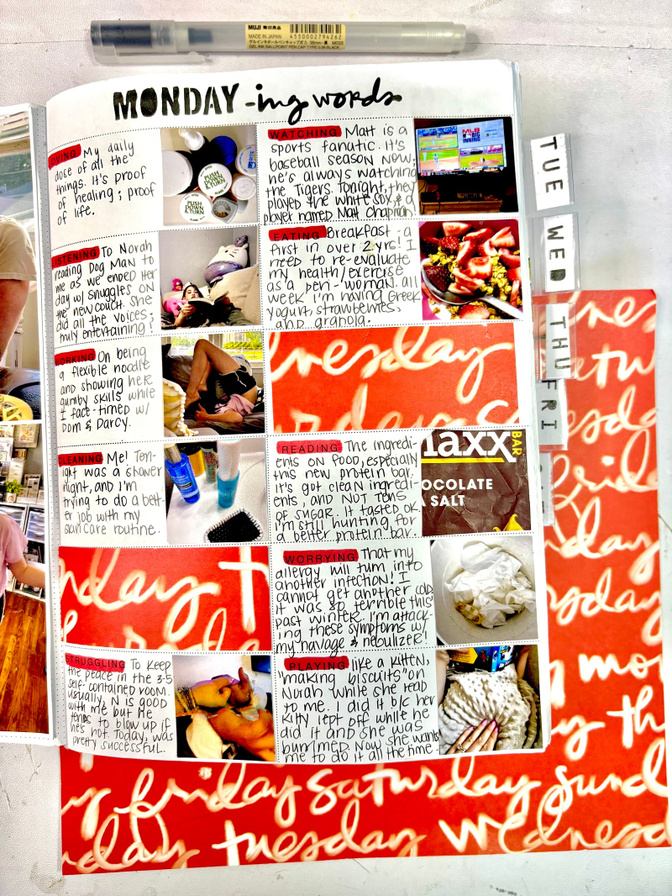
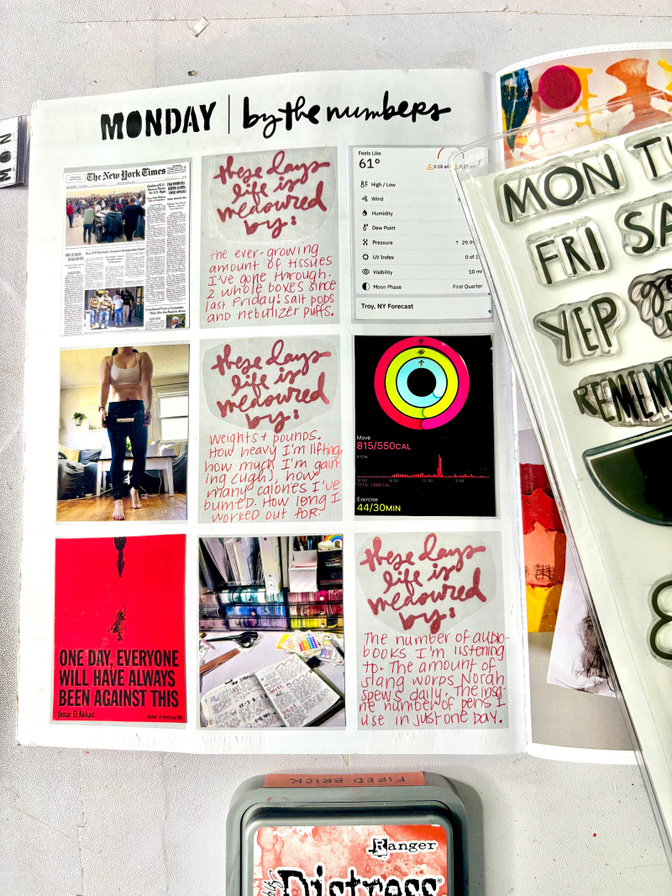
For the “by the numbers” page, I had lofty goals. After all, I purchased the mini kit in hopes to use numbers of things as a lens to document my week. Welp, that didn’t happen and that’s okay. Instead, I used this page to keep a consistent record of the same things each day that were important to me to remember. They are: the front page of the NYT, the weather, a workout or wellness photo, my apple rings at the end of the day, what I was reading, my crazy shoe/entry way clutter (which I forgot to add on Monday), and my desk or craft space. I also stamped “these days life is measured by” on clear sticker paper, and then did a little journaling using a color-coordinated gel pen directly on the grey space.
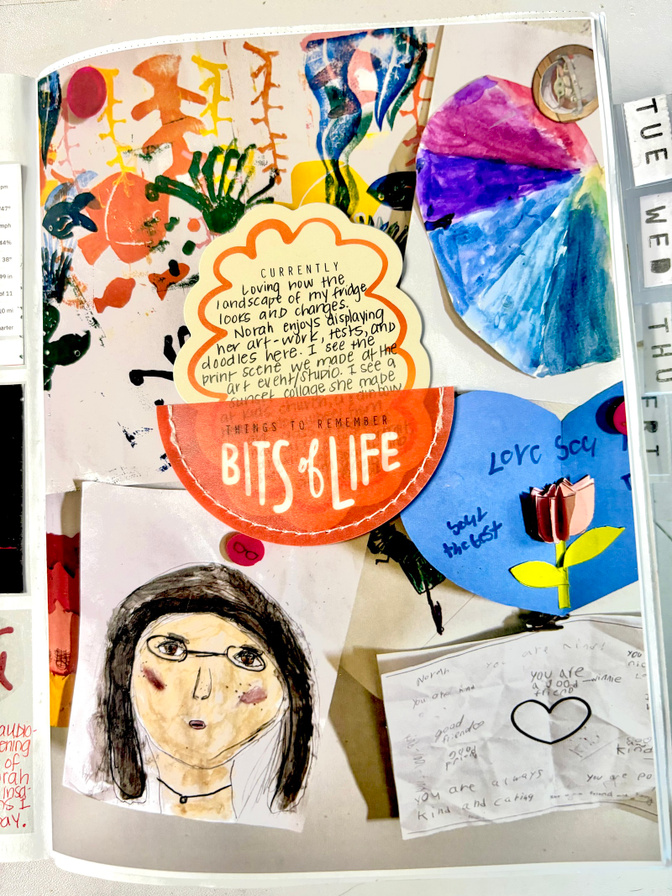
Next to this page, I wanted to include another photo (full-sized or slightly smaller) that was focused on a part of my home I wanted to highlight or a larger memory from the day. For Monday, I wanted to tell the story of what was currently on the front of my refrigerator. I like to display Norah’s school work, crafts she may have made during “kids church”, or her special creations. My journaling for this day was simple; I wrote on the scalloped die cut that sits in the vellum semi-circle pocket. On other days, depending on the size of the photo and the amount of story telling I wanted to include, I would add typed journaling on sticker paper or tuck it in on the other half of the 4x4 paper like I did at the start of Monday. You can see more details about this in my daily process videos.
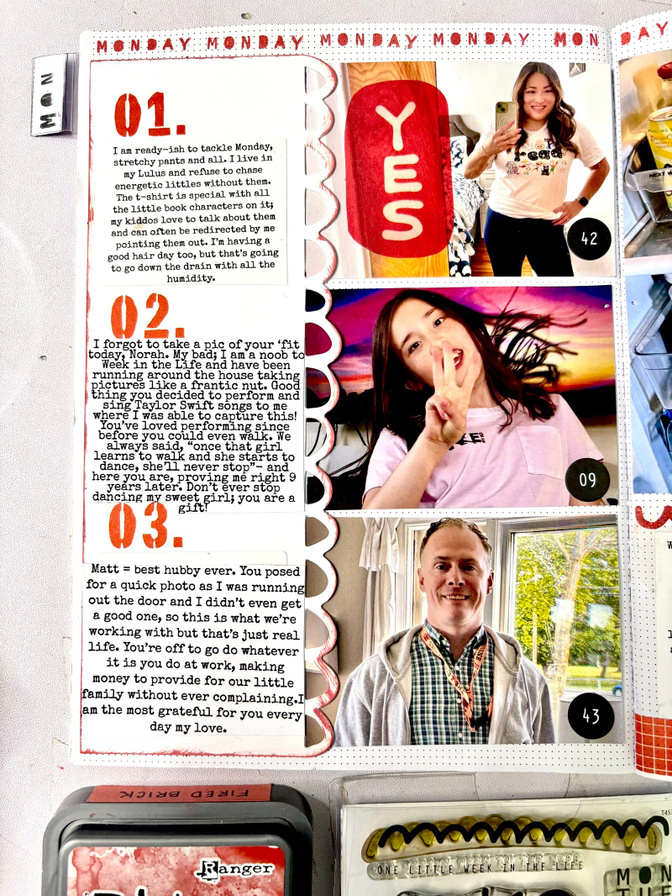
I was intimidated by the next few pages since they were blank! This is where I was inspired by the paper pack to help me figure out a formula. At the risk of adding bulk to the notebook, I included the scalloped paper with the 1/2/3 because it was my favorite (I am obsessed with scallops as a design element). I decided I would try (and failed) to include selfies of each one of us (Matt, my husband, Norah, and myself) each day and use the scalloped die cut to include journaling about each person. I realized I didn’t get many individual photos of each of us on a daily basis that lent themselves to this section, so I ended up using random photos of each one of us from that day and just using it as a spot to expand on my thoughts/feelings about the picture. Honestly it worked out just fine. In hindsight, I would allow a little more time in the morning to snag photos of each of us- a difficult feat for the morning rush before school/work. How did you use this paper?
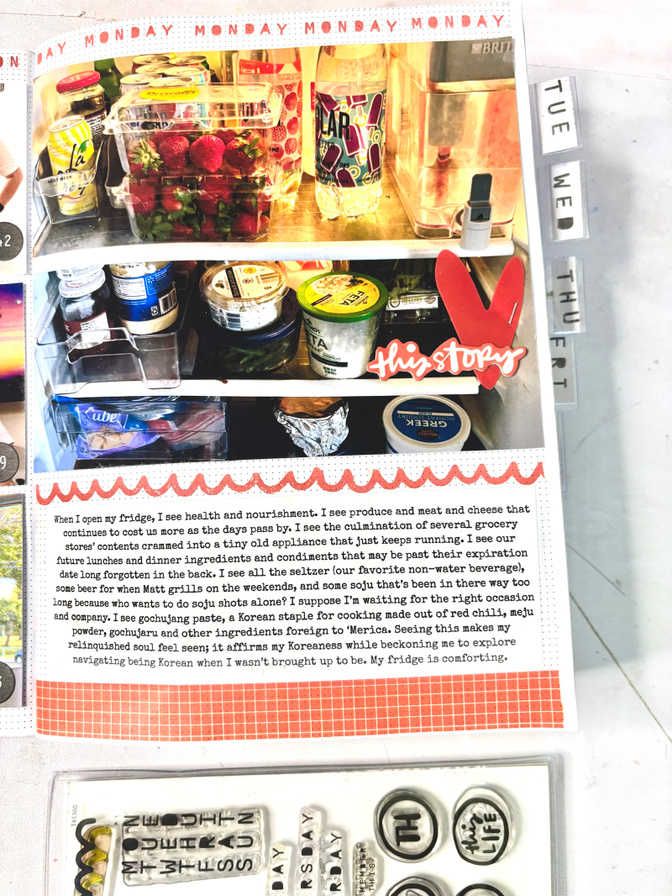
The next blank page was used in a similar way to the beginning of the day, where I added a larger photo of a space in my house I wanted to document or a larger grid photo that focused more on something that happened during the afternoon. On Monday, you can see I decided to include a picture of the inside of my fridge- kind-of random, I know. But, when you read the journaling it makes more sense and tells a lot more of the story! This, I realized is exactly what I love so much about this week in the life process and why I will be participating again next year! On these pages, I kept embellishments simple by stapling a plastic heart (from my stash) layered with a “this story” chipboard piece or by adding hidden journaling.
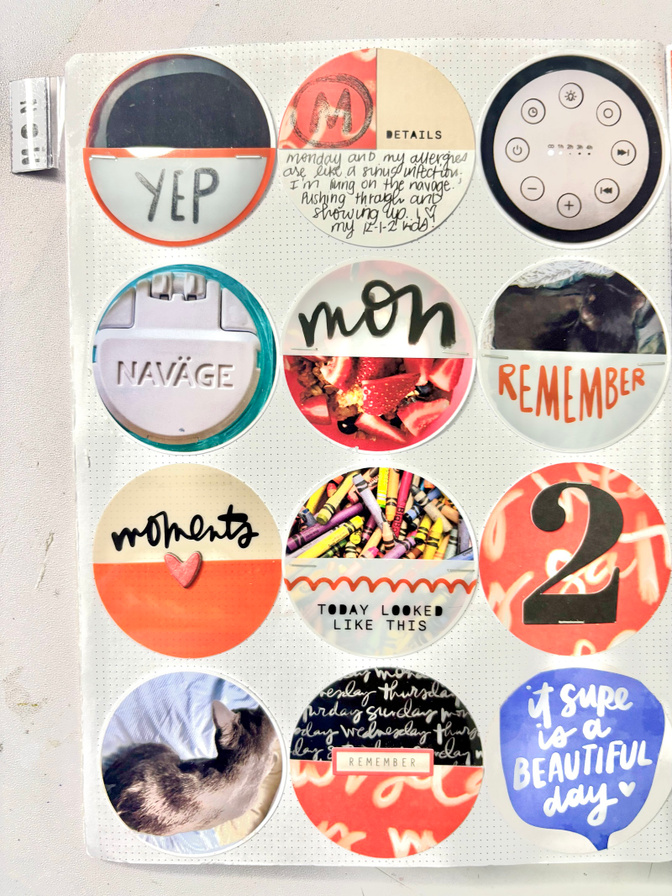
Let’s talk about my favorite page each day- the circle page! This page was completely scrap-lifted and inspired by sweet friend Linda (@lindalovescreating) whom I sure you all know. I tried to remember to take photos of circular items each day, and if I did not have enough I would use photos that made sense to be presented in a circular format (see photo for examples). Then, I used the half-circle die cut pack to embellish the photos. I also punched the patterned papers that coordinated with the color for the day, and used my tiny attacher to staple the number die cut to represent the date. I had a lot of fun getting creative with this page choosing to include ephemera, stamp directly on the plastic, and using chipboard pieces from my stash. I will certainly be using this technique to inspire future projects!
The last page for each day was used to house moments from the evening, and if I didn’t have one I wanted to use I chose to add a photo of an important memory from the day that I wanted to expand on. For Monday, I was fortunate to grab a picture of my husband in his usual spot on the couch while we were nestled in for our nightly routine, and a photo Matt took of Norah reading to me on my “new” craft room couch (thanks again to Linda for gifting me the couch!). I embellished these photos by cutting the square 2x2 die cut in half, and stamping the day of the week and Ali’s script word “moments” in the color of distress oxide ink that I preselected for the day. This ended up being my formula on every last page photo each day. (See the photo below for details.) Another fun way I incorporated a consistent formula each day, was by including the other half of the 4x4 die cut (previously used for hidden journaling) and tucking it into or behind the photo. This time, I used the initial for the day of the week chipboard circle, peeled off some layers to reduce bulk, and stapled it to the top of the die cut to then act as a tab. I thought this was clever while also including a little more of the kit each day.

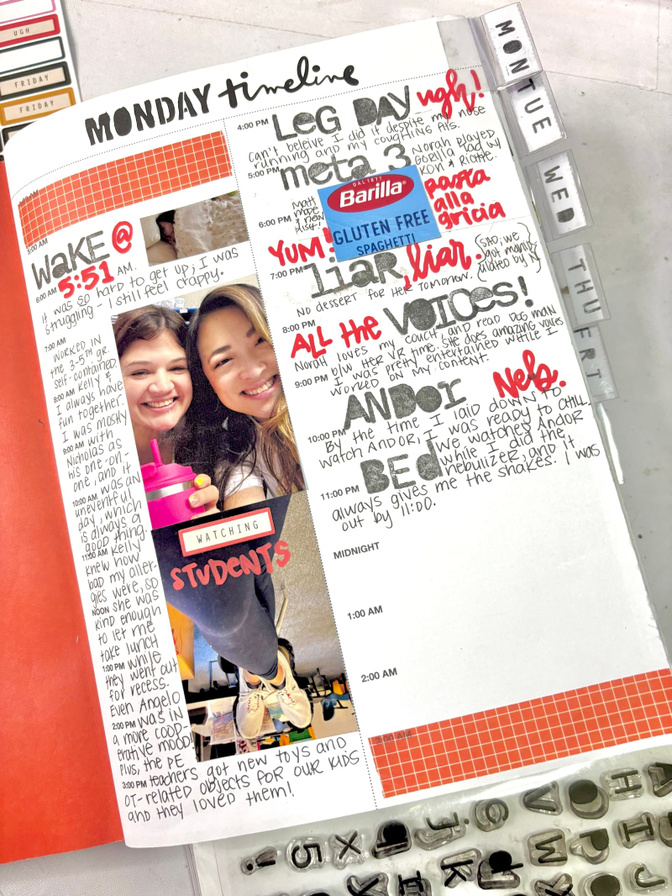
Remember, I saved the timeline page for last even though it’s the first page of each day! Every day, I added washi to the top and bottom of the timeline. Then, I used this as an opportunity to hold photos that weren’t included in other parts of the day. I also chose to add wonky stamping with the alphabet 4x6 stamp set and my Shachi-iro blank ink pad (I found this to leave the least amount of ghosting or bleed through) to bring attention to certain parts of the day I wanted to see at a glance. I used a paint pen (posca, sharpie creative marker, or grabie paint pen) to do the same thing, and I enjoyed doing this include more color to the page. Then, I filled in the white space with more journaling, but in my own handwriting using my .38 muji gel pen in black ink. The only obstacle I identified with this page was at the bottom where the timeline goes from midnight to 3:00AM. I wasn’t quite sure what to include here, so I left it blank. Any suggestions?
WHEW! That wraps up my very lengthy walk through of my first ever week in the life process. I do have process videos for Tuesday-Sunday of the week and a full flip through of the completed notebook up on my youtube channel if you want to see more details or hear more about the actual days events (link to my flip through is below). I’m SO grateful for all of you and humbly invite you to follow along with other scrappy projects and journaling/planning fun using my handle @chappyplans.
—> Youtube
—> Week in the Life Flip Through Video
Take care and remember you are enough!


Comments
Sign in or sign up to comment.
29 comments
I love this so much!
Replies to AliEdwards
Thank you so much!!!
Sign in or sign up to reply.
I really enjoyed looking at your WITL album! Such awesome ideas!
Replies to justlisa
That’s so nice of you to say- thanks!
Sign in or sign up to reply.
Look at you being featured your first time! It looks great! Lots of fun ideas. Welcome to the addiction that is Week in the Life. 😀
Replies to Jeannew
Hahahaha- adds another crafty obsession to the list…
Sign in or sign up to reply.
This is so great Jenn! ❤️
Replies to kelly_watson
Thanks my sweet friend!
Sign in or sign up to reply.
Love this so much, Jenn!
Replies to denine2
That means a lot, Denine! Thank you so much!!!
Sign in or sign up to reply.
This is awesome, Jenn – I love how you utilized the notebook for your WITL! (And I personally love a good inside the fridge picture!)
Replies to slflatley
Ahhh you are my people! Thanks for the kind words!
Sign in or sign up to reply.
I love this and had already watched your Youtube ... as I found you when looking for crafters who used the Notebook this year! Thanks for sharing that snippet of your background, and then all the details about how you put this together. Will be super helpful to me as I start on my Notebook! Thanks!
Replies to CathyMac
Your words mean a lot and encourage me to continue sharing and being vulnerable. I’m so glad you were able to find inspiration and meeeee!
Sign in or sign up to reply.
Happy to see you here! Your project is fantastic!
Replies to mcbce
That’s so sweet- thanks a lot!
Sign in or sign up to reply.
Thank you for sharing!! Love it ❤️
Replies to ElisabethC
Thanks for the encouragement!
Sign in or sign up to reply.
This is so great!!
Replies to tuna13
Thank you!
Sign in or sign up to reply.
Woohoo! Congrats on your feature. Love love love all of your pages. I want to dissect my fridge items now too
Replies to ealvite
Hee hee- everything is just asking to tell a story!
Sign in or sign up to reply.
Jenn - this is so awesome, especially for your first time doing WITL!
Replies to SusanB
That’s so kind- thank you!
Sign in or sign up to reply.
Love this so much!!! Yayyyy Jenn for joining WITL + knocking it out of the park on the blog.
Replies to lindalovescreating
Awwww thanks bestie! You’re such an incredible friend and crafty inspiration!
Sign in or sign up to reply.
Great to see someone else working in the notebook for more inspiration
Replies to cannycrafter
Thanks- I think I’m hooked lol!
Sign in or sign up to reply.
This is so awesome Jenn! I watched all of your videos and took some inspiration in setting up my own WitL journal!
Replies to Moparop
Sign in or sign up to reply.