Week In The Life™ 2025 | Special Guest Shannon Flatley
Tags: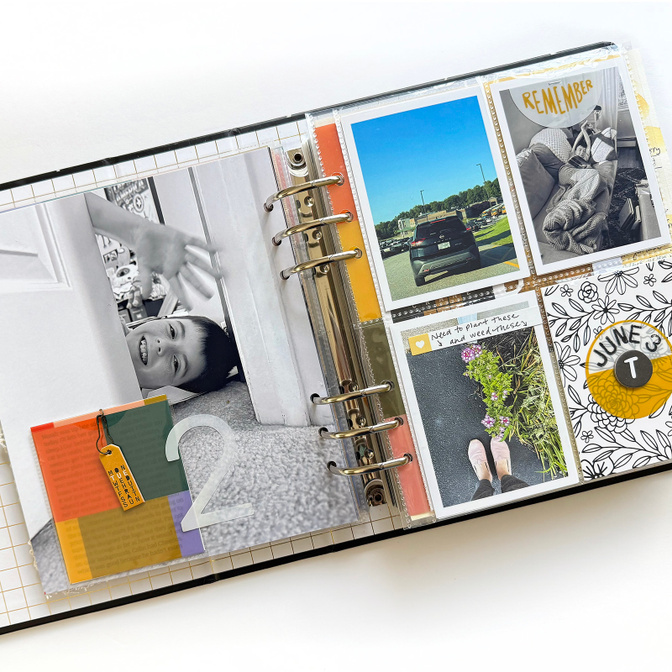
Hi friends! I’m excited to be here to share with you my recently completed Week In The Life™ album. And wow, is it full! It’s always one of my favorite projects. In addition to sharing some of my ideas I also put together a couple of flip through videos to share the completed album - one is a quick no-talking version and the other dives into a lot of detail about how I put it together. Below are some thoughts on my process starting with before documenting week and then how I pull it together afterwards.
Prepping my album before the documenting week:
I always start by getting as big of a jump start on my album as I can. For me, all of the really crafty things I would like to do have to get done before the actual documenting week. I knew this week was going to be super busy so I tried to give myself reasonable expectations in order to not become overwhelmed. There were so many awesome ideas from community members and the AE team about things to track, and I was hyper aware of the fact that I could not include them all!
Here are a few things I did before documenting week:
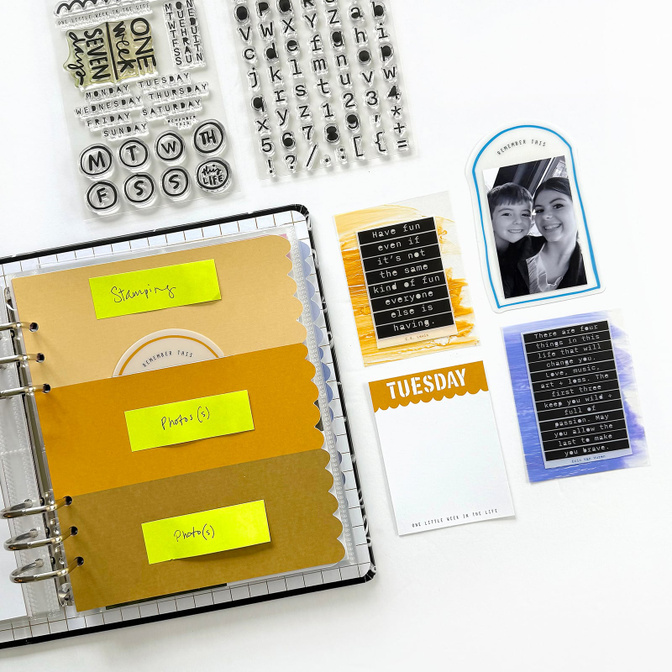
Create an intro page:
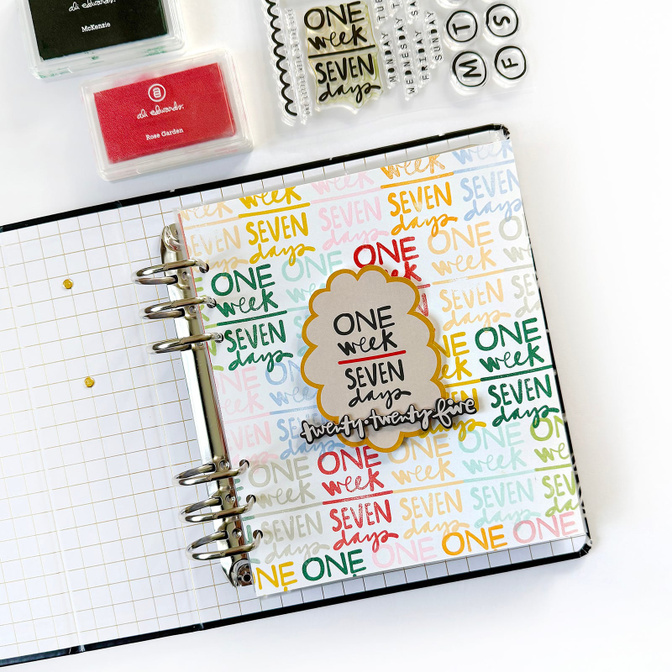
I repeat stamped using the “one week seven days” stamp in different colors to create a background, then trimmed out the scalloped portion of the 3x4 card from the main kit. I added this to the page with pop dots and finished it with the “twenty twenty five” chipboard piece.
Embellish the day of the week dividers:
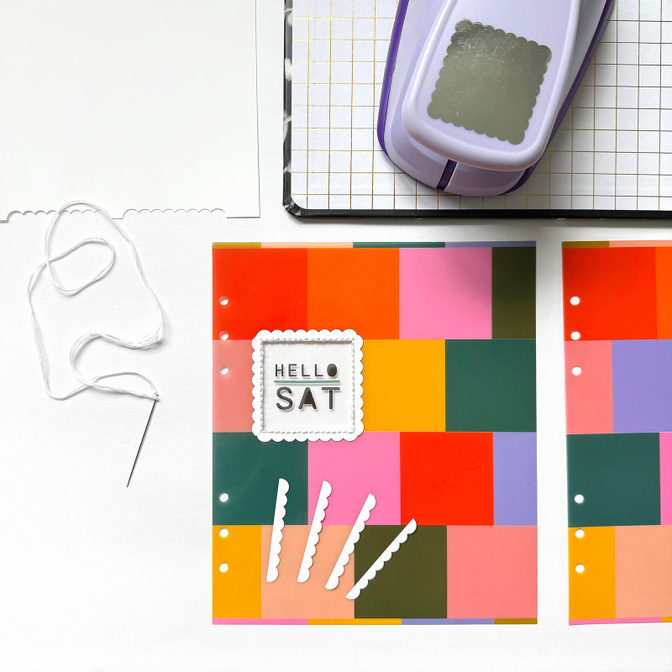
I wanted to bring in a scalloped edge similar to some of the other WITL pieces, and I remembered I had a large scalloped square punch… the punched die cut was only slightly larger than the square (not enough to make a real impact), so I wound up punching four pieces and assembling a border. This wound up being a perfect solution because it allowed me to tightly snug each piece to the stitching when adhering so there aren’t any gaps.
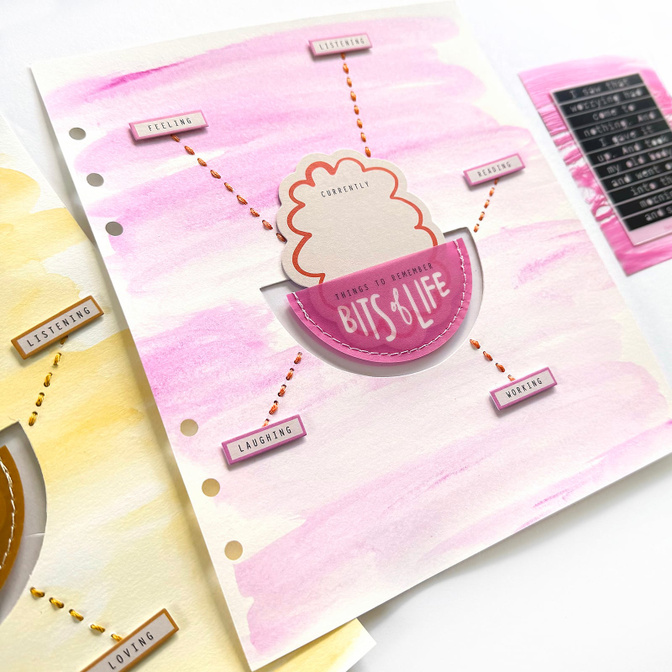
Create a daily prompt page:
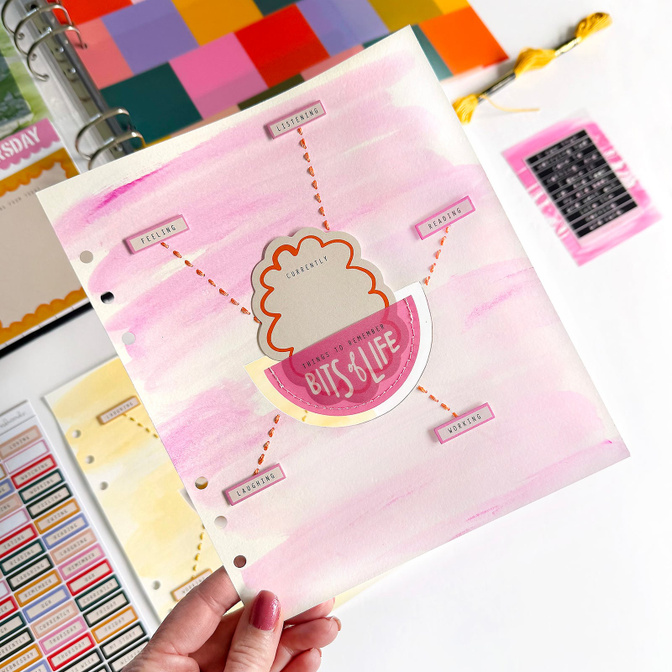
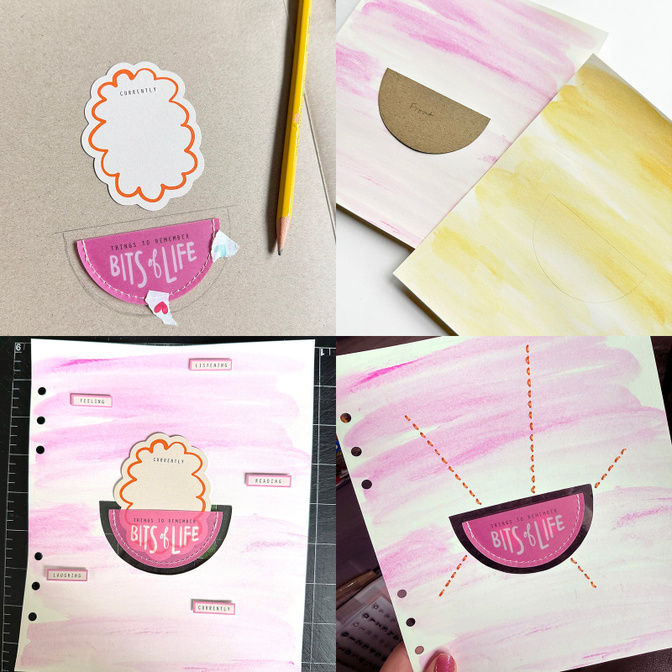
These pages combine two of my favorite crafty things (stitching and see-through elements) with my favorite pieces from this year’s kit - the stitched half circle pockets.
Something I have found over the years is that if I have already crafted pages to which I can add my journaling (with prompts, even better) then I am SO much more likely to record my info during and after the documenting week.
I started with a color wash background inspired by the cards in the paper variety pack, using acrylic paint diluted with lots of water. I cut a half circle a little bit larger than the half circle pocket in the center, using a template I made from scrap cardboard. I traced the shape onto the paper, which made it quick and easy and also kept the cutouts all the same. I used a craft knife to cut the shape and then added a piece of transparency on the other side. I kept my template so that when I was ready to do the reverse side I could easily cut the same shape. (Below you’ll find a process video showing how I completed this page later on.)
Next I figured out where I wanted the prompt stickers to go and drew lines to those spots from the center, and made marks 1/8" apart to keep the stitches uniform. I used embroidery floss in the complimentary color of the scalloped card to stitch over the line, and added low profile pop dots to the stickers for a little dimension.
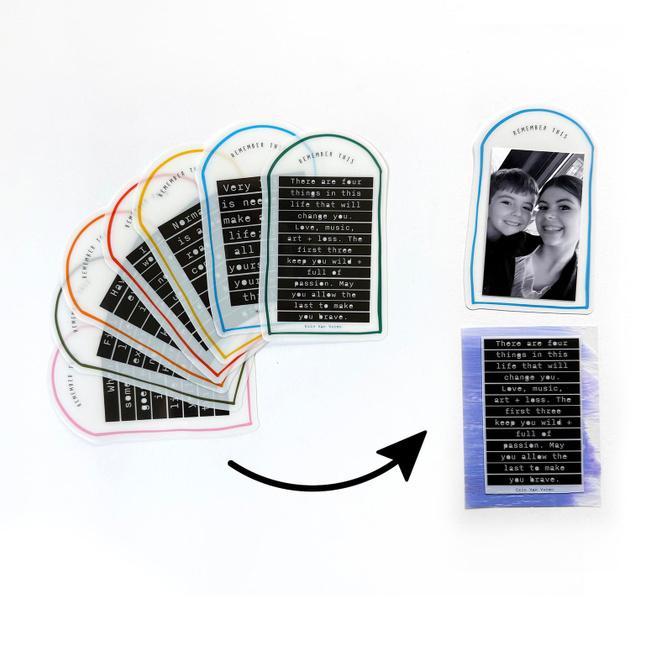
Alter the rounded plastic quote cards:
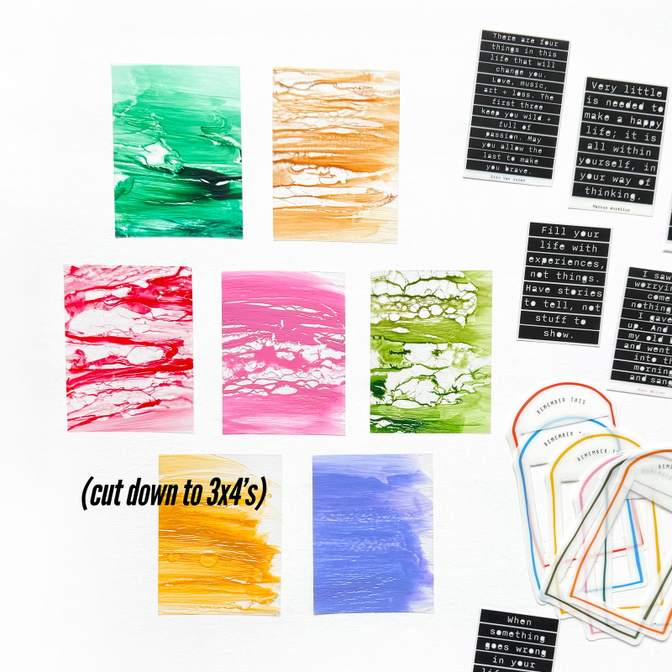
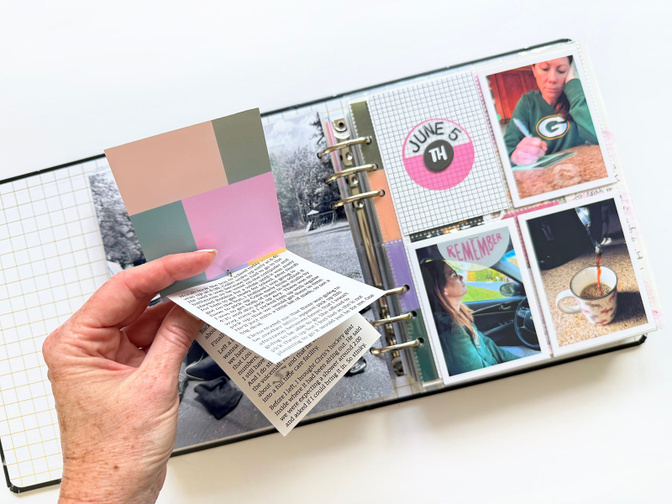
I loved the plastic quote pieces and how they could stick out of a pocket… after considering a few different ways to put them in my album I decided to deconstruct them and get two elements from one. I carefully trimmed out the quotes and put them on top of some transparency art I made. I have a big pack of lightweight (and inexpensive) printable transparency – I’ve never even tried it in my printer, I only use it for craft projects like this. All I did was randomly smoosh some paint around the transparency and then throw some drops of water on it. I was looking for a simple watercolor effect, but as it dried the paint and water separated and contracted in different areas to give a pretty cool effect. I cut some 3x4 pieces from each sheet and the quotes go on top. I waited until I was putting the project together to see which quotes fit best for each day. *side note* I saved the extra pieces and wound up using them in a 2x2 pocket each day. This is why I save all my scraps until I complete my project – you never know how you might use them.
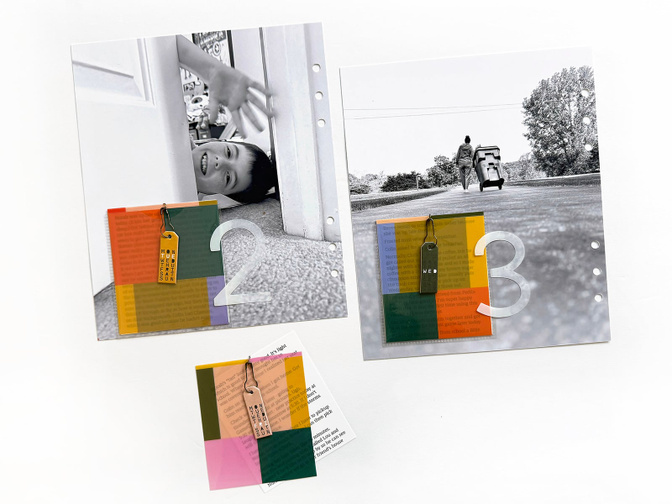
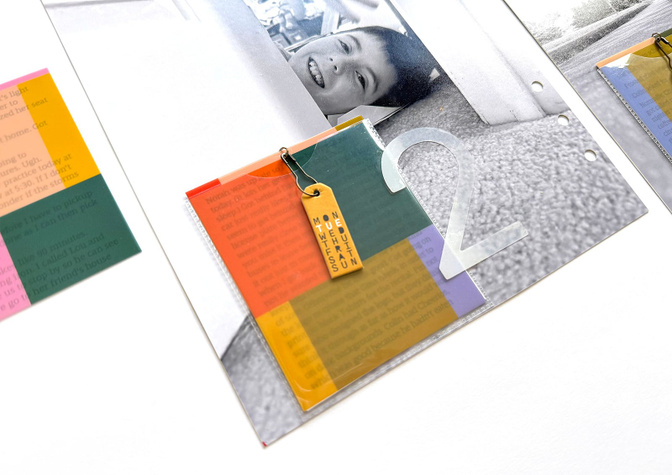
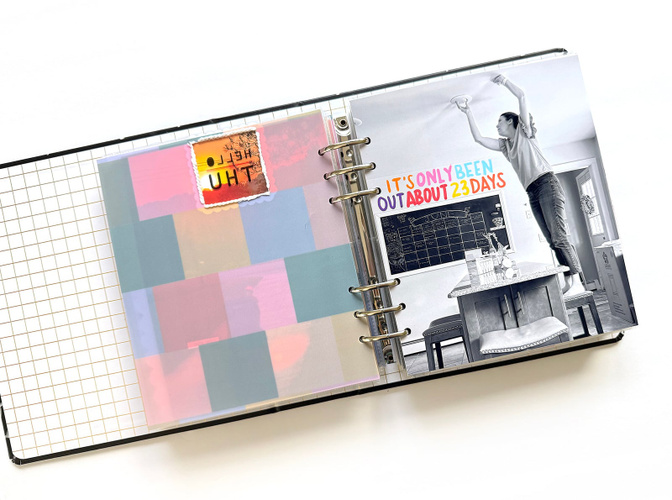
For the remaining “remember this” piece I decided to add a photo taken by my kids (I asked them to take a “creative selfie” together every day.) The piece tucks inside a pocket on the color block page (old selfie shown as an example.) I simply made a slit in the top and put scrap paper on the back so it doesn’t fall through. At the time, I planned to stamp on the top color block and put photos on the bottom blocks. I did stamp on the top, but wound up keeping the middle plain, and added an ephemera cluster along the bottom.
Documenting week
As far as photos go, I tried to focus on quality as opposed to quantity. Last year I took 21 pictures of my meals - 3 meals a day. This year I think I took 3 total. And it was enough! Each year can be (and usually is) different.
I knew trying to journal too much would stress me out, so I did talk-to-text in my notes app at the end of the day. This wound up being my journaling in the pocket and I gave myself the freedom to not care about punctuation or tense or any of that. It is just stream of consciousness writing and I’m happy with it as is. I knew I could always add more detail just by looking back on the photos if need be. I did try to jot down ideas for my prompt pages, even if it was simply a couple of words, that would remind me of what I wanted to say later.
As far as the project is concerned, I don’t do anything but take photos, journal, and save ephemera during the documenting week.
Putting everything together
Since I always use a formula for my WITL album, my post-documenting process is to first finalize how I want my days to flow and then do everything in batches. I don’t go day by day until the very end when I’m filling in any holes I might have and embellishing. I generally set up Monday the way I think will work best, then proceed to full on assembly line. One of the things I like about this, in addition to it being efficient, is that if I stop midway through and go back to it a year from now (which has happened) I have a little bit done for every day and it just feels easier to pick up where I left off. It also feels awesome to add 7 things into my album at once. It gives me a sense of completion and keeps me motivated to do the next thing.
3x8 scallop cards:
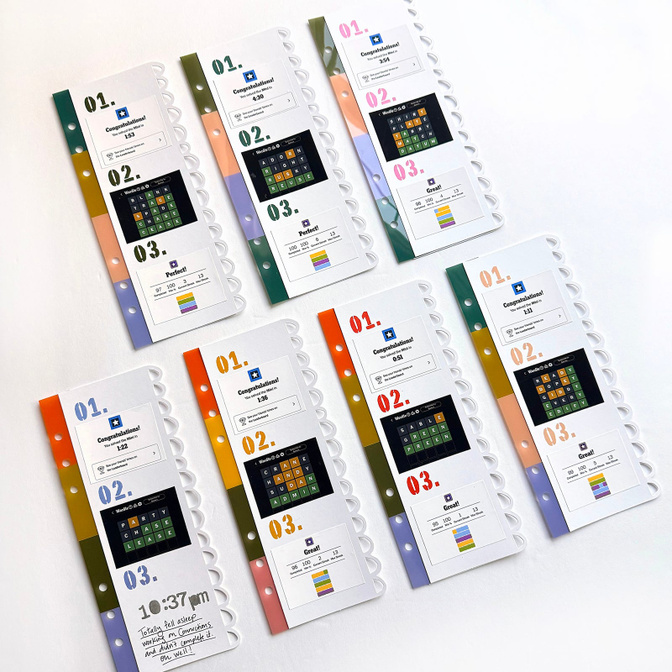
Once I cut the 11x8 day of the week page dividers to fit the 6x8 album I was left with a good size piece to use elsewhere. First I cut and punched strips to make attacher pieces for the 1-2-3 cards which I used for screenshots of the NYT games I play daily. The attachers are adhered on the back of the card and are covered by what I put on the reverse. I like that it adds a touch of color and also allows me more space by not punching holes directly in the card.
Journaling Pockets:
Another spot where I incorporated the off cuts from the transparencies is in pockets, where I added a cut piece that acts like a cover for my journaling blocks. I cut a page protector pocket to 3x3.5 (two of the (4) 3x4 pockets page protectors gave me all 7 pockets.) and added it to one of the full page b&w photos. I cut a notch in the pocket so once I combined the journaling and transparency with a jump ring and bulb pin, the chipboard tag could hang down and not be obstructed by the pocket. I talk a little more about this process in my flip through. I love how they came out.
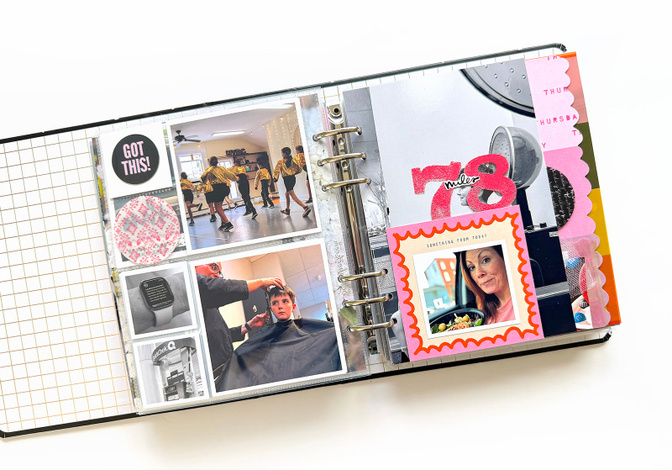
4x4 square cards:
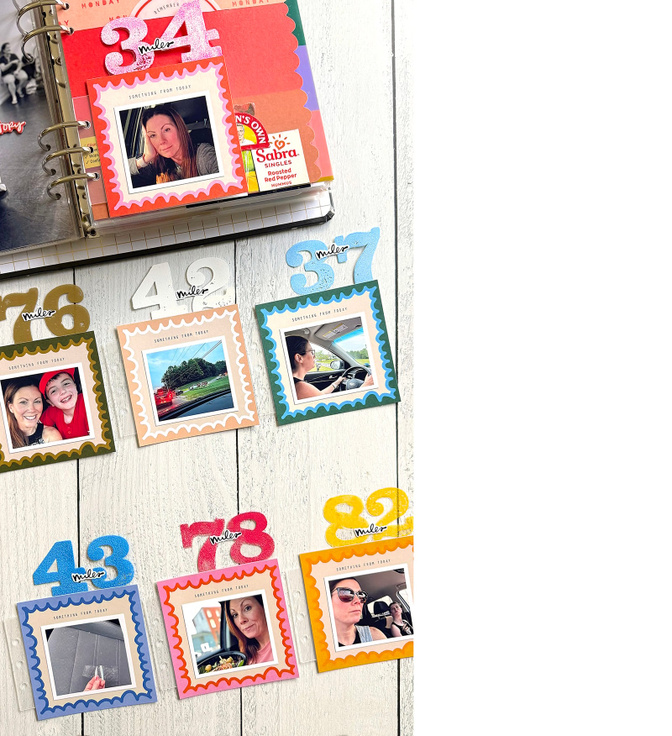
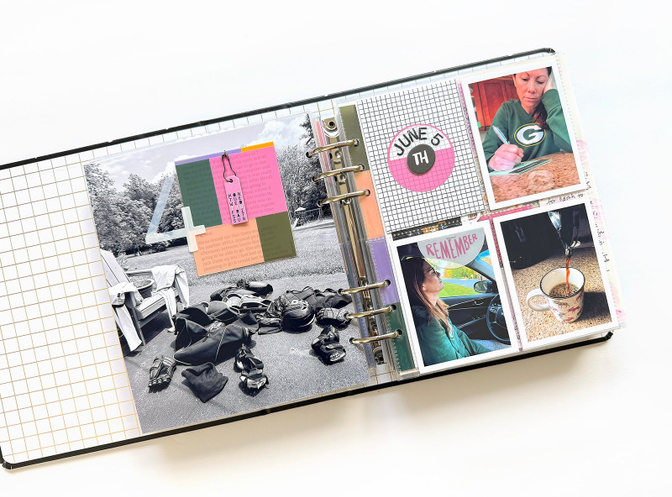
I decided to use the square cards to feature a car selfie or car related photo and my miles traveled for the day. I stamped and embossed numbers on heat resistant acetate and cut around the numbers, leaving a portion of acetate below them to adhere to the card. I used a tiny print of the “miles” digital art to hold the two numbers together which made them more stable. I used an ali edwards plastic attacher to add it to the album.
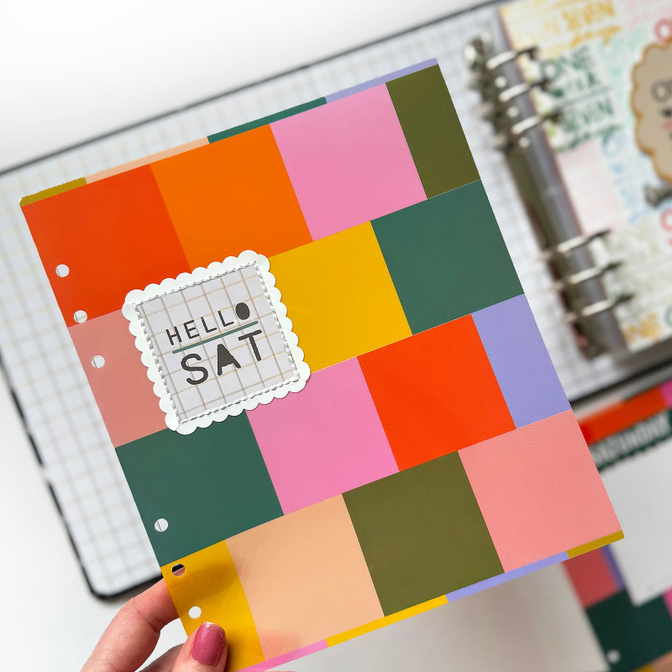
Scalloped color block cards:
Here’s a video showing my process of getting the reverse side of the color block card completed:
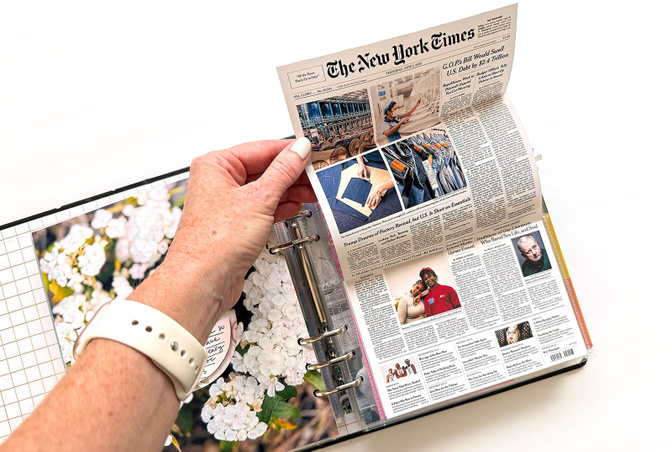
Newspaper “today in the news” flip up:
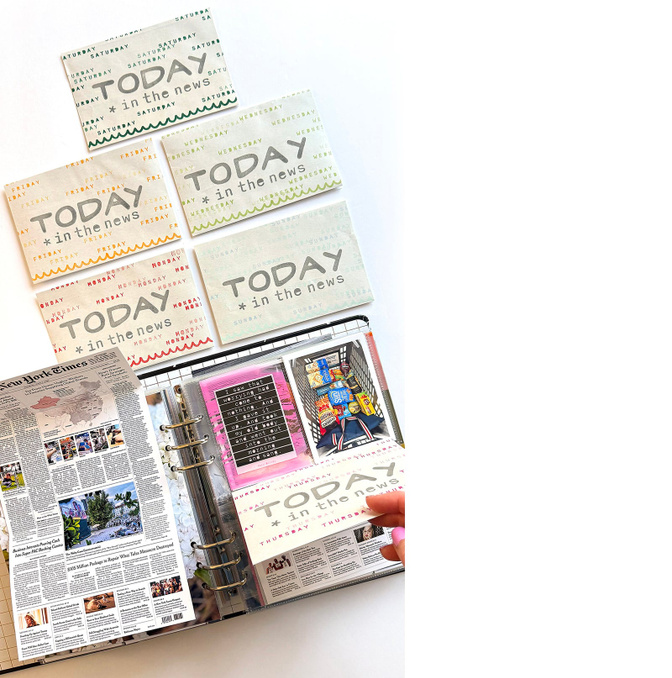
This year I wanted to print my front page news in a way that was large enough to allow you to read it. I printed and folded it so the bottom would sit in the 6x4 pocket and could be unrolled to reveal the whole page. I stamped on packing paper that came in the box with my WITL order to give a bit of a newspaper feel. Because I used lighter weight papers it doesn’t add a lot of bulk which I love.
Below is a closer look at one of the days in my album and my reason why/reflection pages:
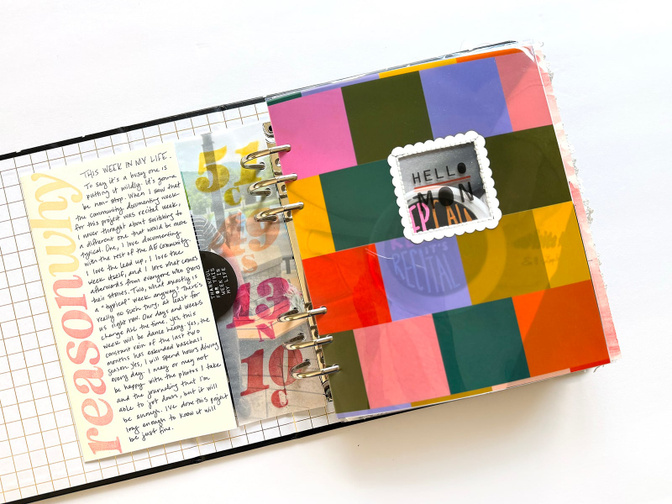
On the back of my intro page I added a full page family pic and my “Reason Why.” Sometimes my reason why is super short. This year I wrote way more than usual – I go with whatever feels right year to year.

I started each day with the divider, followed by a full page black & white photo. After I wrote in POSCA pen on the first day of the week I decided to continue it for the rest of the days as well.
On the reverse side is another full page b&w photo which holds a trimmed out pocket from a page protector. Inside the pocket is my journaling with an off cut from the page divider which serves as a cover. I put a hole in the top and used a jewelry jump ring to connect them and added a bulb pin along with the chipboard tag for that day. The pocket has a little notch cut out in order for the tag to hang easily. I made the mistake of using glue stick to adhere the pocket to the photo (not sure why I thought that would work) and it reacted with the ink on the photo. It wasn’t a big enough deal for me to reprint them all because you don’t see it when the journaling is in the pocket. I used plastic numbers from my stash, which I put through my Xyron machine, and that helps hold the pocket down as well. For each day I vary the placement of the pocket (which was cut down to 3x3.5) so that the pages wouldn’t build up too much in one specific spot.
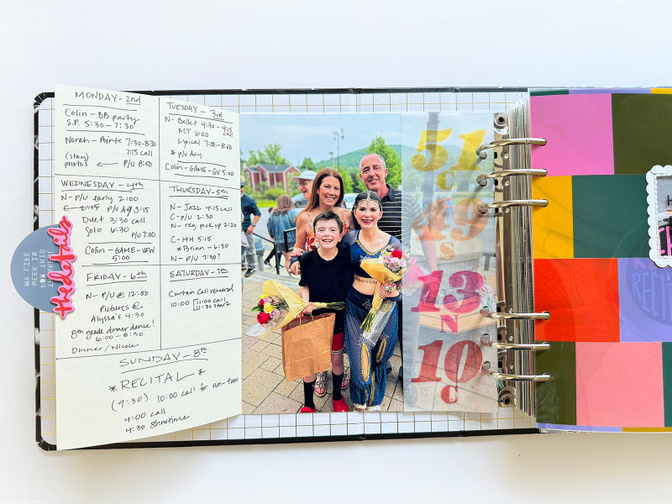
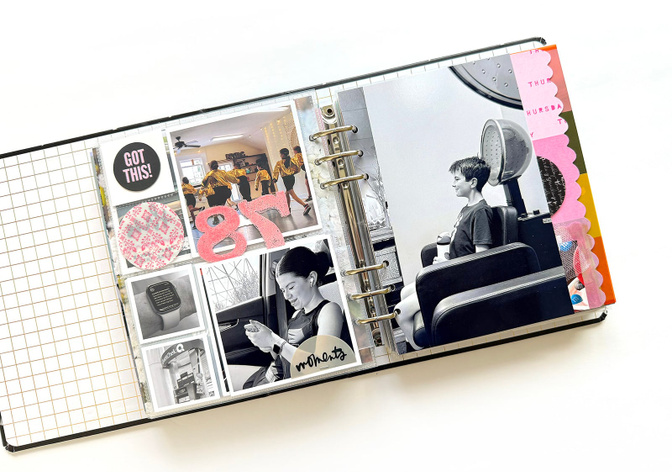
On the righthand page I used (3) 3x4 photos and attached the remember half circle to one of them using a tiny attacher. In the remaining pocket I used a black and white paper from my stash which I put behind two of the half circles and the black chipboard piece. And yup, it kind of looks like a Poké Ball. Haha. I chose to put white borders on all my 3x4, 4x4, and 2x2 photos.
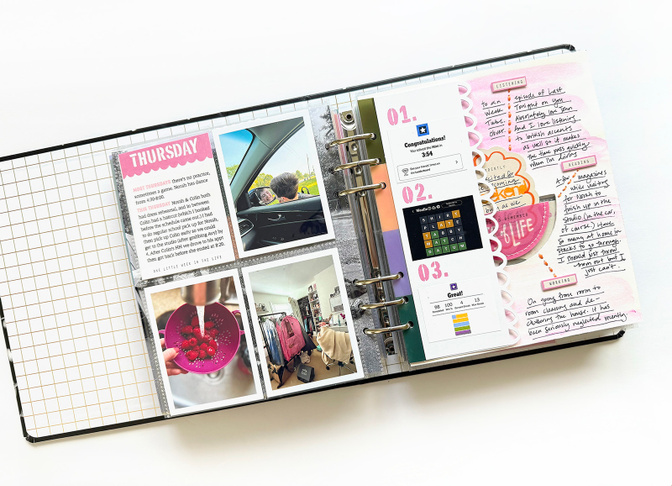
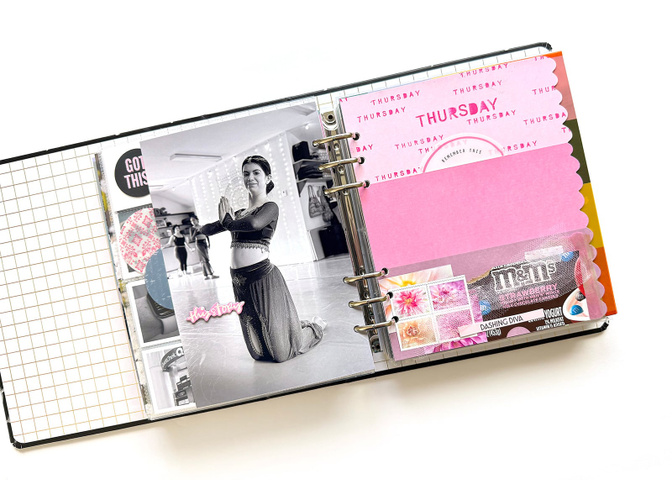
On the next page I used 3 more photos as well as the day of the week 3x4 card. For these I decided I wanted to give a brief nod to the fact that this week was a little different than most, so I used the prompt “Most Thursdays” and “This Thursday.” This was inspired by a prompt in a previous WITL (2020) which was “some + most.” I printed the journaling onto sticker paper which worked out perfect for this space. I used a rubber stamp type font to mimic the typeface on the card.
Next I added my 3x8 scalloped card with my NYT game screenshots and stamped the high and low temps and steps (stamped using the 2020 WITL number set “Numbers of Right Now”.) I also created an embellishment using that day’s initial stamp.
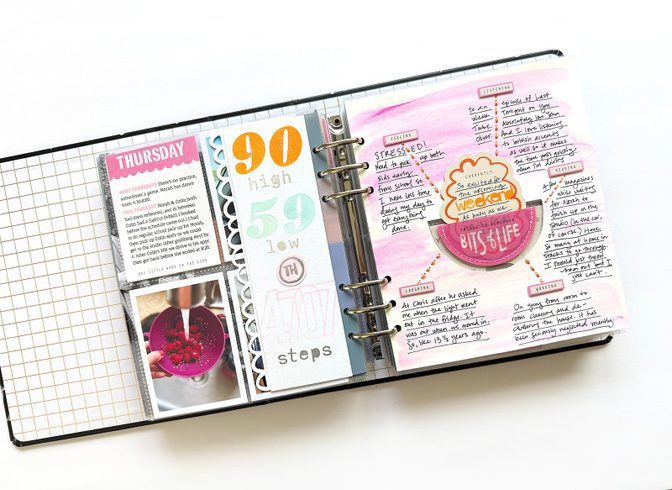
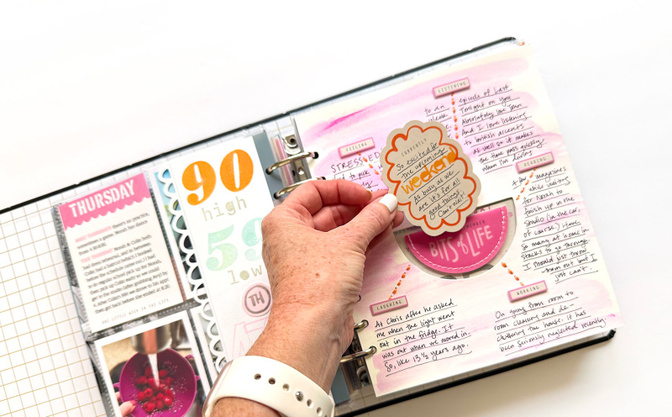
I then added my half circle prompt page with journaling. Really love how these came out.
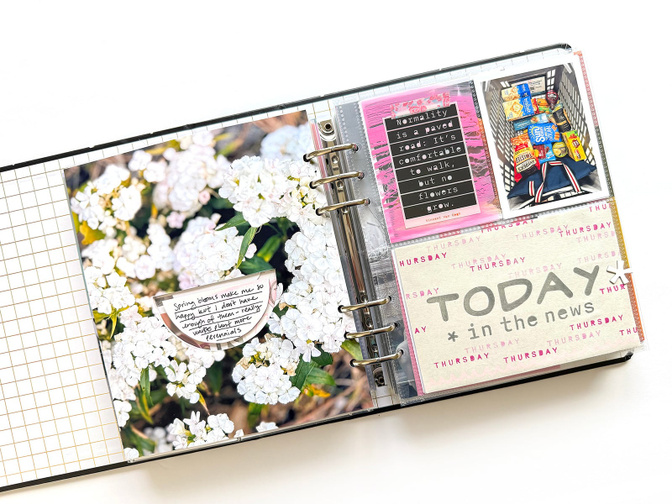
On the next page I used the watercolor acetate/quote combo which I put together with a simple piece of wash tape. I added a 3x4 photo on the right pocket, and put my NYT front page, which folds up and out from the bottom, in the 4x6 pocket. I added a chipboard asterisk to the right side to act as a tab and help open it up.
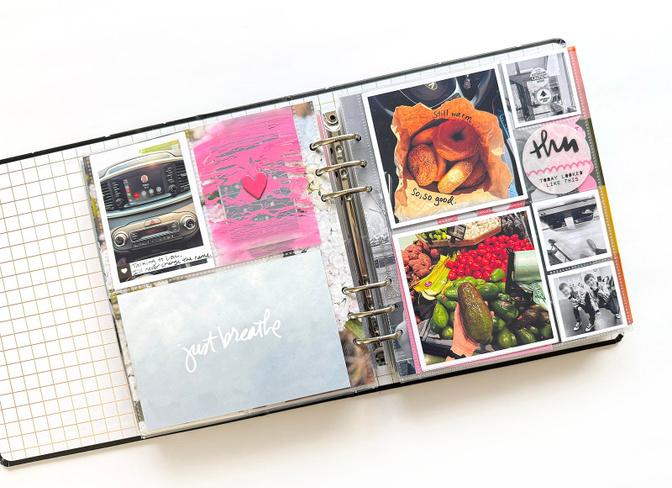
On the reverse side of this page I added a chipboard heart to the back of the acetate and a 3x4 photo on the left. In the 4x6 pocket I put a quote card (I have lots in my stash) or in some cases a journal card or photo.
The page protector on the right is from scrapbook(.)com and comes with only two holes, so I had to punch additional holes to make it fit in the album, but I like being able to add 4x4 and 2x2 photos together. In one 2x2 pocket I joined together the brush script abbreviation of the day and the “today looks like this” to form a full circle, adhering them together with washi tape strips on the reverse.
After this page protector I added my 4x4 “miles” card, adding another photo to the reverse and attaching the “moments” half circle with my tiny attacher.
I added two 5.5x8.25 photos back-to-back and except for the first and last day added another half circle as a tab. I generally kept the one side clean and added the “this story” chipboard to the reverse.
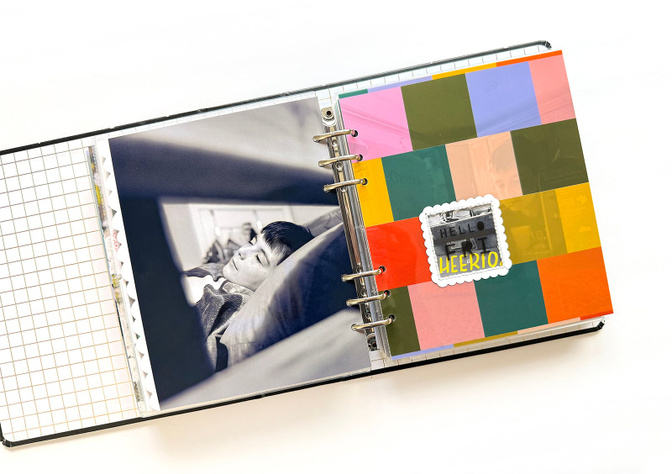
Last is the scalloped color block card which has stamping on top and an ephemera cluster along the bottom. I put the remember this piece inside the pocket that sits behind the card, which holds the selfie of my kids. The day ends with a simple b&w full page photo on the reverse. I generally didn’t add any embellishments to these photos.
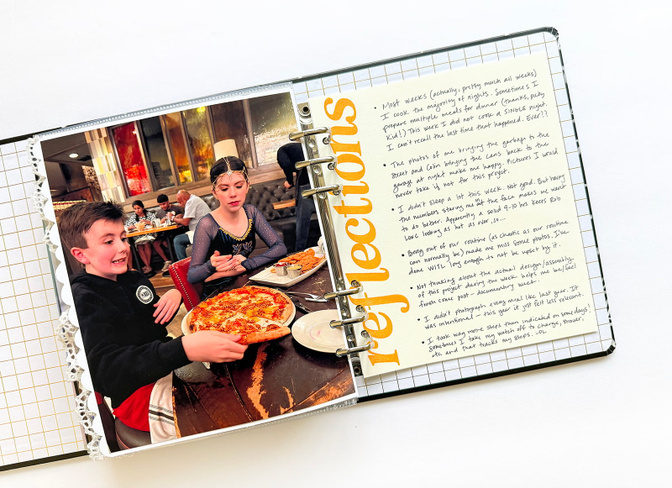
I ended my album with a “reflections page,” inspired by Ali, in a similar style to my reason why.
Thanks for checking out my album! If you have any questions feel free to reach out in the comments. I am also on instagram (@softdaystudios) if you are interested in seeing more of my memory keeping.


Comments
Sign in or sign up to comment.
21 comments
Wow! Super awesome WITL album - lots of great ideas!
Replies to justlisa
Thank you so much!!
Sign in or sign up to reply.
Stunning album! So many creative ideas!
Replies to Jeannew
Aw, thanks Jeanne! Appreciate it!
Sign in or sign up to reply.
So great to see your process, such a fun album!
Replies to carrieW
Thanks very much, Carrie!!
Sign in or sign up to reply.
OMG! You are a rock star! Your album is amazing!
Replies to denine2
You are too sweet, thank you my friend!
Sign in or sign up to reply.
LOVED THIS! You used all the elements from the kit, but put your own unique spin and created an album that is totally unique.
Replies to Tanyaerica
Thank you, I love trying to do different things with the products - I really appreciate the feedback!!
Sign in or sign up to reply.
Stunning album. Love how you modified the elements of the kit and used the elements throughout a day (I.e., the transparency dividers). I am a work-in-process when it comes to cutting up/deconstructing elements. Though I am starting to embrace it through inspiration from people like you and the AE creative team. Thank you for sharing your talent with us.
Replies to mgleeson
That’s so kind, thank you! And I totally get it, I’ve been memory keeping a long time and it took quite a while to get comfortable with just “going for it” when it came to cutting stuff up! I think the more you do it the easier it gets for sure. Not everything works out how I envision it, but luckily there are always new products to work with! So definitely just go for it - good luck!!
Sign in or sign up to reply.
Love your album! Where did you get all the ephemera from to add to the bottom of the colored pages? That is impressive! Also, your kids are so sweet taking selfies everyday! I can't ever get a picture of my daughter- she has been in the 'don't take photos of me' phase for almost 3 years now- its very frustrating!
Replies to 217Liz
Thanks so much!! Most of my ephemera is product packaging that I save and clip (and peel the top layer to make it less bulky.) I also saved some tulle, ribbon, and tissue from my kids’ recital flowers and used some things from catalogs (the stamps are from a USPS brochure) Also pieces of receipts or shopping bags or junk mail. I’ll use just about anything if it fits!
And yes my kids are generally good sports when it comes to being in pictures, hopefully they will keep humoring me for as long as possible!
Sign in or sign up to reply.
Absolutely amazing album! You documented your week with such style and including so much details! Love the large b&w photo with the insert colored paper. Thanks for the inspiration!!
Replies to yin100
Thanks so much, Yin! The large b/w pages with the pockets are my favorite, too!
Sign in or sign up to reply.
I loved the white scalloped edge around "Hello xxxday". When I saw it, I went straight to my craft room. I had 2 sizes of scalloped squares so I punched the smaller and then the larger one. It made a frame that fit perfectly. I added a 2 inch square of velum behind and what a difference, it really popped! Thanks for that idea. I love your album.
Replies to sgothard
Oh that’s awesome! So glad to hear you made that work for you, thanks so much for sharing!!
Sign in or sign up to reply.
Love this -so much inspiration!
Replies to alalbrecht
Thank you!!
Sign in or sign up to reply.
This is amazing, love your formula and the way you streamlined the process. I think it’s great that you captured a week that is not exactly typical; it’s so cool to have all the pieces of recital week documented. I also love all the ways you show up in the pictures. Thank you for sharing!
Replies to kbledsoe
Sign in or sign up to reply.