Weekend Creative : March #1 : Butterfly Mobile
Tags:
Yep, more butterflies.
The prompt this weekend is to make a spring mobile. Something to brighten things up a bit + celebrate the coming season.
This is a great project for using what you have. Gather up some of those random pieces of this and that and plan a little creative time (you can always check out the supply list below for specifics). The idea here is to play and experiment with each of the butterflies as your canvas.
Another cool part of this project is that it can easily be done in bits and pieces. Paint all the butterflies. Go do laundry. Come back and add some accents to a few. Run around outside with your kids. Come back again and do some handwriting. etc. Or settle in for the long haul.
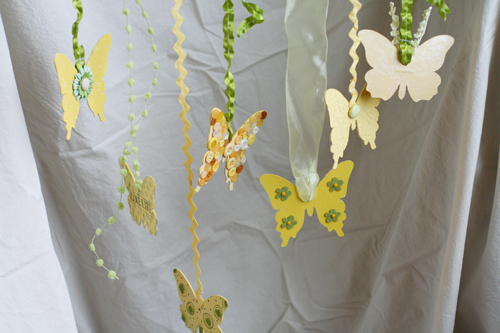
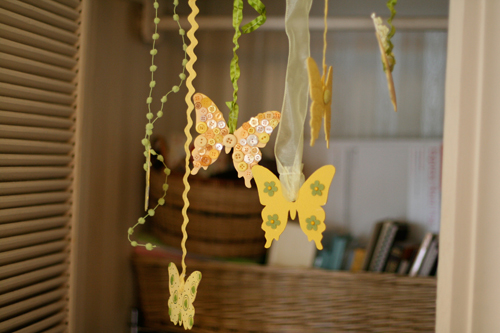
To attach each butterfly to the branch I punched a hole and wrapped a piece of ribbon through. Rather than creating a loop, I stitched the ribbon together to hold it in place + cut the ribbon (you will be able to see this in the photos below). To attach it to the branch I tied a knot at the top.
Supply Basics:
• Jenni Bowlin Butterfly Chipboard (4 to a package : could imagine using these birds too)
• Making Memories Paint (banana + buttercup)
• Crackle Paint: Tim Holtz Distress Crackle Paint (Mustard Seed) - one of the coolest things about this product, besides how it cracks
the paint with no work on your part, is that the brush comes inside the
lid (you can see Tim using it here)
• Ribbon: Amercican Crafts Halstead 87558 (green stitched), yellow rik rak, super cute green dot/puff ribbon from the October Cocoa Daisy kit
• A way to punch holes in the chipboard butterflies - I like the Crop-A-Dile or the hammer set from Making Memories
• Black Staz-On Ink
• A branch or something on which to hang the butterflies
Here's a look at each individual butterfly (both sides) with additional supplies listed below each photo:
Number One:
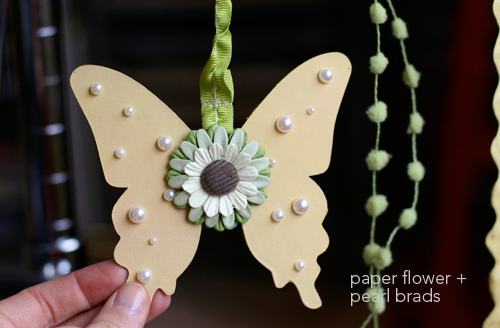
K&Company Paper Flower Brads + K&Company Blue Awning Adhesive Gems
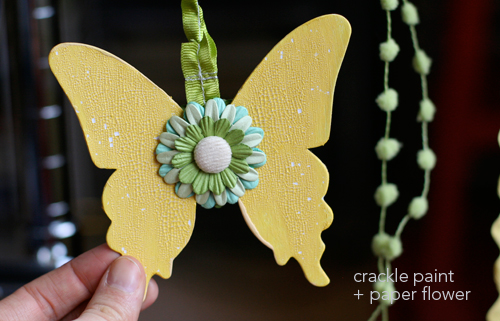
Here's what the crackle paint looks like after it dries. You just paint it right on (using the brush in the bottle) and then as it dries it cracks. Cool stuff. I attached the flower brads with a glue dot rather than using the metal feet (just fold them back and place the glue dot on top).
Number Two:
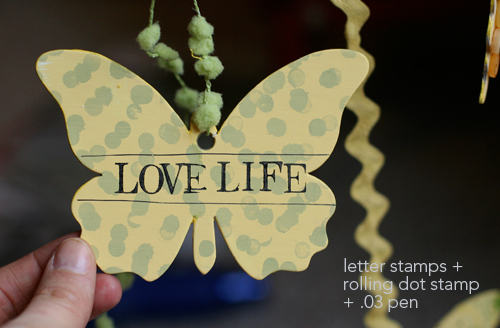
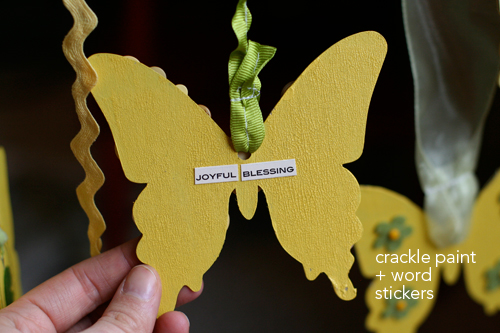
Letter stamps (from a Japanese company) that you can often find here. American Crafts Precision Pen (my favorites). The dots were created using a cool rolling stamp from Stampin Up (Looks like it's called Stampin Around).
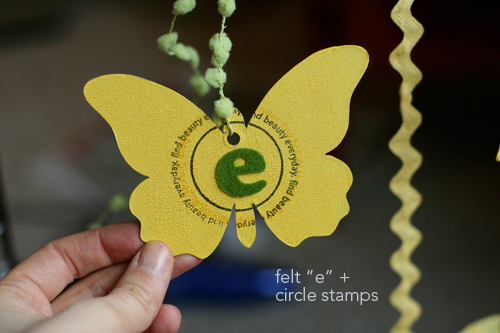
Felt letter "e" from American Crafts. Circle stamps from Savvy Stamps (581D Outline Circle) and the word one is part of an Everyday Life kit offered through the CK Kit Of The Month back in May of last year.
Number Three:
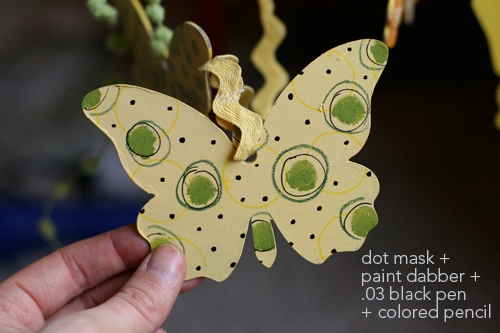
Green circles were created using the Heidi Swapp Dot Mask and an Adirondack Paint Dabber. Colored pencils are from Prismacolor.
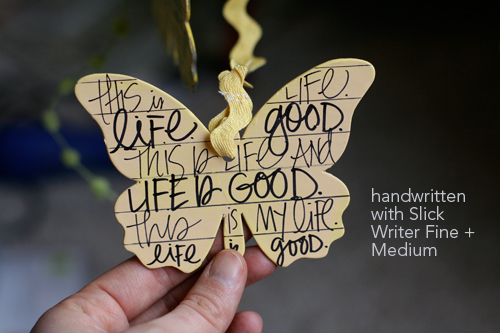
Slick Writers are another staple in my supplies. I used a ruler here to get the lines down.
Number Four:
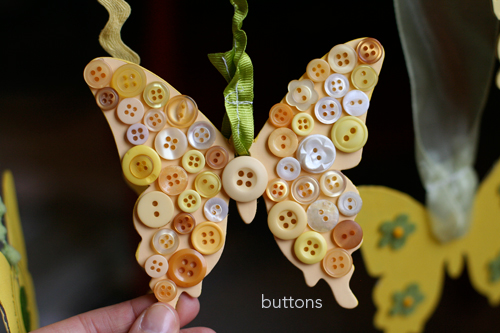
Bet you may just have some buttons in your collection of stuff. If not, here's some.
Words from 7gypsies 97% Complete Document sticker sheet.
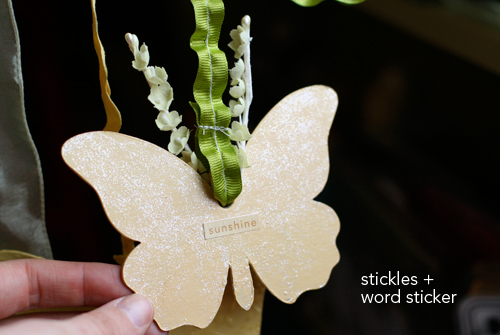
Number Five:
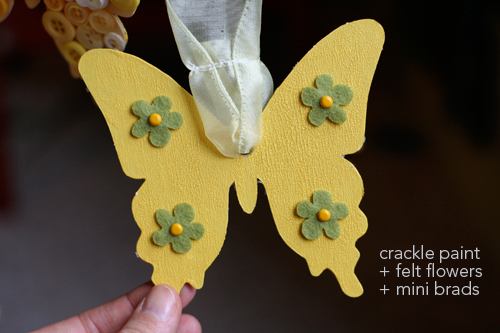
American Crafts Felt Flowers + Mini Yellow Brads (again, I used the brads for decoration rather than function)
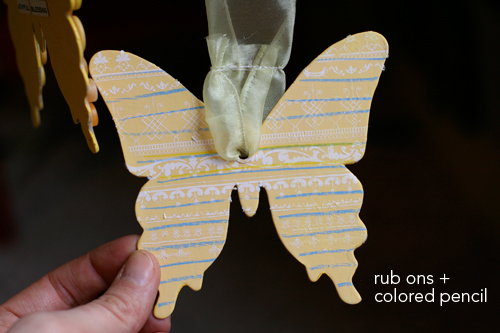
Basic Grey Rub Ons.
Number Six:
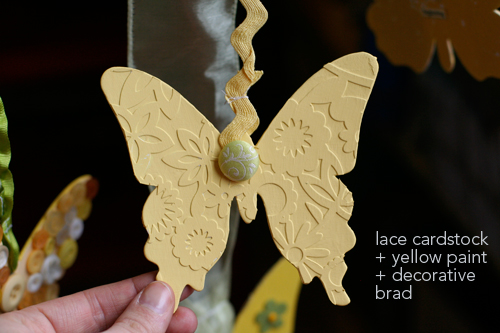
KI Lace Cardstock (Flower Child White) + K&Company decorative brad. This is the same technique as a couple week's back - see the prompt here.
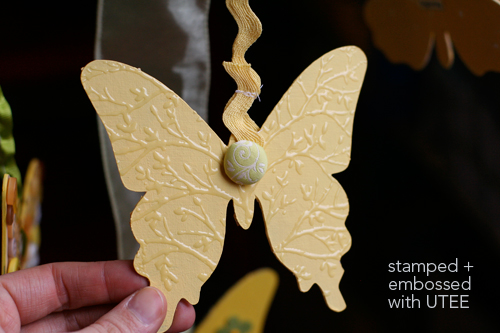
Hero Arts Design Block Tree Stamp + Embossing Ink (Versamark) + UTEE (Ultra Thick Embossing Enamel)
Number Seven:

The random flower wire here came from a wonderful little crafty Easter kit from Flea Market Studio. She has some great little ephemera kits. Word sticker is from a Making Memories Wordfetti package.
Stickles: Frosted Lace (basically just rubbed it right onto the butterfly with my finger)
The tough part seemed to be figuring out where to put the darn thing.
While I was working on it I hung it in between my closet doors:
When it was done I tried it on the ceiling in my office (using ribbon from Paper Source):
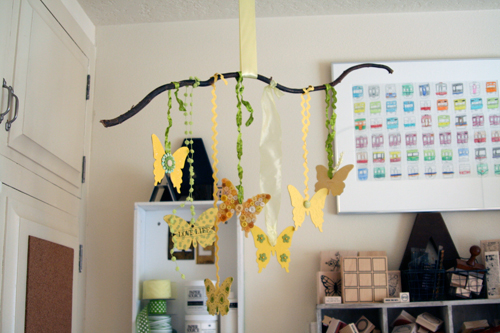
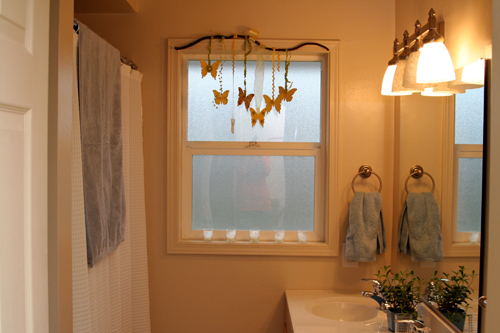
And then decided to hang it above the window in the bathroom:
For more visual inspiration to get you going check out this Mobile Swap Flickr group (based on the swap started by Elsie Marley). I also found a couple mobiles on etsy that I loved: check out this one + this one. And I love this one from Sally Shim that could easily become the inspiration for an Easter mobile (thinking ovals).


Comments
Sign in or sign up to comment.
70 comments
what about owls? i am loving all of the owls out but owls don't shout "spring" to me....
Replies
Sign in or sign up to reply.
amazing and beautiful - all your work is :)
Replies
Sign in or sign up to reply.
Soooo cute!
Love it!
Replies
Sign in or sign up to reply.
Ali, You rock! Can't wait to see you next week!
malika
Replies
Sign in or sign up to reply.
I LOVE the way they look in the bathroom window...very sweet.
Replies
Sign in or sign up to reply.
brilliant...again!
xo
catherine
Replies
Sign in or sign up to reply.
I love, love, love this idea.
Thank you!
Replies
Sign in or sign up to reply.
This has GOT to be the best thing created that I have EVER seen!!!! Wow, just Wow.........
Replies
Sign in or sign up to reply.
I love these! I need to make some for my little girls room, all the bathrooms, and some in my kitchen too! Feels like spring! Thanks for sharing!!
Stacey
Replies
Sign in or sign up to reply.
How beautiful! Though here in Australia we have just entered Autumn (Fall), so I think instead of butterflies I'll try using leaves to celebrate the start of our new season.
Replies
Sign in or sign up to reply.
ooohhh....yum. more butterflies!! my favorites of late! I want to fill ever window with these! lovely...lovely. tfs!
Replies
Sign in or sign up to reply.
Awesome-I have the perfect driftwood branch to use as the holder too-when I re-organized my studio space last month i picked up the branch at least 10 times-almost threw it outside but then though " No I will find a use for it soon"
We are in the middle of a blizzard here in NW PA=seriously 18" of snow and 40 MPH winds,it is not nice outside! This would be a wonderful project to pass the weekend!
thanks for sharing! mary
Replies
Sign in or sign up to reply.
Perfect spot for a beautiful piece.
Replies
Sign in or sign up to reply.
Ali-thank you for sharing this cool idea! This would not normally be my kind of project, but I'm thinking I might just try it 'cuz you made it look so beautiful!
As always, you inspire me to do something new. Thank you!
Replies
Sign in or sign up to reply.
Ali,
beautiful work.
you're a gem.
Love you!
Jess
Replies
Sign in or sign up to reply.
OMgoodness. This is so fun. Love it.
Replies
Sign in or sign up to reply.
I found your site a few weeks ago and I love the stuff that you put on here!!! Thanks for sharing your creativity and talent with all of us, so that we can make cute things too!!!
Replies
Sign in or sign up to reply.
This is too cool, Ali. I love the embossed butterflies!
Replies
Sign in or sign up to reply.
OK ,, how stinkin' cute is that idea? I say it's pretty stinkin' cute!!!!!! Thanks for sharing something so darling!!
Replies
Sign in or sign up to reply.
first I thought this would not work for me, cause I just don't enjoy mobiles.... then I linked over to the mobile swap...Got an idea and can't wait to work on it!!!
Thanks for pushing our envelopes and encouraging us to do something different! My craft has stepped it up a big ol' notch with folks like you and Christine!
Replies
Sign in or sign up to reply.