December Daily 2010 | Ideas For Using The 6x8 Layered Templates (+ Video Walk-Through & Tutorial)
Tags: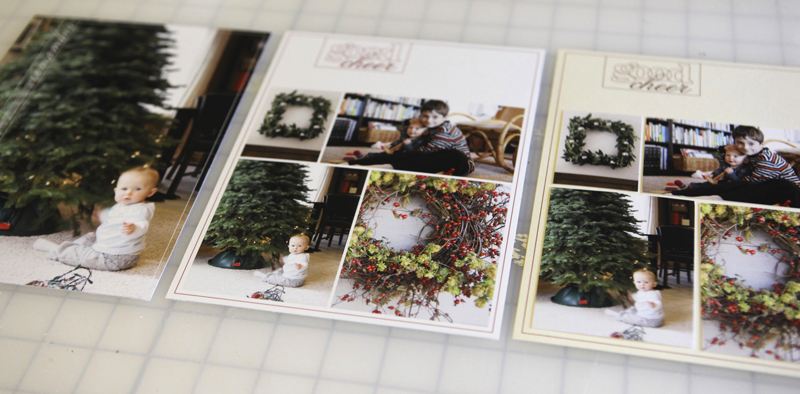
First off I wanted to say thank you to those of you that requested these 6x8 layered templates. After playing with them today in preparation for this post I can definitely see them coming in very-handy for my album.
Today's post includes two videos. This first is a walk-through of the ways I plan to use these 6x8 layered templates and the second is step-by-step instruction in Photoshop Elements.
Let's start with a little walk-through video:
Ali Edwards | December Daily 6x8 Template Walk-Through from Ali Edwards on Vimeo.
And here's a video that walks you through using the templates in Photoshop Elements:
Ali Edwards | 6x8 December Daily Layered Template Tutorial from Ali Edwards on Vimeo.
Here's a look at the ideas I covered in the above videos:
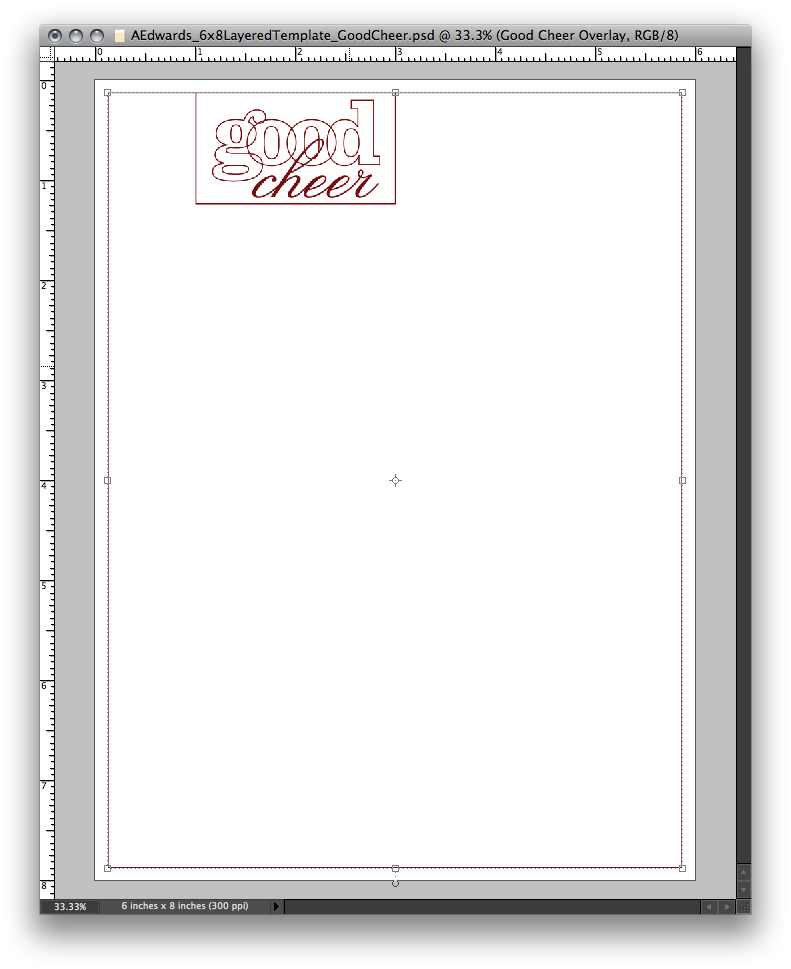
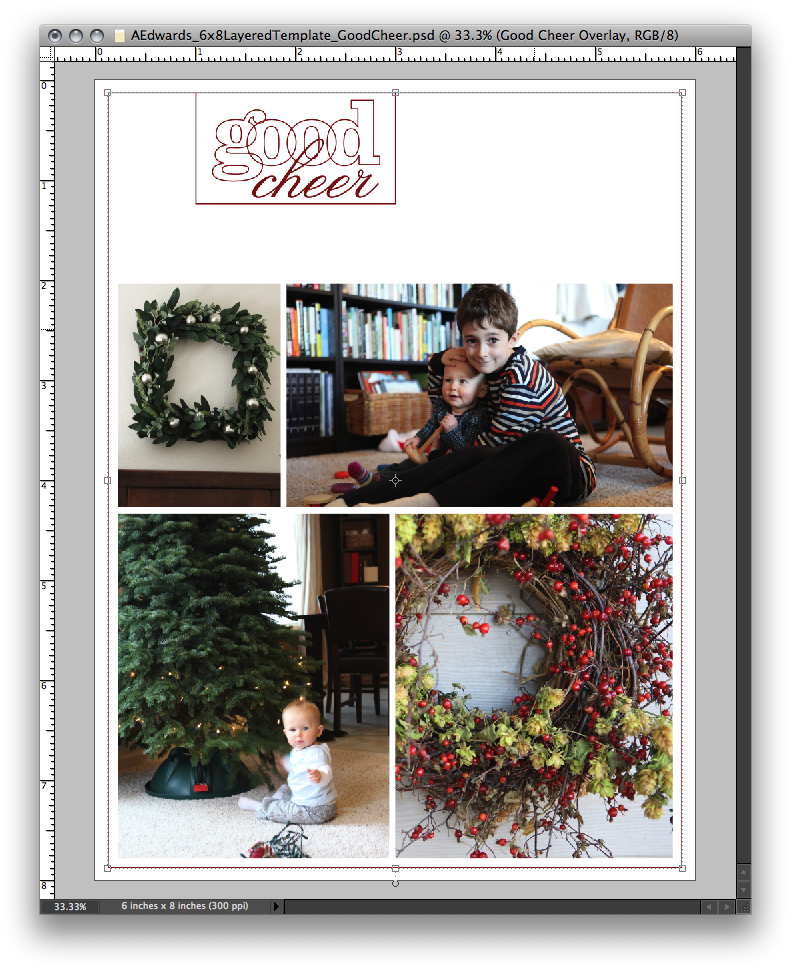
IDEA #1. Use as an overlay on a full page photo.

Inside the layered template package there are two pages that are designed specifically to use for full-page photos. Any of the others could also be used by hiding/removing the image boxes (the yellow photo boxes).
Here's what this one looks like after printing and cropping from the 8.5x11 sheet of photo paper:
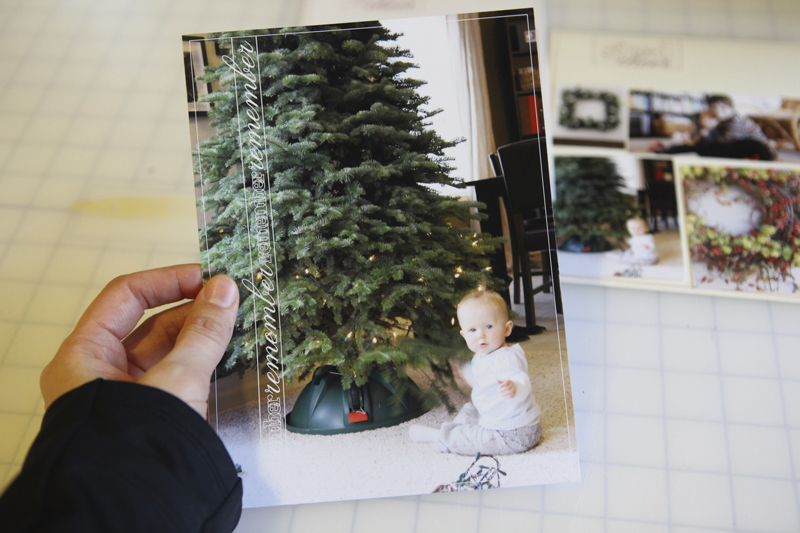
And as a spread with the 2010 date overlays:

The page with the #2/right-hand side of the spread might include:
another photo or more than one photo
handwritten journaling
journaling from my typewriter
something that came in the mail or other little pieces of paper from the day
a photo with journaling
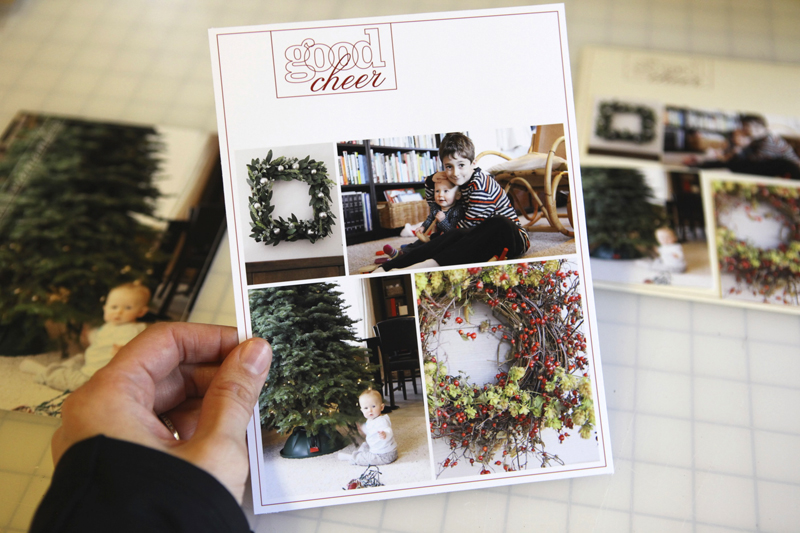
IDEA #2. Print the photos on photo paper + print the frame on cardstock.

Use the layered template to just print photos. Mask your photos (command G on a Mac or control G on a PC) into each of the squares and print on photo-paper (turn off the overlay layer before printing by clicking on the "eye" next to the layer in the layers palette).
Turn the overlay layer back on (and turn off your photo layers) and print on cardstock. Crop images from photo paper and adhere onto cardstock background.
Here's what this one looks like after cropping and before adhering the photos on the cardstock:
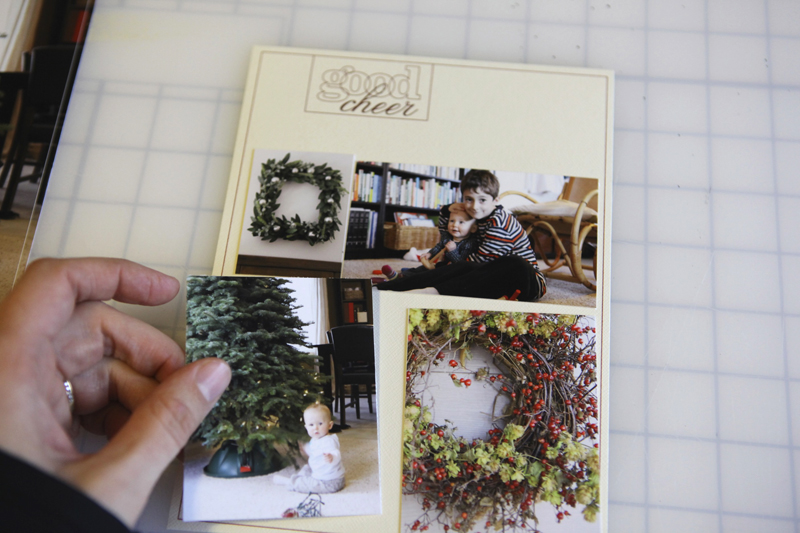
This is a really great option if you want to add more dimension to your album. Use foam dots under the photos to have them stick up off the page. There's lots of possibilities with this option. The best part is that the basic design is already decided allowing you to focus more on the images and the story.
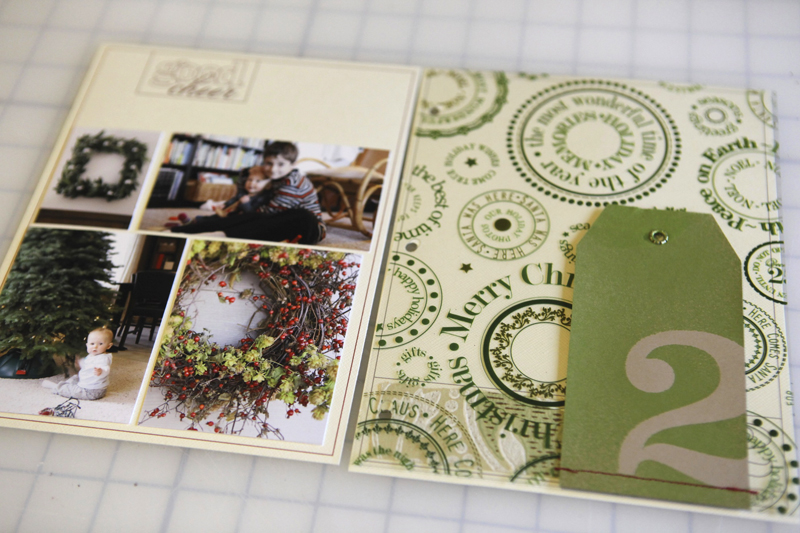
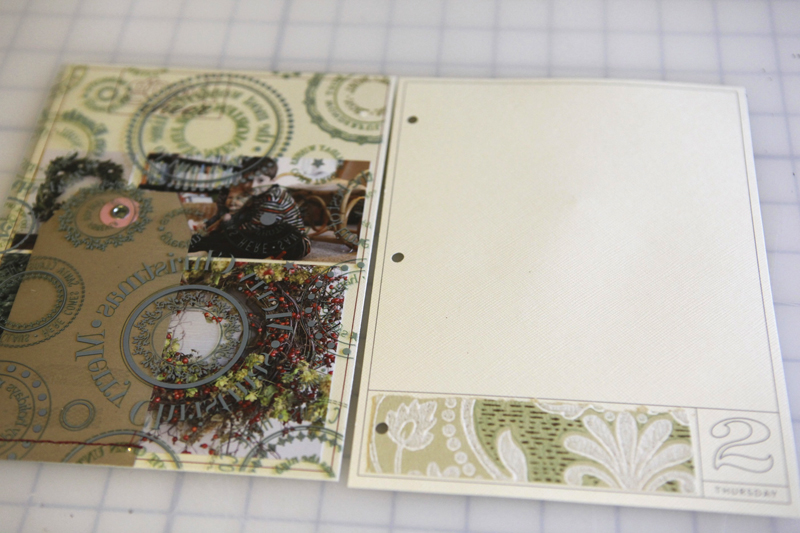
Here's what it looks like as part of a spread with the transparent page in-between:
IDEA #3. Print the frame and photos on photo paper.
The super quick and simple option is to just mask your photos and print on photo paper. Add other digital elements or not. Add traditional embellishments after printing or not.
Here's what it looks like after being cropped from the 8.5x11 photo paper:
And a look at this one in the spread:

Want more information or additional video tutorials on digital and hybrid scrapbooking? Click here to access my Getting Started With Digital Scrapbooking tutorials.
ADDITIONAL SUPPLY INFORMATION
Photo Paper | Ilford Galerie Smooth Pearl 8 1/2 x 11
Printer is a | HP Photosmart B8550
Trimmer | Fiskars Desktop Rotary Trimmer
If you've got any questions about this process let me know in the comments. I hope you're getting excited!
For more on December Daily go here.


Comments
Sign in or sign up to comment.
107 comments
Ali - great tutorial; I learned more in 15 minutes than I did at work today! I can't wait for Dec 1st!!!
Replies
Sign in or sign up to reply.
Do you by any chance know:
1. how heavy the Bazzil card stock is? I've ordered the cream criss cross paper but can't find anywhere info on how heavy it is, and my printer can only deal with 160mg max...
2. Oh, and another "paper-questions" - My printer only can print max A4 sized paper (which is OK as the journal will only be an A5 size... would it work if I pre-cut the 12x12 paper into 6x8 parts before printing, or cut it into an A4 size...)
3.You are thinking of making two pages per day (I really like this idea and want to do it too) BUT:-) would you be printing the page on the left and then glue it together with the back side of the right side page from the previous day? Or do you know how to get a double-sided printing on a 6x8 paper (which is a non-standard size of paper for printers I think)
4. If, giving up on too complicated printing issues, I decide to just go with an A5 (in inches 8.3"x5.8") format - what would I need to change in the overlays and the photo templates to re-size them to fit the paper size? (I have PS Elements)
1 million thanks for taking your time reading through this message and even may be answering this long list of questions!!!
Replies
Hi Anastasia -
(1) I don't know the weight of the cardstock. It's nice and study :) but not too thick.
(2) I've pre-cut my 12x12 down to 8.5x11 before printing (and then saved the extra for another time).
(3) I will be glueing the two pages back to back. It's possible to print onto the back of an already cut 6x8 (just run a test print to see exactly where it will print onto a 8.5x11 sheet and then adhere your 6x8 right onto that same spot). I've done it before but it definitely takes a couple test prints to make sure your page is oriented correctly.
(4) What I would do is create a new canvas and make it the A5 size. From there I would open one of the overlays, drag and drop it onto the new canvas, grab an edge and drag it to the size you want (in Elements you can just drag and it will keep the correct proportions - if you were in Photoshop CS you would need to hold down the shift key). It's likely it won't fit exactly but should be good enough.
Sign in or sign up to reply.
Alie, I have to ask, where did you get your beautiful round wreath with the berries?
Replies
They are from a local woman. This year she was selling them at Glory Days Antiques in Springfield, Oregon.
Sign in or sign up to reply.
Ali - Do you ever worry about the inks from the home printers? It seems you print much of your work at home. I've always had my photos and digital pages professionally printed because I've worried that printing at home will result in fading or less archival quality than professional printing. What are your thoughts on this?
Replies
Hi Amy, I don't worry about them. I use both professional printing and home printing and go along with the understanding that some will survive and others won't for any number of reasons...and I'm ok with that :). The pages that I completed back in 2003 and 2004 using photos from my home printer at that time still look just fine.
Sign in or sign up to reply.
LOVE these tutorials, these are so helpful. Bought my templates and am getting SO excited for the month to begin. Such a fun time of year:)
Replies
Sign in or sign up to reply.
This is my first December Daily project and I'm really looking forward to it! I did the WITL project in May and LOVELOVELOVE it!! I've got a question, and wasn't sure whether to comment on your latest post or back on the Q&A (since you've already answered!) Anyway...I'm wondering if you use page protectors over your photo pages to keep things like grommets and other memorabilia from scratching and abrasing the photos. My 'middle' pages are patterned paper instead of transparencies and some have scratchy glitter in the pattern. Thanks for all you do. You inspire!
Replies
Hi Tiffany - I don't use page protectors in this album normally (unless they are the divided ones that I cut down to fit). I just pulled out my album from 2007 today and it looks just fine.
Sign in or sign up to reply.
I finally finished my foundation pages and posted them to 2Peas here http://www.twopeasinabucket.com/gallery/member/167146-jendem/1685857-dec-daily-part-1/
Ali - I'm really enjoying this and can't wait for Dec 1st.
thanks so much,
Jen
Replies
Sign in or sign up to reply.
Great vids!
regarding the 6x8 template with numbers and days specific to 2010.......is there a layer to change the day so i can use it for other years? if not, do you have a suggestion for covering it up so it doesn't look cheesy??
i just realized after watching the videos that I only bought the set without the numbered templates! :)
thanks ali!
Replies
You can always select the text you don't want and delete it, whether it's in its own layer or not.
Sign in or sign up to reply.
Yes, I am getting excited and getting my book set up at least what I can do for now.
Thank you for explaining about the templates I was not sure what we were to do with them, if they were to replace the overlays or put inside the overlays or what so now it makes sense to me.
Replies
Sign in or sign up to reply.
Thanks Heather! I am a serious novice with digital as u can tell! Am i able to change the text as well?
appreciate the help!:)
Replies
Sign in or sign up to reply.
Hi ALi,
I have Photoshop CS5 that I mainly use for photo editing. I am familiar with the layers used in that, but I have never delved into digital scrapbooking. I watched the video you made and loved it, however, I was unable to figure out how to apply your instructions to regular photoshop. Would it be worthwhile for me to invest in ELements, too, or is there a tutorial that can show me how to do it in regular photoshop?
Thanks,
Lisa
Replies
Hi Lisa - which part did you have trouble with? You definitely don't need Elements if you have CS5. I use CS4 normally but use Elements for the video tutorials (more people have it than the CS versions).
Sign in or sign up to reply.
[...] Ideas For Using The 6×8 Layered Template Package (+ Video Walk-Through & Tutorial) [...]
Replies
Sign in or sign up to reply.
I am really loving the videos. When I first became interested in memory keeping years ago, I was too intimidated so I collected a few things here and there and bought magazines for a few years. I'm so glad that beginners and experts will all get something out of your videos. Thanks much.
Replies
Sign in or sign up to reply.
Hi Ali,
This will be my first time doing a December daily. I am very excited!
My question is, how do I get the 6x8 template from photoshop onto a 8.5x 11 paper for printing at a photo developer with out changing the original size?
Replies
Hi Sharon - my suggestion would be to create a new file that is 8.5x11. Flatten the 6x8 when you are completely done with it and then use the move tool (black arrow) to move it over on the 8.5x11 and then save as a JPG for uploading.
Sign in or sign up to reply.
I bought and downloaded the 6 by 8 templates and have watched the video but even with my husbands help we don't seem to be able to work out how to use them.I have photoshop elements 6 and when I go to edit I can't find any 'group with previous' and Control G has no effect. The photos won't fit the photoframe horizontally. Please could someone help!!
Thank you
Angela
Replies
Hi Angela - are you on a Mac or a PC? To mask the photo into the boxes did you try hovering your mouse between the two layers, holding down the option key until you see the two little circles, and then clicking on the line between the two layers you want to mask?
Tell me more about what you mean about the photos not fitting the frame horizontally? Are they too small when you drag them onto the template?
Sign in or sign up to reply.
Hi Ali,
Thanks for the great vids and ideas! I've been using the templates a ton already but i'm having one problem. When I print them they are too big...not a ton, just a 1/2 inch or so, but i have to trim them down and i'm losing frame etc that way. The same thing has happened when I create a new blank at 5.5 x 6.25 to make a collage etc for the large box on the dated overlays...too big and cropping again causes me to lose part of the images. Am I doing something wrong when I print?
Replies
I'd check your print settings. Sometimes the scale to fit media box gets checked (or unchecked - can't remember which one right now) that can skew the actual printed size. Look around for anything that references "page scaling" and mess around with that :).
Thanks for your idea Ali. I've been playing with this for 3 days now and here's what I've discovered now...when I tell my printer (HP B209a) to print as "general everyday printing on plain paper" it prints at 6x8. If I try to set it to photo paper it prints 1/4 inch too big on each side. Guess it's not a PS problem after all. I know our printers are different, but do you (or anyone?) know anything about fixing that? I guess I can just print as everyday..seems to look ok...shrug
thanks for your time!
Sign in or sign up to reply.
Hi Ali, First off thank you so much for your inspiration and guidance I have a few of your templates and would love to buy more. For some reason when I drag my photo to the template it goes behind and I can't remember what I need to do to bring it on top. Could you give me advice? Thank you for all that you do!
Thanks,
Roberta
Replies
Sign in or sign up to reply.
[...] digital layered template set to create the first page. I followed the same set of steps as I did in this tutorial post (printing photos on photo paper and the frame layer on [...]
Replies
Sign in or sign up to reply.
Hi Ali!
Ok...I KNOW I've seen you post it before, but for the life of me cannot find it tonight---What size are you printing photos/trimming papers for the numbered pages? Like for the advent calendar page...the whole page is 6x8 but what did you trim the calendar page to, to fit in the little squares? Like a 5.5 x 6 something or other?
Thanks a bunch! LOVE LOVE LOVE your album! This will be my first year making one and I've got tons of pics from December already, so putting them in the pages shouldn't be a problem...just sizing them right to fit! ;)
Happy Holidays!
~Heather
Replies
Mine are 5.5 x 6.25 - it's not a perfect fit but seems to be working just right.
Sign in or sign up to reply.
I am going to be using this for December 2011 and am really excited. Is there a hole punch that is designed for this 8" length page? How did you know where to punch the holes? Thanks!
Replies
Sign in or sign up to reply.