December Daily™ 2012 | Foundation Pages
Tags:
Welcome to December Daily™ 2012.
If this is your first year I invite you to check out my December Daily™ page that includes links to all my previous albums. Some years they have been much more decorated in advance using a wide variety of products and other times they have started simple.
Just as in years past, these pages are just a beginning. This album will be built over the course of the month as I fill it with photos, words and products as the month progresses.
As with all projects I embark on, December Daily™ can be anything you want it to be. Make it work for you. I've gotten into a routine the last few years using printable daily pages that has simplified the process for me. I love having a structure set up in advance that I then build upon during December and add as little or as much glitter as I want.
I'm starting even simpler this year.
In past years I've included overlays for each day - this year I decided to skip that step.
For 2012 I decided to go with a 4x6 album (included in the sold-out kit from Studio Calico). I wanted something smaller this year, something to mix things up.
Here's a look at how I'm starting things off for 2012:
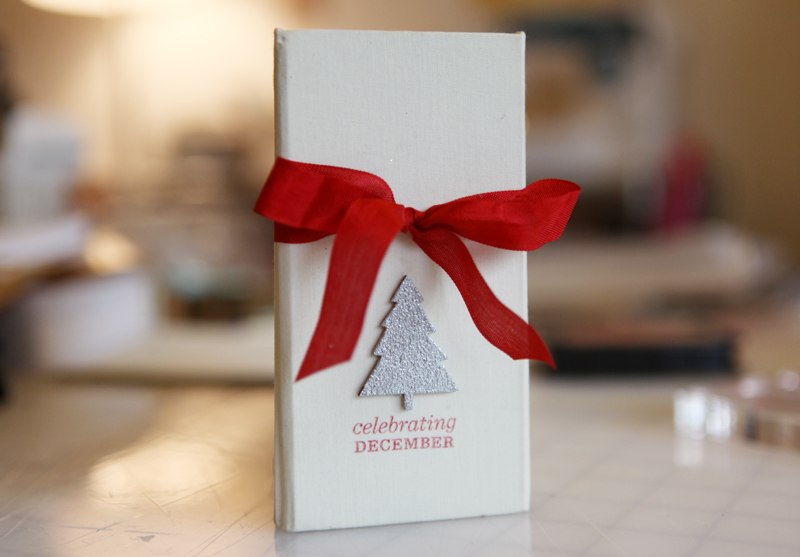
On the spine of the album I adhered a wood veneer tree (embossed with silver glitter Zing) and stamped "celebrating December" using staz on black cherry ink and the 2012 December Daily™ stamp set.
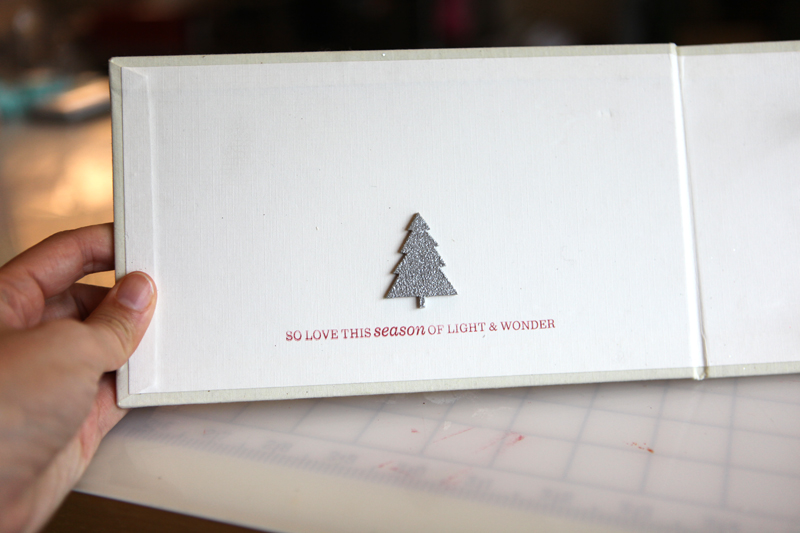
I repeated the same tree + stamp on the inside cover.
My first page in the album is a clear transparent page (included with the kit). You could totally use any overlays for this, including ink jet transparencies or if you are lucky you might still have some awesome Hambly printed overlays in your stash.
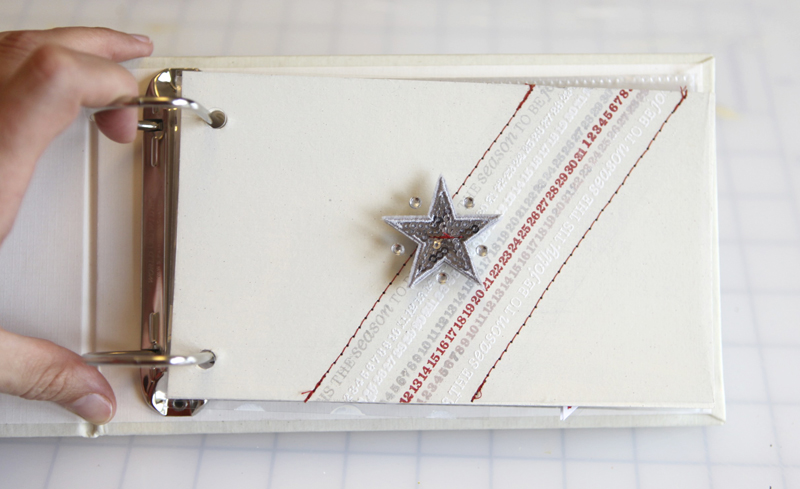
On both sides of the transparent page I adhered a Heidi Swapp Disco Star and ran it through my sewing machine a couple times with red thread. Around the star I added some silver jewel embellishments (again on both sides of the transparency).
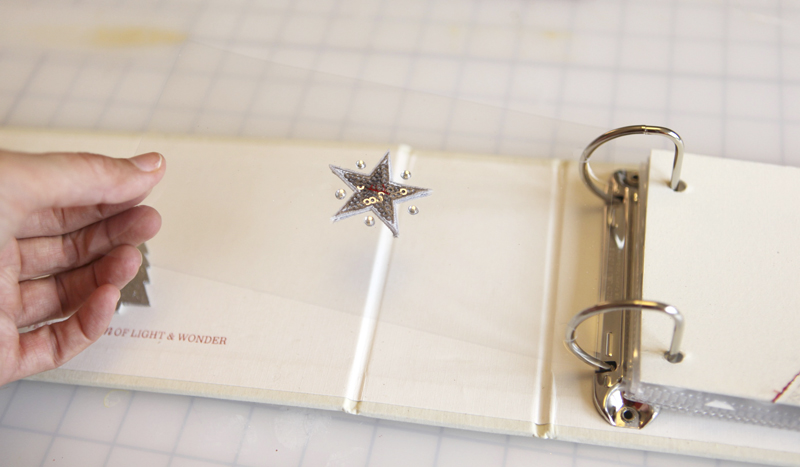
You can see the back is a repeat of the front here.
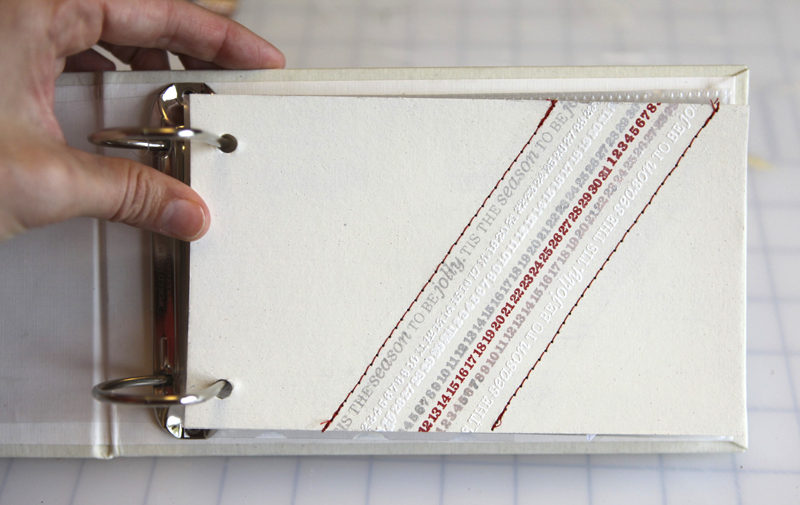
For the next page I used one of the chipboard pages included with the album. My plan is to add more of these chipboard pages throughout the month when it makes sense with the story I'm telling.
I used cream paint on top of the chipboard and then used the long number and sentiment stamp from the 2012 December Daily™ stamp set to create the diagonal pattern. I alternated Colorbox Silver Chalk ink and white opaque Zing and red glitter zing with the stamping. The outside lines were created by running the whole thing through my sewing machine.
The back of that page is blank for now. Most likely I'll cover it with a photo at the start of the month.
![]()
As an into page I used another of the clear transparent pages.
I used the "hello December" stamp + red glitter zing onto white cardstock and cut around the outside. I then laid that onto the transparency and cut around the edge (if I was to remove the red arrow you'd see a transparent arrow underneath).
On the transparency I created dots by painting on top of a 12 x 12 Doodling Template (Swiss Dot) from The Crafter's Workshop.

On the back I cut another arrow using green pattern paper and added a joy badge on the top.
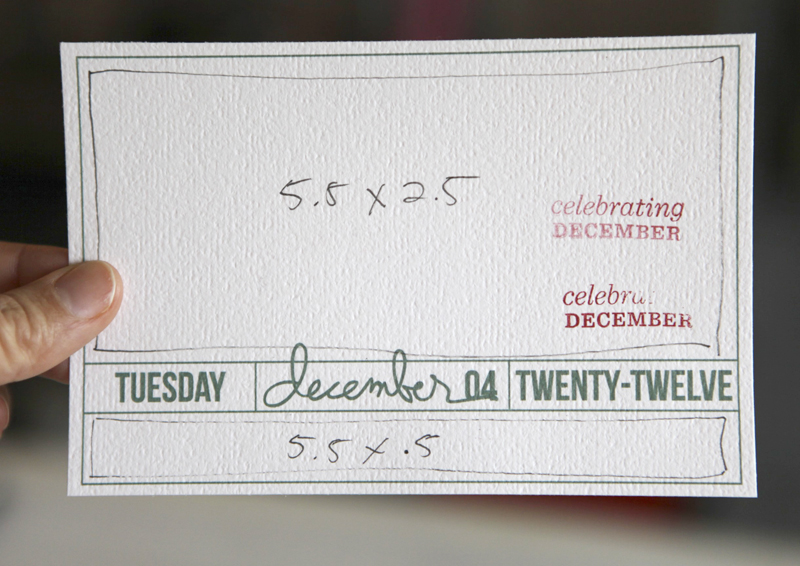
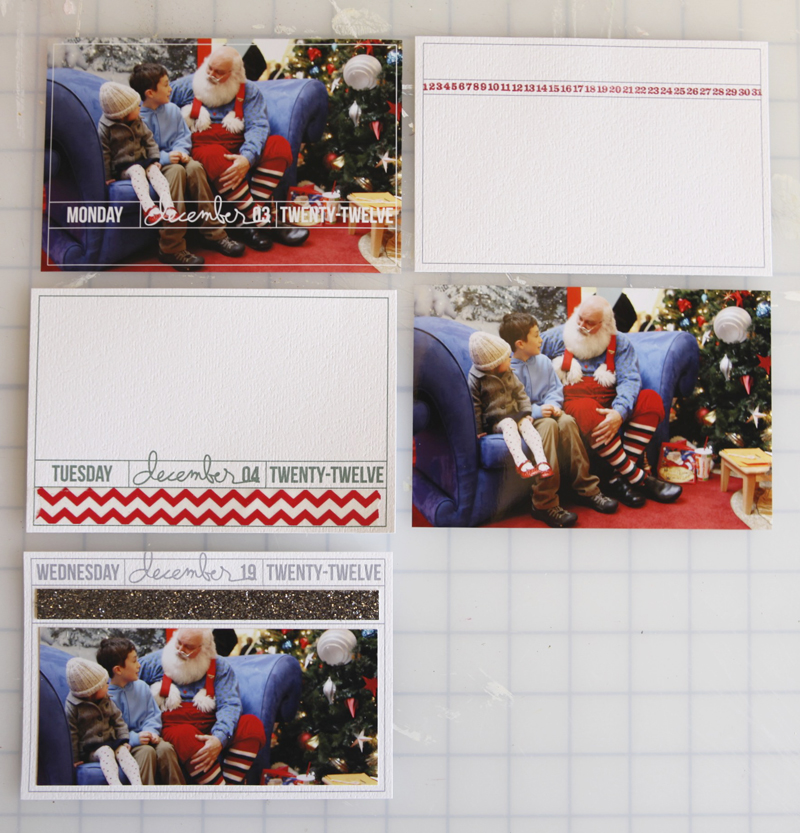
For my foundation pages this year I designed a new set of 4x6 overlays that can be easily printed or added on top of a photo before printing.
I've been doing foundation pages using printables for the last few years and what I love about this is it takes some of the guess work out. I establish a base foundation and I build from there. Some days I just print a photo, add some text into the pre-printed 4x6 card and call it good. Other days if I feel like doing more I have space to play - add letter stickers, pattern paper, multiple photos, etc.
The 2012 4x6 December Daily™ set includes two designs - a top and a bottom (I mixed them up in mine) and printable PDF files in black, red, gray, and green.
The 6x8 and 12x12 versions will be available later this week. Please note that the 12x12 version does not include PDF files. The 12x12 can be easily re-sized to 8x8 or 6x6 if that is the size you are choosing for this year.
Here's what the PDF looks like when you open it:

I printed them out on white Bazzill cardstock (both gray and green). Even if I don't use them all I could slip some into Project Life.
Here's a little map that might be helpful if you are going with the 4x6 size too:

Here's a look at a few different ways you can bring these together:
The package includes PNG files that can be added on top of a photo before printing. It also includes a blank file (no days or dates) that I used in the above image to just stamp a number line.
Most days I imagine my pages will look something like this:
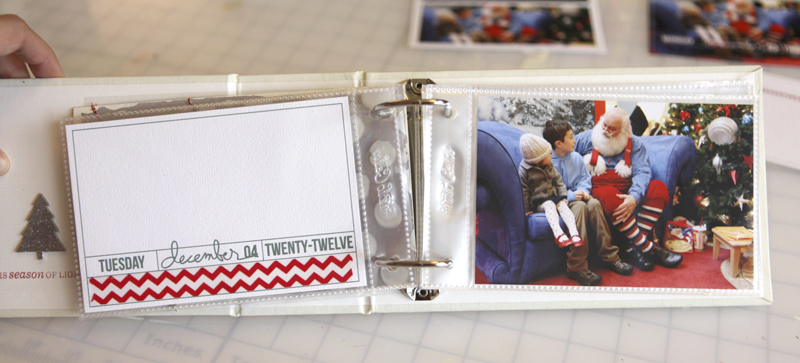
4x6 card in one pocket - most likely for journaling with a photo on the facing page. I most often do a spread but like having the option to do just one page too.

Above you can see that blank card again (included with the 4x6 set) where I just stamped the numbers. Lots of options here.
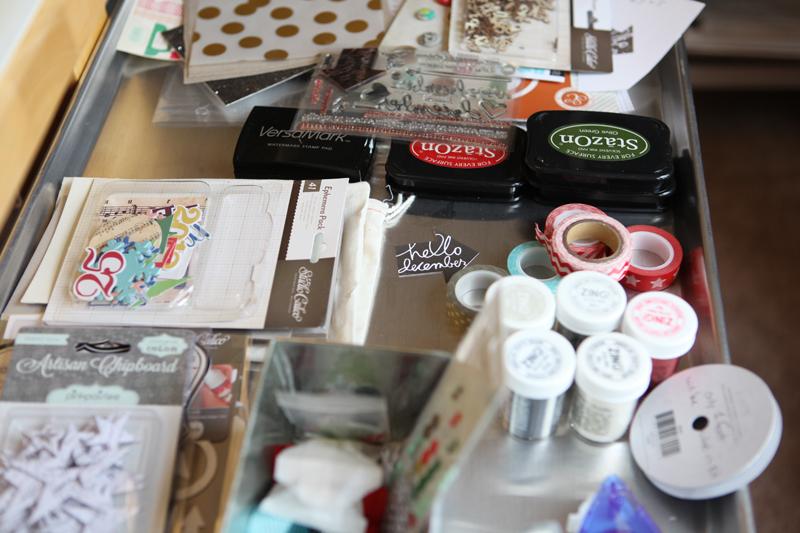
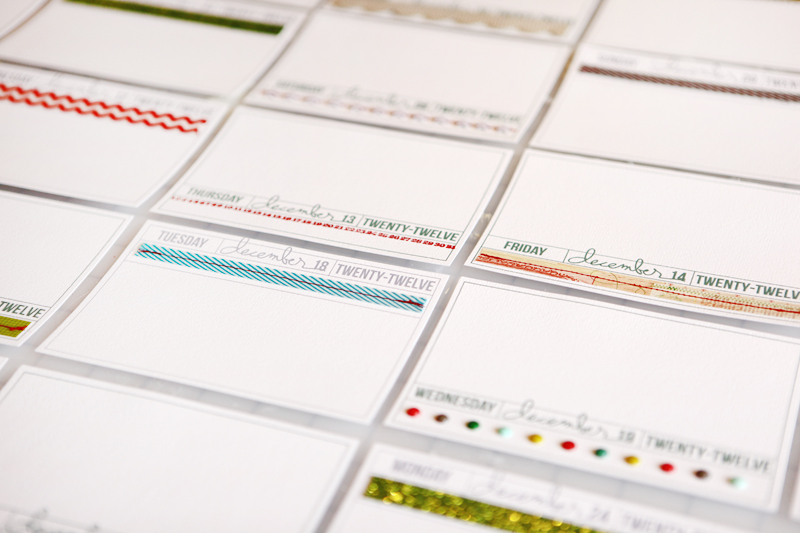
And here's a look at all the 25 days I've set up in advance, mainly using a combination of washi tape, strip stickers, small embellishments, strips of pattern paper and ribbon:

Again, a super simple way to set myself up for documenting December. Here's a quick video overview:
December Daily™ 2012 from Ali Edwards on Vimeo.
SUPPLIES
Click on the images to link to the products.
2012 DECEMBER DAILY™ BANNER
Feel free to add this to your site (the code is listed in the box below):
Please drag the banner onto your desktop. From there you can upload it to your blogging software and link to: http://aliedwards.com/2009/12/december-daily-compilation.html
Follow the conversation on Twitter with hashtag #decdaily
Share your work in the 2012 December Daily™ Flickr gallery.


Comments
Sign in or sign up to comment.
183 comments
I really love what you did with the spine and inside cover, simple and beautiful! I'm new to the scrapbooking and paper crafting world and I just looked through your DD compilation, very inspiring!
Replies
Sign in or sign up to reply.
I'm excited!!! OMG!!! Just a quick question, on the overlays, can you change the dates on previous version or I need to buy this years overlays? Thank you for the inspiration, can't wait to work on mine.
Replies
Yes :) On the larger size ones from last year you can delete the date and retype in the new date
Great question bc I LOVED last year's and would love to be able to use that version in the future.
Sign in or sign up to reply.
I love this time of year! I have been waiting patiently for you to show us the foundation pages. I splurged and bought the SC kit this year and I am sooooo glad I did! I love it! I can't wait for it to arrive so I can start to build my album. Looking forward to trying some new techniques too this season. I know it is going to be a fun month! I even bought the designer digital kit too!
Thanks for starting this tradition for me - this is one thing that I really look forward to each year. I think my first photo may actually be one of all of December Daily's :)
Replies
Sign in or sign up to reply.
Hi Ali,
Do you know any other places that sell the 4x6 horizontal album? I have looked online after purchasing the set and now I can't find the album! Ugh. I was going to print them all of blank 4x6 white PL cards. Any ideas? Thanks so much!!
Replies
Sign in or sign up to reply.
Ps: it doesn't have to be the same album, I can't find ANY similar album. :(
Replies
Hi Crystal,
Here is a similar album From Prima
http://bit.ly/YCFEfr
Sign in or sign up to reply.
Ali - is the kit in the SC kit the same as at technique tuesday?
Replies
you answered me on twitter thanks :)
Sign in or sign up to reply.
Love it Ali and thank you for the video! Always enjoy seeing (and hearing) your thoughts and process.
Replies
Sign in or sign up to reply.
Wow! I love what you have come up with this year! I am not doing a DD but will be adding many of your ideas to my Project Life album. Quick question: I don't have photoshop. Do you know if the PNG files can be used in Picasa? I was hoping to use the 4x6 overlays but I think I might have to print out the PDF file out on maybe a transparency and use it that way....
Replies
I"m not sure, I've never used Picasa. Does anyone else know?
Sign in or sign up to reply.
I was so happy to read this post. :) Very excited to get my kit and start my foundation pages.
Replies
Sign in or sign up to reply.
I am so excited for Christmas. This year I will be doing my first DD and can't wait for my kit to arrive so I can get started. I will also be starting a new tradition this year with my son that I read on your web site yesterday from a prior year's post, wrapping Christmas books and opening them as part of the advent calendar. This weekend I will start rummaging around the bookcases to see what books we already have. One of my favorites is "The Christmas Star" by Marcus Pfister, better known for "The Rainbow Fish". In this story you follow the shining star as it guides shepherds, kings, and all the animals of the forest to the stable where the Holy child lies.
Replies
Sign in or sign up to reply.
Love your foundation pages Ali. I love, love, love this project so much! This is my fourth year doing December Daily. The sad part is I have never finished one. This year is going to be different. I am going to simplify and go smaller. I know I can do it...so excited!!!
Replies
Sign in or sign up to reply.
Oh darn you Ali Edwards - just when l thought l could probably give December Daily a miss this year.....you come up with such a super cute and easy format. :-)
Tonight l'll be digging out my Christmas stash in preparation.
Really appreciate the easy approach and size. 6x4 albums are easy to come by - right across the world.
ChrisyC
Australia
Replies
Sign in or sign up to reply.
Love your foundation pages! I was hoping to do it this year but missed the Studio Calico kit. However, I might do it still - digitally :)
Replies
Sign in or sign up to reply.
Love this! I'm a total newbie to scrapbooking and DD, so I love all the details you've provided. And I can't wait for my SC kit to show up!!!!!
Replies
Sign in or sign up to reply.
hi ali, i saw that your email came across early this morning, but i waited to read it and watch the video until the boys were all in bed. OMG! everything looks amazing! thank you for your inspiration! i cannot wait until my SC kit arrives. i love how simple and elegant your foundation pages look. still turning over ideas in my head, but simple and elegant may win... so that the project is done. :) thanks again!
Replies
Sign in or sign up to reply.
What a beautiful foundation! Love what you have done with the cover. I am wondering what you used to adhere the trees to the cover? Also, do you have any tips for stamping on the cover?
Replies
Hi Beth,
I used red line tape for adhering the tree to the cover.
My only tip would be to just practice on a similar paper/fabric if you can, to know how the stamp is going to come out. Make sure you use StazOn for the ink.
Sign in or sign up to reply.
adorable! love the tiny, simple look for 2012
Replies
Sign in or sign up to reply.
Hi Ali,
I love this project and have been doing it for the past couple of years. Not only is the album fun to put together but it inspires me to seek out fun activities and holiday traditions to document. The holidays are sometimes difficult for me and this project helps me stay in a happy frame of mind and provides the momentum to seek out positive experiences. It really has such a positive impact on not only my life but on my family's as well. I can't thank you enough for that.
lisab
Replies
Love that :)
Sign in or sign up to reply.
Ok I have to admit I was really not sure on the whole 4x6 size, even after seeing your pictures. But I actually got time to watch the video today, and I'm sold! One less bit of fuss, so I can spend more time enjoying the things that matter most during the holidays.
Replies
Sign in or sign up to reply.
I love what you've done with your album, Ali! I brought the 4x6 templates, and I plan on using a little 6x8 album with divided page protectors that have 2 4x6's in them, and maybe some standard 6x8 pages. You're album is always so inspiring, and I can't wait to get these printed over the weekend so I can start decorating them with patterned paper!
Replies
Sign in or sign up to reply.