December Daily® 2022 | Crafting With Krystal 04
Tags:
Hi friends! Krystal here, back again with a recap of my next Crafting Life with Krystal - December Daily Edition recap!
This mini-series is composed of a weekly Live video on the December Daily Facebook Group. This live event takes place each Thursday at 12PM ET throughout the month of September.
This week, our product topic was embellishments, papers, and stickers. If you missed the video this week, you can check that out below.
LET’S RECAP
In today’s video, we discussed different ways to use the various shop products (embellishments, papers, & stickers) for a wide variety of page designs. Let’s go through each product individually and talk about design ideas.
My hope is to give you ideas that you can translate into your own projects this year - helping you to love + use all the beautiful components of the 2022 December Daily collection.
1. 3X8 JOURNAL CARD SET
The 3x8 Journal Card & Transparency Set includes a set of eighteen 3”x8” journaling cards. The cards come pre-punched to easily add them into any 6-ring binder… but can be used in a ton of different ways beyond that! Here are some ideas for how to incorporate these 3”x8” journal cards into your album this year:
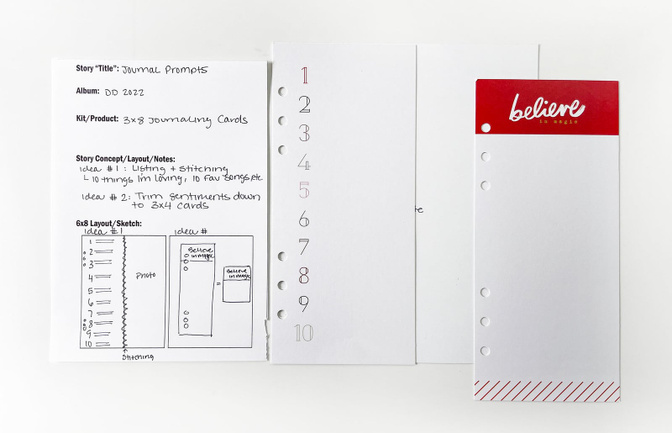
Turn the 3x8 cards into a full page design by attaching (adhering with tape OR stitching) a photo to the edge of the journaling card. Add a 7x8.25 photo to create a 10x8 page OR add a 3x8.25 photo to create a 6x8 page.
Trim the sentiment cards down to create additional 3x4 journaling cards.
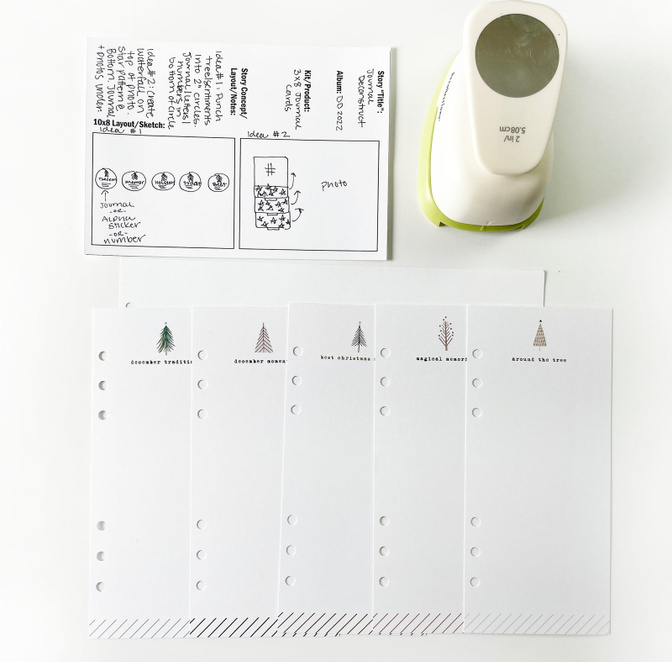
Use a 2” circle punch to punch out the five cards with trees/sentiments. Use these as a repeat element, journal on the bottom section, or create layered embellishments.
Use the repeated patterns (stars, stripes) on the bottom section of journaling cards that are then turned into a waterfall element. Or, use them on multiple cards to make everything look cohesive on the page.
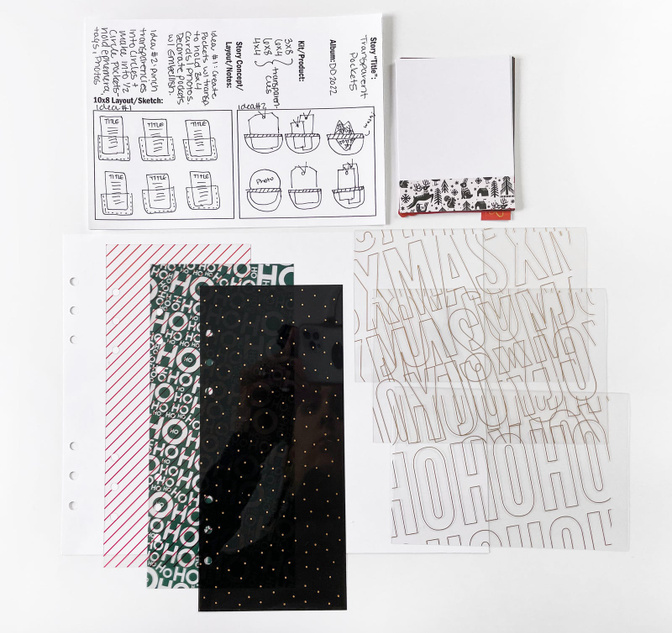
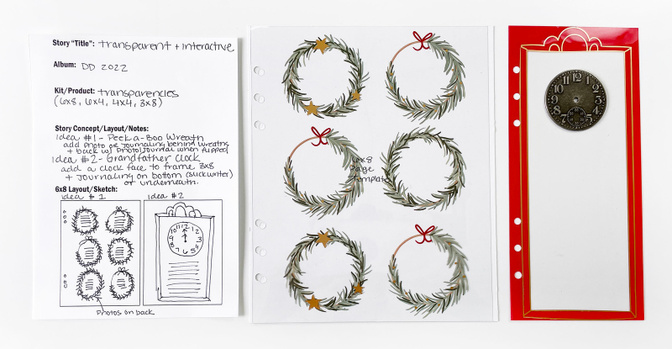
2. TRANSPARENCIES
In the 2022 December Daily collection, you can find transparencies in all different sizes. You can find 3x8 transparencies in the 3x8 Journal Card & Transparency Set, 4x4 and 6x4 sizes in the Transparency Journal Card Set, and the 6x8 size in the 6x8 Transparency Set. Here are some ideas for how to use these different transparencies this year:
Create a Peek-a-Boo effect using the 6x8 wreath transparency. Add journaling behind the six wreaths and back the journaling with a photo - both cut into a circle shape. You will get a peek at the next page/story in the transparent space around the wreaths.
Add a clock face (image, cut file, embellishment) to the 3x8 frame transparency. Use the bottom section to add in journaling.
Layer transparencies on top of tags (black or white) to create more design.
Fussy cut small images from transparencies (santas, frames, wreaths, etc.) and use as an embellishment OR to create confetti for shaker pockets.
Punch transparencies into 2-3” circles. Cut the circles in half and stitch the bottom half to a patterned paper, only around the curve. Add an embellishment on top of the transparent half circle and store anything you like into the pocket (ephemera, tags, photos, journaling, etc.).
Cut transparencies down to 3.5x2 rectangles and stitch around sides + bottom to a page. These become pockets for storing 3x4 journaling cards/photos. Embellish for added interest or add numbers/titles to top of pockets.
Fussy cut the transparent trees from the 3x8 and 6x8 sets. Combine with other transparent trees for more options.
3. FELT PRESENTS
Next up are the felt presents. These embellishments are super fun to play with and bring such a cool dimensional/textured look to a page. Eight presents are included in the pack, with varying sizes and colors. Here are a few ideas for how to use these on your layouts this season:
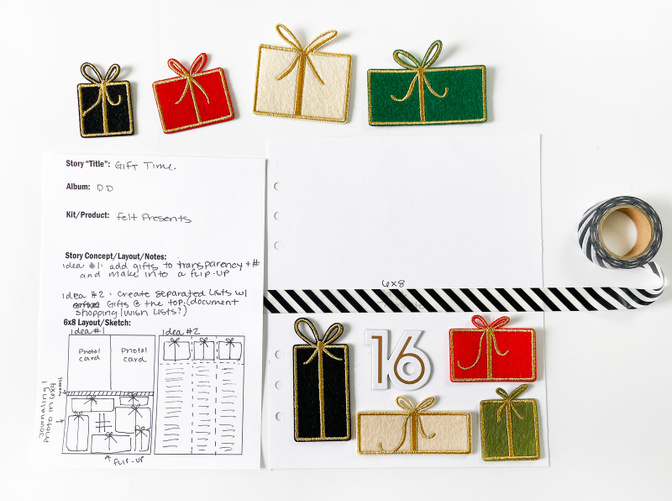
Add the felt presents (along with a number) on top of a 6x4 transparency. Adhere to the top of a photo/journaling card using washi tape and create a flip up element.
Create separated lists using the gifts as the column toppers. Could be a great way to document wish lists or shopping lists for the season.
Add as an embellishment to a layered tag for more texture.
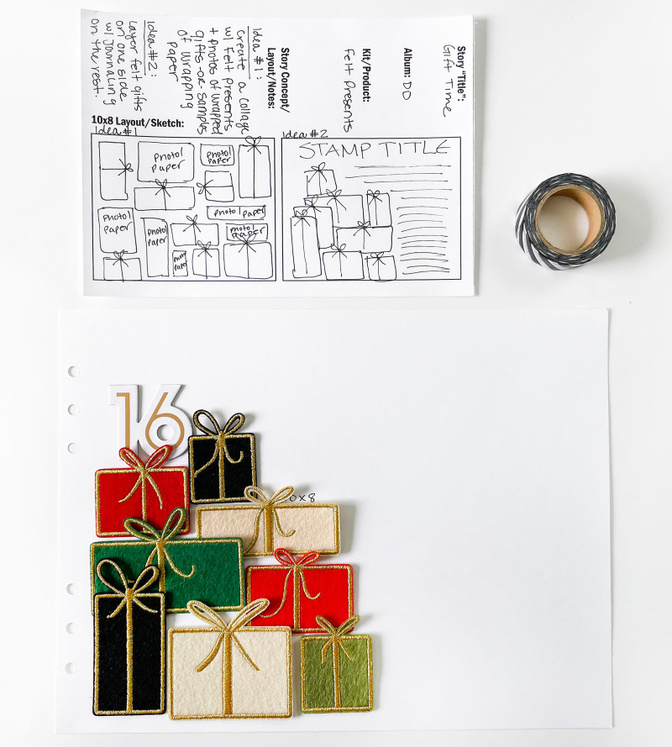
Create a collage using the felt presents, stamped presents, present die cuts, vellum present tag, photos, and/or wrapping paper samples.
Layer the felt presents into a pile on a page. Add title/journaling around the outside of the gift pile.
Add a brad into the bow portion of the felt gift. The present could swivel to reveal hidden journaling/photos.
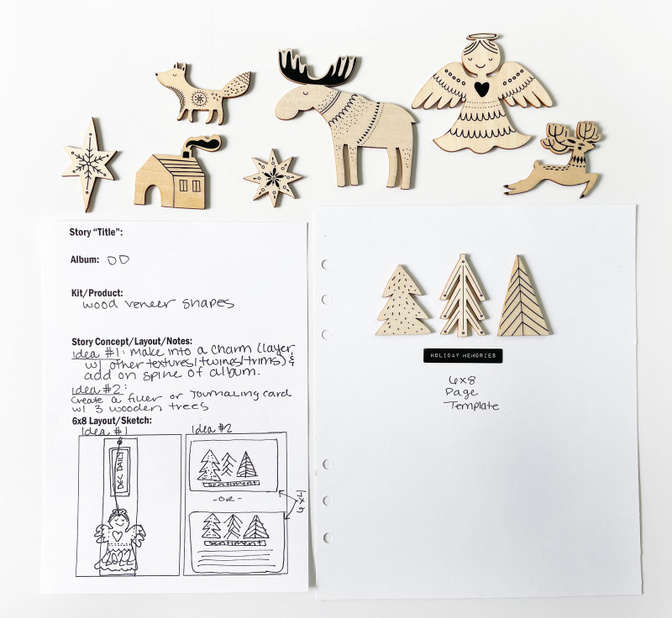
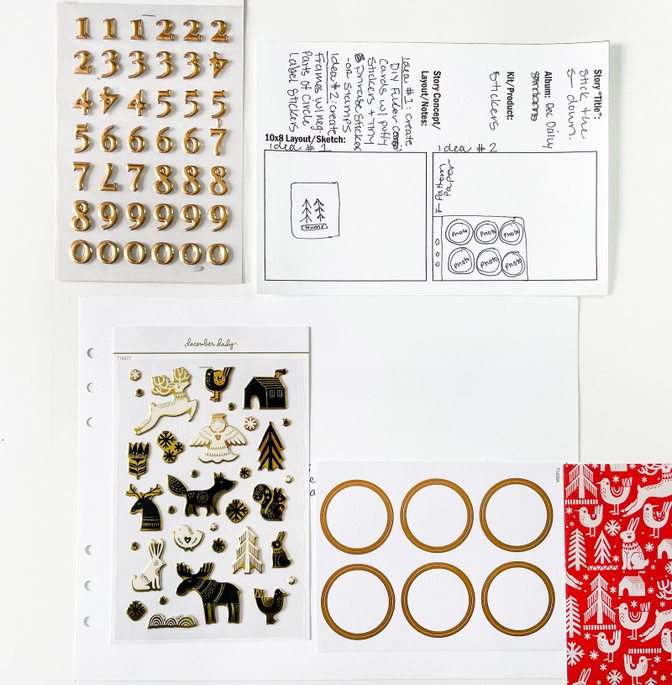
4. PAINTED WOOD VENEER PACK
The Painted Wood Veneer Pack is another awesome product for including different material/texture in your layouts. Adding wood to your projects is a great way to help ground the page and give it a natural feel. The icons/drawings in the pack this year are darling and can be used in a lot of different ways. Here are some ideas for how to use the wood veneer in your projects this year:
Add a piece or two to the bottom of a tag/journaling card as an embellishment.
Punch a hole in a wood veneer piece and (along with other twines/trims/textures) create a charm to hang on the spine of your album.
Add the three wood veneer trees to a 6x4 card and pair with a tiny phrase sticker or plastic phrase to make a DIY filler/journaling card.
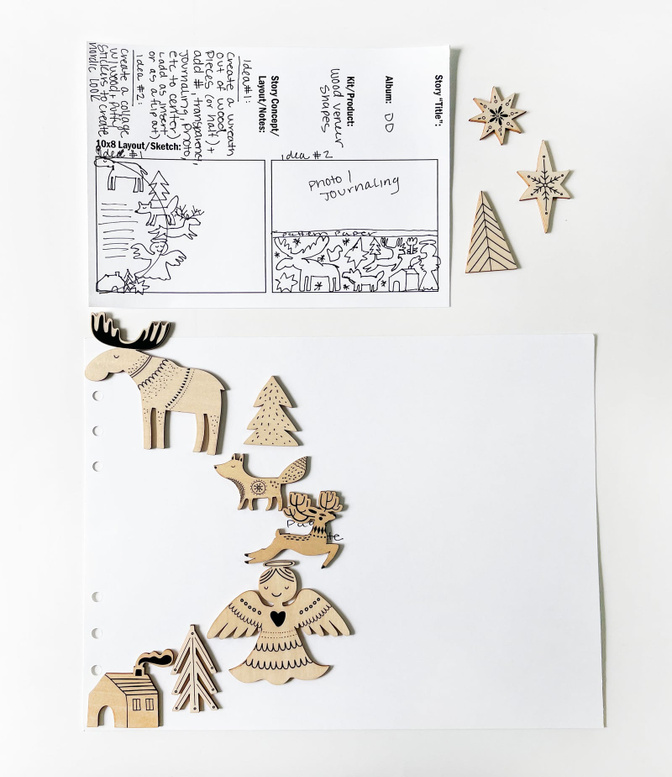
Create a wreath shape with all/most of the wood veneer pieces. Add to the outside of a circle/half-circle photo, journaling, or transparency.
Create a collage of the nordic-looking icons on the bottom half of a journaling page. You can bring in some of the puffy stickers that use the same shapes/designs. Think “nordic sweater” vibes.
Use wood veneer pieces as bullet points, journaling starters, or in a grid type layout.
Flip wood veneer pieces over and emboss/stamp in different colors to create custom wood shapes with your own color scheme.
5. RUBBER SHIPPING TAGS
Rubber is a texture I’m super happy to see back again this year. I really love how vibrant and detailed these pieces are. While the Rubber Tags are dimensional and I would caution against adhering directly on top of a photo, I do have a ton of ideas for how you can use these beautiful pieces this year. Here are some ideas:
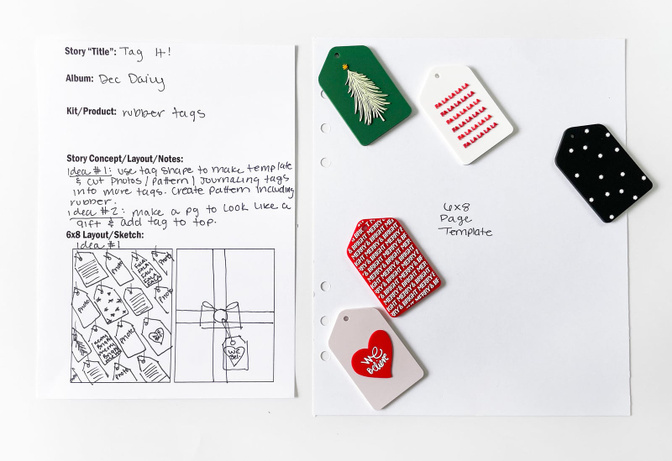
Use the tag shape as a template and cut more tags from patterned papers, photos, journaling cards, blank paper (to journal on), etc. Then, use all of the shapes, rubber tags included, to create a repeat patterned page with the tag shapes.
Create a page that looks like a gift and use the tag as an embellishment. Could make the page open up to reveal photos, journaling, etc underneath.
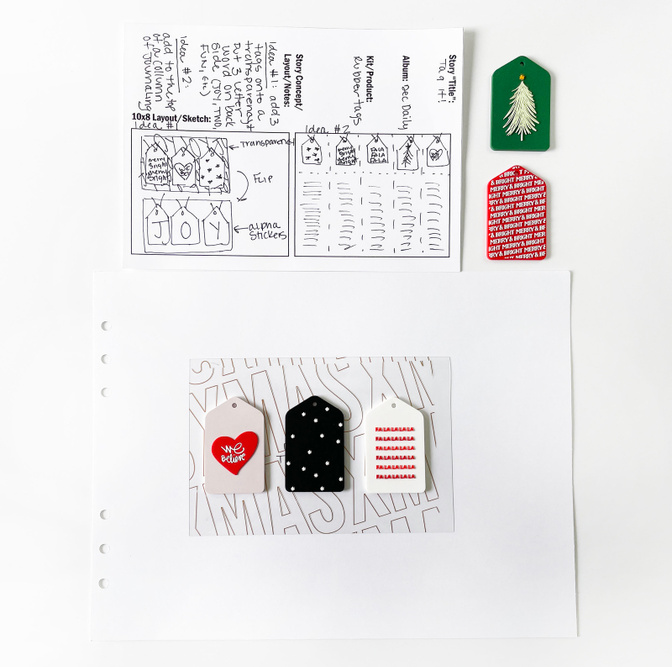
Add three rubber tags to a 6x4 transparency as a filler card. Use the back side to add alpha stickers that spell out a word for the next story. Could spell out a title OR a number.
Use the tags in a grid layout where the tags are at the top of five columns and have journaling/photos/etc underneath.
Tie the tags around a large felt number as an embellishment.
6. DIMENSIONAL PUFFY SANTAS
These Dimensional Puffy Santas are so super cute! I love how they can add to a page as an embellishment or serve as the main feature. Here are some ideas of what you can do with these:
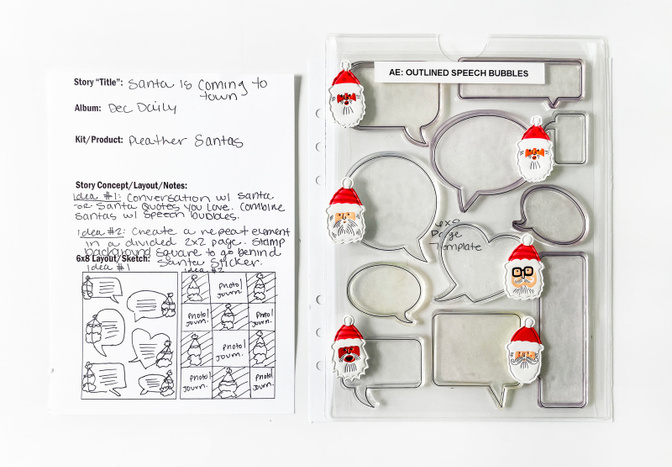
Use the Santas in combination with the Outline Speech Bubble stamp (or speech bubble die cuts you may have on hand) to document a conversation with Santa OR your favorite Santa quotes.
Create a repeating element for a grid layout by adding Santas to a stamped/patterned 2x2 square and alternating in a 2x2 page protector.
Add as an embellishment to a tag/journaling card, layered with other textures.
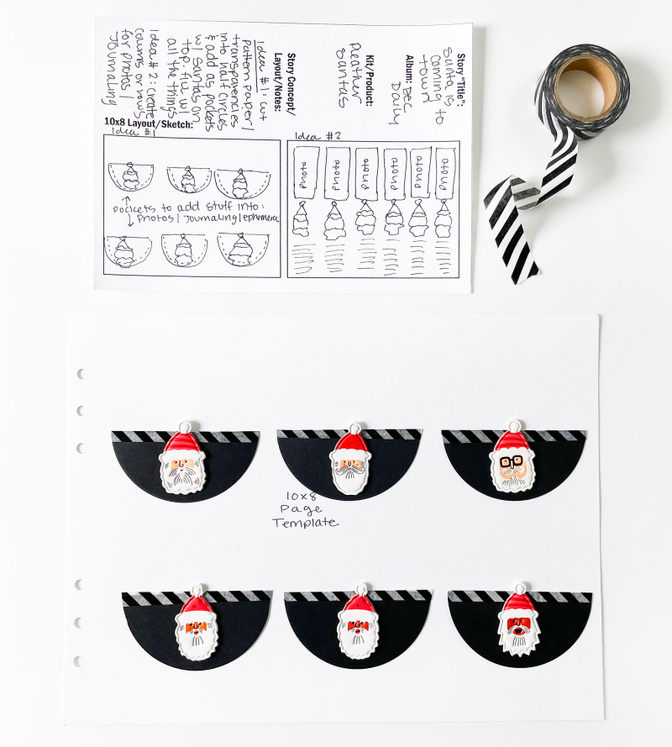
Punch patterned paper into 2-3” circles. Divide in half and add ½ circles to a page as pockets. Embellish the pockets using the Santas.
Create a grid layout using photos, Santas, and journaling.
Create your own DIY filler card by adding Santa(s) and sticking/stamping a phrase underneath.
7. STICKER SETS
The 2022 December Daily collection includes a few different sets of stickers; including Puffy Number Stickers, Circle Label Stickers, Woodland Puffy Stickers, and more. Here are a few ideas for page designs including these stickers:
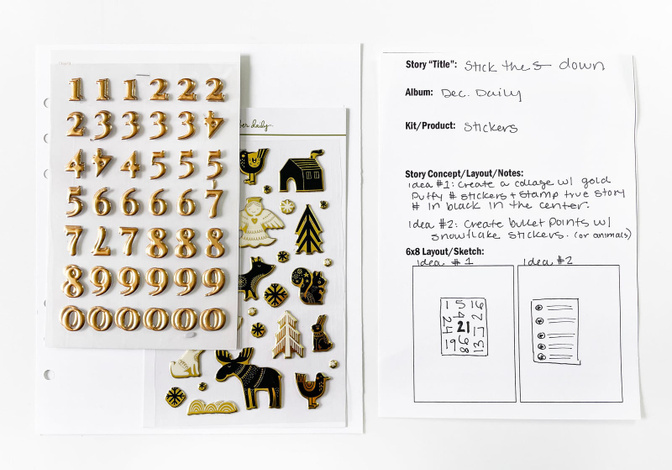
Create a collage of the gold puffy numbers. Stamp the true story number in black ink (or emboss in a different color than gold) to create a number title card for your story.
Use the snowflake icons from the Woodland Puffy Stickers as bullet points for smaller journaling cards.
Use the woodland puffy stickers and create a nordic sweater looking page/design.
Combine the puffy tree stickers and a stamp/plastic phrase/tiny phrase sticker to create a filler card.
Use the negative portion of the circle label set as frames to go around photos/journaling.
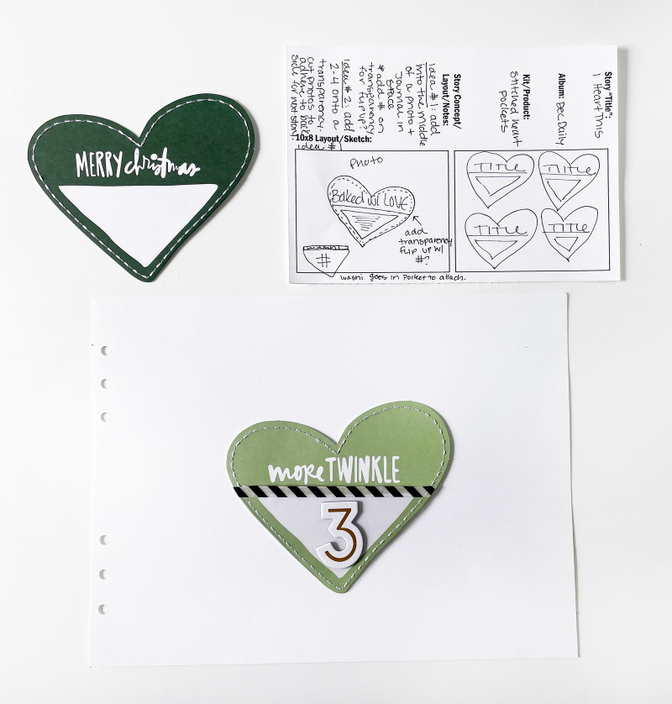
8. STITCHED HEART POCKETS
The Stitched Heart Pockets make such a statement on a photo/page. I love the variety of stories these can help tell and can’t wait to have a page featuring one of these in my album this year. Here are a bunch of ways you could think about using these pockets in your own album:
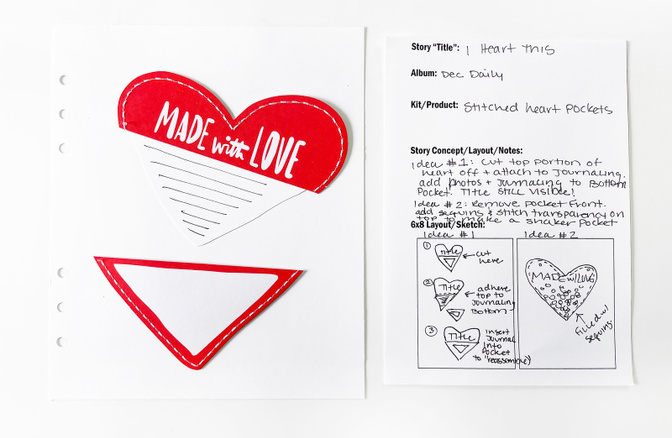
Cut off the top portion of the pocket - separating the title from the pocket. Attach the top/title portion to white paper and trim down to the pocket/bottom portion shape. Add journaling to the paper and slip inside the pocket to “reassemble” the stitched heart back together. Add additional photos, journaling, etc behind the title for more functionality.
Remove the front pocket portion from the heart. Stitch a transparency to the full heart with sequins tucked inside for a fun shaker pocket element.
Print photos/journaling shaped like the hearts and add them into pockets.
Add heart into the middle of a blank page and journal around the outside - in the shape of the heart - for a really cool effect.
Add the pocket heart into the center of a full page photo and journal in the white bottom pocket space.
Attach a transparency onto the bottom of the heart (by adding washi to top of transparency and tucking into pocket). Place the story number on top. Transparency flips up so the journaling space underneath is still usable/readable.
Add 2-4 onto a single page to create a collage look - add on transparency and print/cut heart shaped photos to adhere to the backside of heart pockets.
Combine all heart pockets, along with heart shaped photos - made to fit on the backside of hearts, to create a mini book of memories for the season. (Could make a really great gift for a loved one.)
CONCLUSION
One of the things I love most about many of the shop products in the 2022 December Daily collection is the ability to add in different textures, materials, patterns, and more to my album. I’m especially excited to use those tiny dimensional santas and the stitched heart pockets from today’s video, and can’t wait to see what other ideas surface from our community over the next few months. Is there an add on that you are excited about using this year?
Today, I want to leave you with a challenge to help you think ahead about how you want to use some of the shop products/add ons you put into your December Daily box this year: Take one of the ideas presented in today's video/blog post and create a page sketch idea of your own. Store this with your December Daily supplies to pull out when your products arrive OR when you are documenting your December memories this winter.
I’m going to be back in the December Daily Facebook Group one last time this coming Thursday 9/29/22. I hope you’ll join me live at 12PM! (The video will be recorded and I will include a blog post as well recapping our live session.)
Until then friends, have a great day!


Comments
Sign in or sign up to comment.
3 comments
Great inspiration ideas, as always!
Replies to rhondawilcox
Sign in or sign up to reply.
You never fail to amaze me!
I will purchase most of these items digitally (except for the felt presents, which I just had to have in physical form), and many of your ideas can be used for the hybrid pages I am planning. When I look at the 3X8 red-framed transparency, I see a door! I could use that as an introduction to Christmas at home. Having the pngs means I can fill in the holes on the left with red.
Replies to mecastro
Sign in or sign up to reply.
Yes it would be good to see the paisley press kit in action. Loving these videos. Thx
Replies to minkaclark
Sign in or sign up to reply.