December Daily® 2024 | Special Guest Jen Wong
Tags: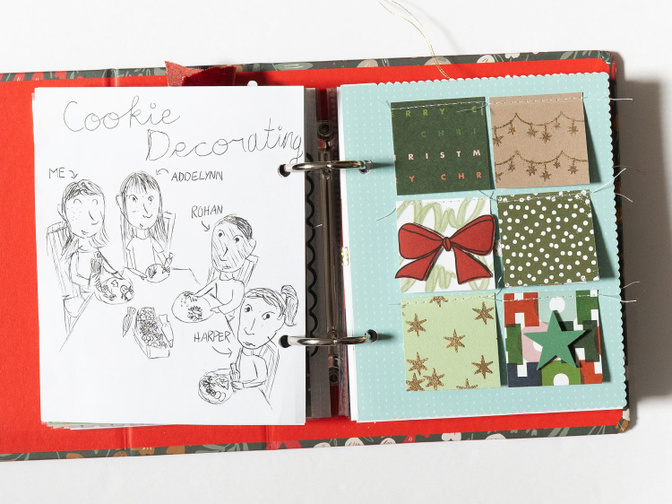
Hello, friends! I’m happy to be back to share more ideas for creating a December Daily album for kids. I’m using the vertical 4x6 album this year to prepare an album for my 9-year-old daughter. I want to include lots of fun, interactive elements and make it easy enough where she can just slip in photos, some short journaling, or a drawing. In case you missed the first blog post where I talked about my strategy and approach, you can find it here.
Although I’m using the smaller 4x6 album, all of these ideas can be adapted to one of the other album sizes and can also be used for non-kid albums. In fact, I loved making some of these pages so much that they might just carry over to my own album! My daughter loves doing crafts and when she found out that I was going to make a December Daily album just for her, she wanted to help with the preparation! Having your little one make their own pages is a great way to have them participate and get excited for the project. She’s so proud of the pages helped make. I’m sure seeing one of them later in the month will also help keep her motivation high.

Not a surprise, but she really wanted to play with the stencils! She inked up the gingerbread stencil herself and then drew faces on them with a white pen. We cut out her work and adhered the paper to some colored cardstock and then to one of the 4x6 cards from the Paislee Press mini kit.
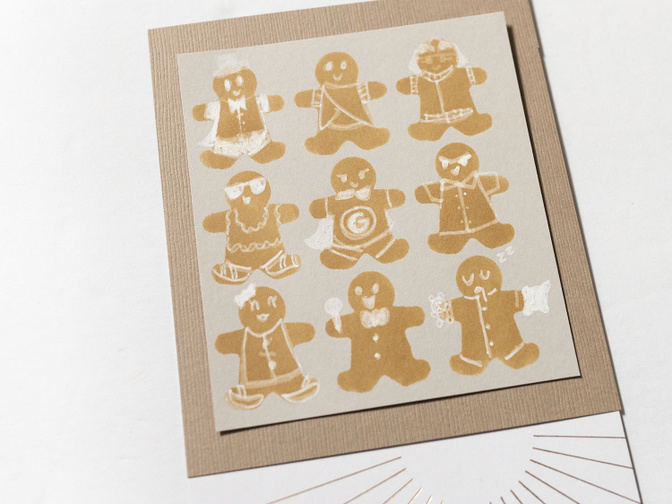
She can use this page to document some holiday baking!
She helped with a few more pages that are shown in the album walkthrough. Meanwhile, I made a few more interactive pages which I’m sharing in detail here.
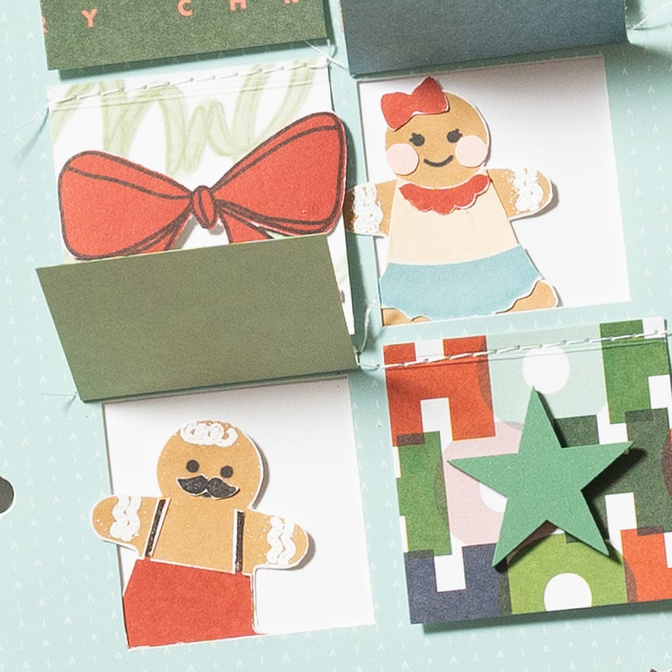
Idea 01: Gingerbread Folk with Die-Cut Insert
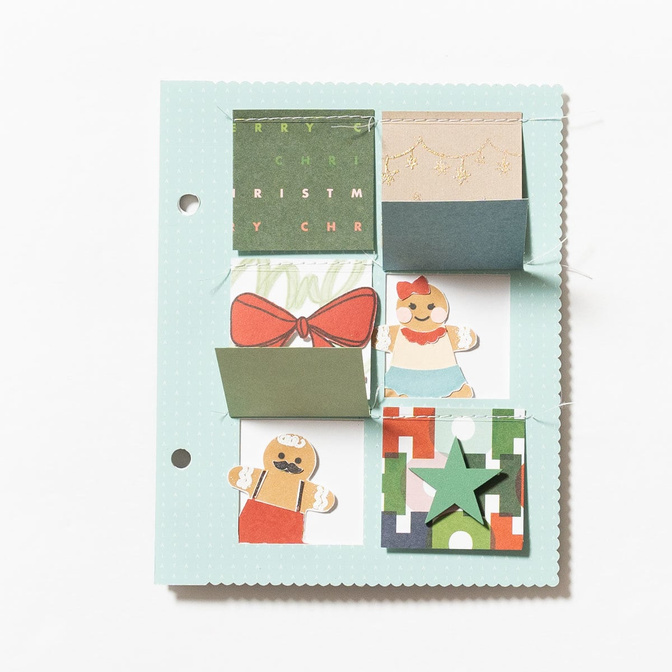
When I saw the scalloped die cut insert with the boxes, I immediately thought how fun it might be to have some gingerbread folks peeking out of them. Using the digital version of the insert, I resized it to fit the page protector size, 5” x 6.25.” I then stamped a girl and boy gingerbread. Adding clothes and the tiny details like the mustache was super fun! To make the page interactive, I cut 1.75” square pieces of pattern paper and solid colored papers from my stash, which I sewed on top to serve as flaps for the windows.
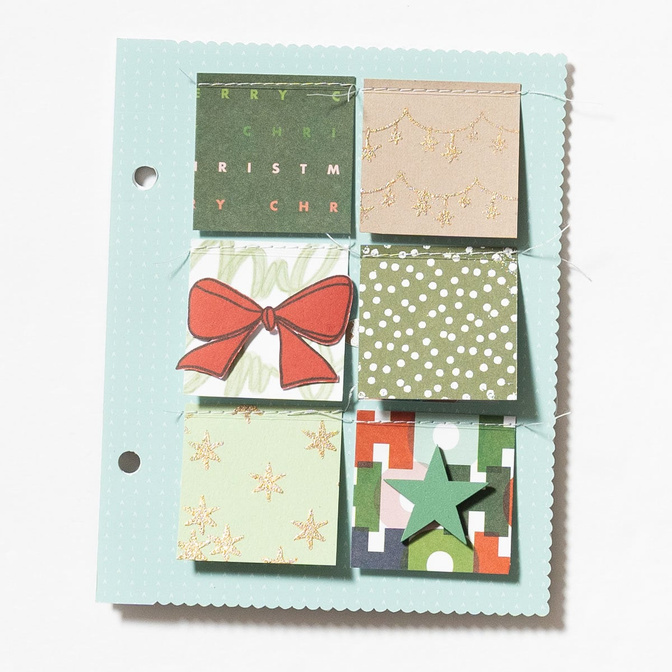
Because I wanted to play with the stamps, I used the Scalloped stamp to stamp some patterns onto the colored flaps. The patterns are embossed in gold and white.
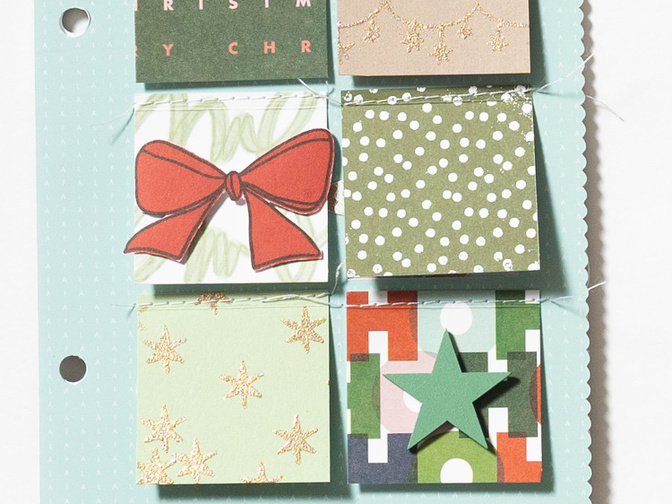
I added the gingerbread people to two of the windows temporarily and the remaining windows can be used for small photos or journaling in December.
The video below shows a closer look at how this page came together.
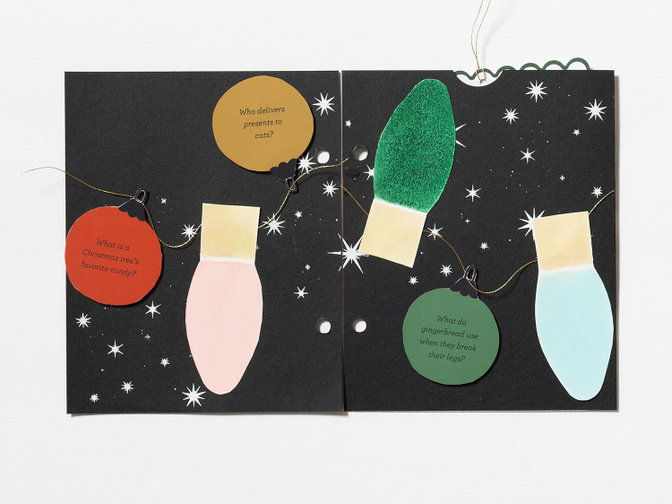
Idea 02: Scratch-off Joke page with Pocket
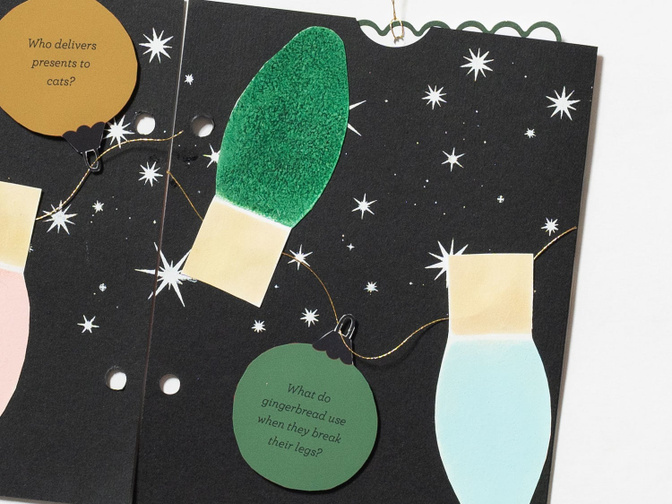
My daughter is at the age where she loves silly jokes so I made a scratch-off joke page using the light bulb stencil.
I found Christmas-themed jokes on the Internet and printed them on ornament shapes. I printed the answers out onto white cardstock and then, using the light bulb stencil, I first colored the light bulbs with ink. I placed packing tape over the inked answers so the paint wouldn’t damage the paper, and then used the stencil again with acrylic paint to create the scratch-off portion. The light bulbs and ornaments are strung with thin gold string and placed on top of black cardstock. Using the stars silkscreen with white paint, I added a star pattern to the background. To include a place for a story for the day, I made the right side into a pocket where one of the 4x4 scalloped cards resides.
You can see me make this page in detail in the video below.
Idea 03: Flip-up and Flip-out Page with 10x8 Paper
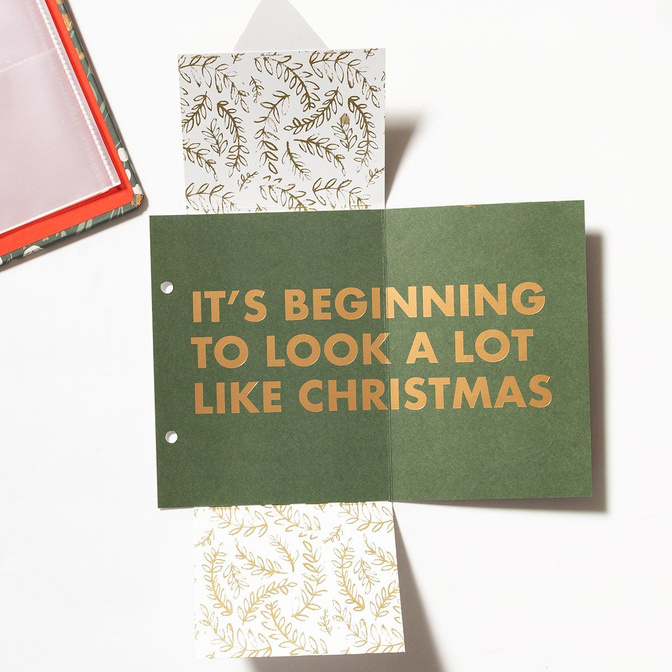
I love the large text on a couple of the 10x8 papers this year and was trying to think of an idea on how I could incorporate them into the 4x6 album. One way I decided to do this was to cut the sentiment from the middle to make a flip-out page. I cut the “It’s Beginning to Look a Lot Like Christmas” paper to 9.25” from the left side and scored it at the 5” mark so that it would flip out on the right. I also trimmed 1” from the top and bottom of the page to make it the height of the page protector, 6.25”.
To add more interactivity, I added additional flaps to the top and bottom. After cutting 2 pieces of pattern paper to 4” wide by 3.75” tall, I scored 3/8" on each end to create the flap. This size allows for some overlap with the top and bottom.
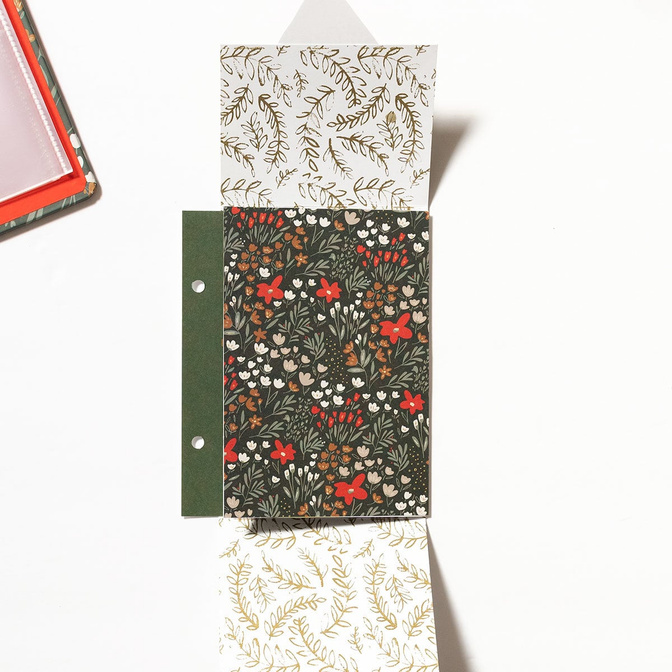
Since the papers are all single-sided, I wanted to decorate the blank sides. I used the leaf pattern silkscreen with an old AED acrylic paint in Timberline on all of the blank spaces. If you watch the video, you’ll see I wasn’t very happy with the job I did on the backside of the green paper, so I ended up covering this with the floral paper from the Paislee Press mini kit.
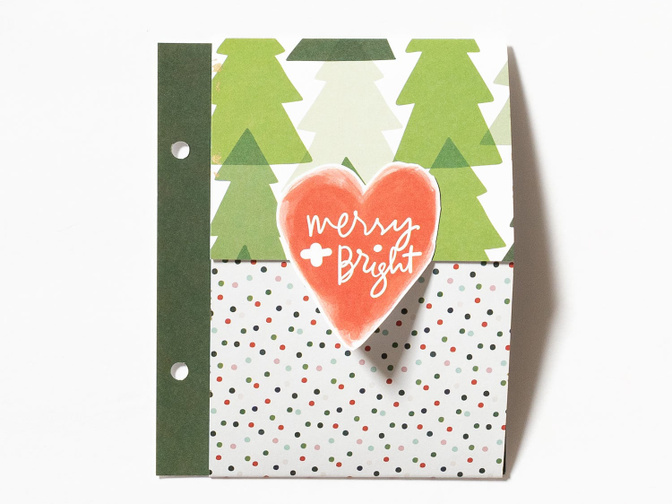
Lastly, I cut one of the watercolor hearts from one of the papers in the Merry Merry Paper pack and glued it to the top flap.
You can see how this page came together in the video below.
Having lots of flaps adds some play and makes it possible to include even more photos and stories!
In addition to the ideas shared above, I’ve created several more pages in the album, which are a mix of simple and interactive ones.
Here’s a look at the new pages I’ve made, starting at the place where I left off on the previous blog post.
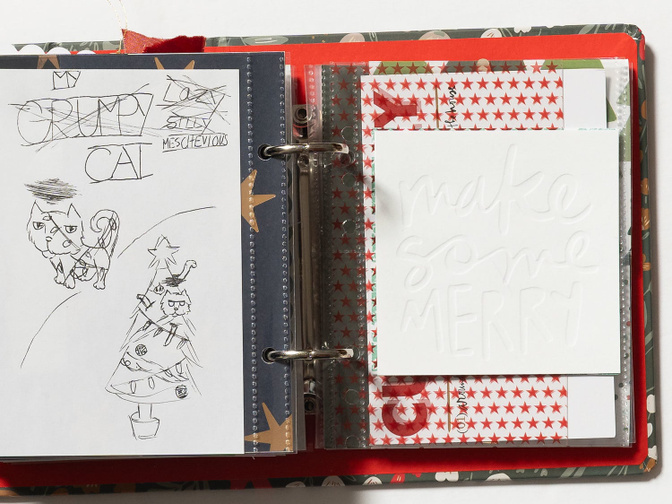
I’ve included extra photos of some of the pages from the new pages in the album below. As in the previous blog post, my daughter added some drawings to show some examples “photos” that might go in certain spots. :)
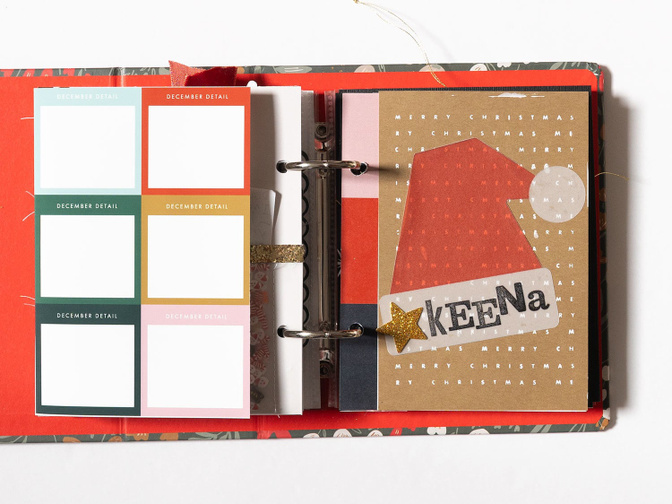
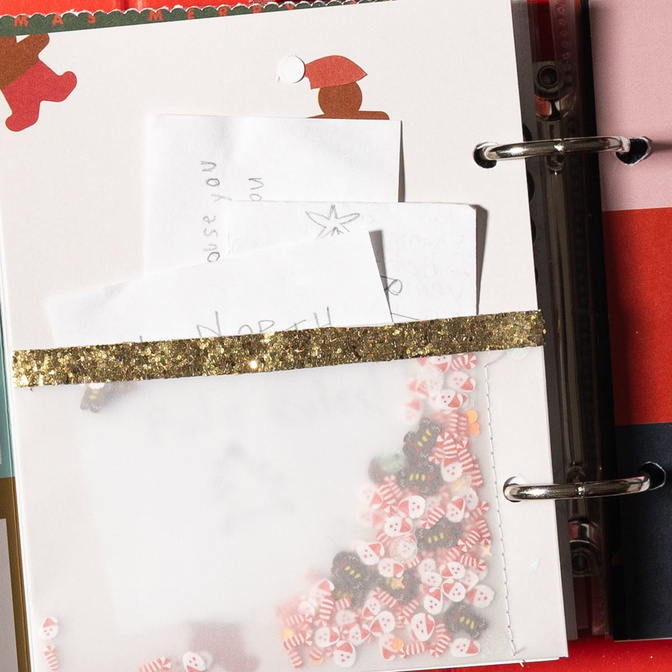
This is a double-sided flip-out page that uses the December Details prompt paper as a place where my daughter can document her elf’s daily antics. There is a shaker pocket inside to store the notes she receives from Keena, her elf.
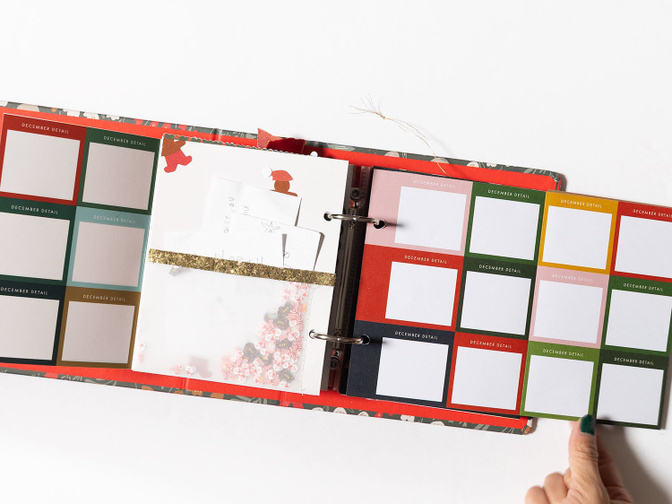
I continue to use the chipboard frames to make easy spots for photos (or drawings). Many of the 4x6 cards can be turned on their sides and used in this album.
This hybrid page is made from one of the digital papers in the main kit which will be used to document our holiday movie watching. I plan to make another one for my album so my daughter and I can play together!
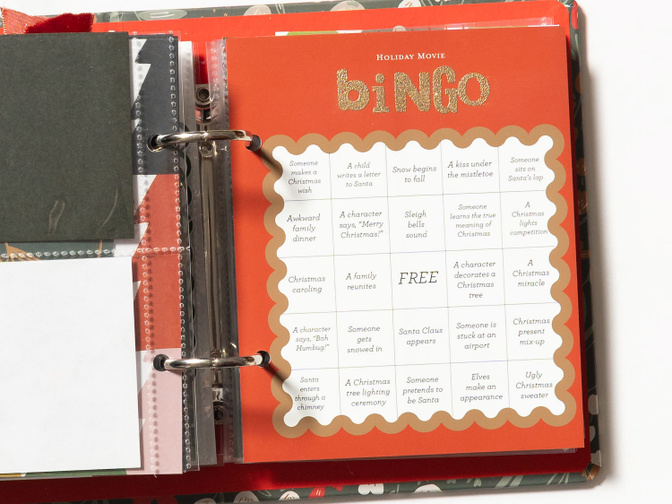
The back of the bingo card contains a side pocket which contains a 3x4 card to document the movies and date watched.
My daughter helped me with a few of the pages, including the one to document her elf shown above. She is at the age where she can do a lot of the crafting steps with some direction. She loved using the stamps, stencils, and embossing with the stencil using a die cut machine.
As I mentioned in the walkthrough video, I’ve finished around 21 pages for the album so far. I still have other ideas I want to try, but I’m undecided between finishing up the remaining pages or waiting until December so my daughter and I can work on them together.
I hope I was able to inspire you and give you some ideas! If you have any questions, please feel free to comment below. You can also find me on Instagram @circleplusarrow or YouTube @circleplusarrow. Happy December Daily!


Comments
Sign in or sign up to comment.
24 comments
Super Cute! Love all these ideas.
Replies to CraftyCat
Thanks so much!!
Sign in or sign up to reply.
this is just amazing ! already told you how much I love your daughter drawings, makes me a little sad that my girls are already grown up. beautiful ideas and great utilisation of the kits, I got plenty of inspiration from you. Thank you so much.
Replies to disneygreg82
You’re welcome! I’m so happy you got some ideas.❤️
Sign in or sign up to reply.
I love all of these ideas!
Replies to lisasproul
Thank you!!!
Sign in or sign up to reply.
I love your daughter's drawings and thank you for sharing your ideas!
Replies to asackr01
You’re welcome! She says thanks for the compliment too!😀
Sign in or sign up to reply.
Love all these ideas!! Loved Jen’s gingerbread folk die-cut insert so much, I just added that stamp set to my box, so I can copy her idea! So so cute!! Thanks for sharing!
Replies to HeatherTarrant
Yay!😀 The gingerbread stamp is a fun one and I’m pretty sure I’ll make some more of them for my own album too!!
Sign in or sign up to reply.
Thank you for sharing all of these great ideas!
Replies to reneemc63
You’re welcome! I am glad you liked them!
Sign in or sign up to reply.
Jen thanks to you and your daughter for these fabulous ideas!!!
Replies to User39396
No problem, we both had fun working on the prep here!!! :)
Sign in or sign up to reply.
This album is so cute, Jen! Great ides! Love that your daughter is having fun crafting too.
Replies to Jeannew
Thanks so much Jeanne!!! It’s really fun we can both do some crafting now.
Sign in or sign up to reply.
So fun! So many ideas for the 4x6! And I'm curious, does she know the reference for 42?
Replies to yin100
Hah, no, she was confused when she saw 42. I probably should have written something funnier but it was the first thing I thought of when I did that sample.
Sign in or sign up to reply.
This is so great, Jen! I would have adored a project like this when I was young. What a treasure for her!
Replies to Jmkane25
Thank you!! I hope she’ll treasure it someday too!
Sign in or sign up to reply.
The scratch off idea is brilliant! Thanks for sharing so many great ideas.
Replies to emeraldcity
You're welcome!!! I'm so happy you liked them!
Sign in or sign up to reply.
I'm a little late to post a thought, but wanted to thank you for such thoughtful and detailed videos. I have the 4x6 album, but will be working in an older 6x8 for December Daily. You've given me some great ideas that can be incorporated in the 4x6 for a future project. Thank you!
Replies to vanessashearer
Never too late to post a thought! :) Thank you for taking the time to write this and let me know you found some useful ideas!!
Sign in or sign up to reply.