Week in the Life : Album Creation Part One
Tags:
I definitely felt like something was missing yesterday. Having a camera attached for seven full days and then taking it away definitely made for a different sort of day.
One of the things I hoped for in doing this project again was to get back into the groove of taking daily photos. It has been awhile since I felt that desire or excitement related to using my camera daily. It definitely renewed my spark and appreciation for the everyday.
This past week I took 247 photos. That is quite a few less than when I have done this project in the past. Monday had the most photos with 83 and Sunday had the least with 14.
I spent most of my working day yesterday figuring out my formula for this album. Here's what I ended up with: two 8.5x11's (also called a spread) with one baseball card divided page protector sheet sandwiched in between. So far I have just completed the basics and plan to do a bit more embellishing (especially on the patterned paper rectangles as the week goes along) - process details to follow below:
NOTE: A lot of information follows. Take a deep breath, read through, and adopt the pieces (if you want) that make sense for how you want to put your album together. This is my album and the way I approach the process is what makes sense to me :) - everyone will be different.
Also, I work fast. Once I get going and decide on a formula I just go for it and don't spend a lot of time wondering if this is the "right" way or if I should be adding this or that. I want to get it done :). This approach is not hard, there are just steps to go through along the way.
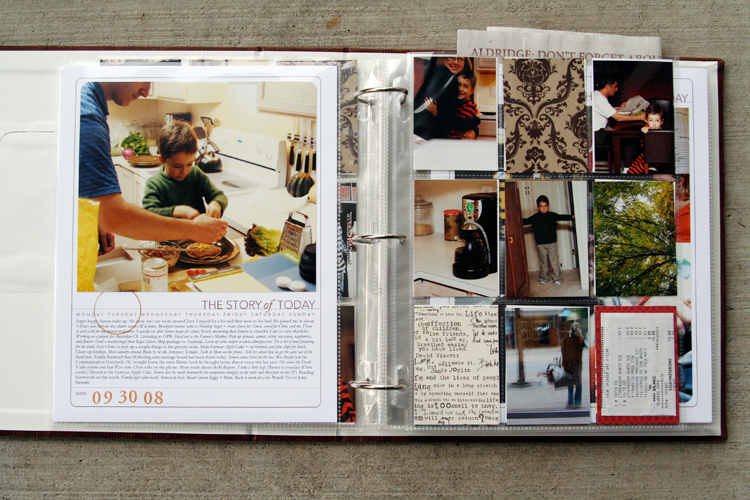
MONDAY
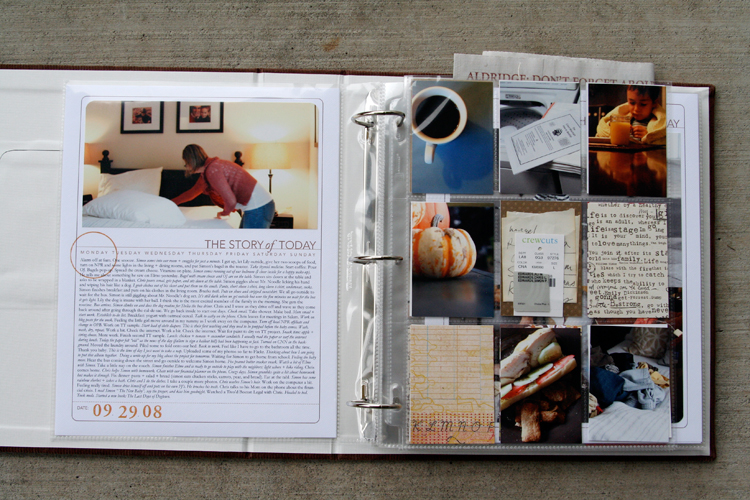
[ album: Corduroy American Crafts 8.5x11 (ended up with chestnut); page protectors: Avery Baseball Card Protectors; cardstock: Bazzill Lily White ]
TUESDAY
THE PROCESS
When attacking a project like this I prefer to do "like" things all at the same time. It's basically working in production-mode: doing things that are the same from one spread to the next all at the same time rather than finding yourself jumping back and forth.
Here's my process:
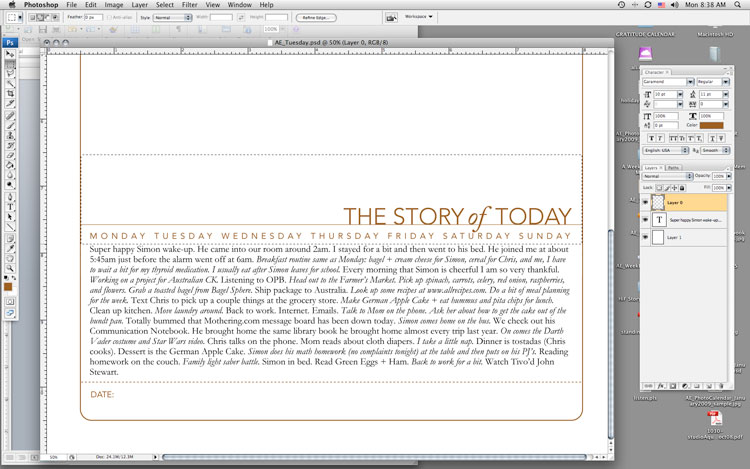
1. Print out all the daily templates (I am using the 8.5x11 Story of Today templates. A 12x12 version - that could be adjusted to 8x8 for printing at home - is also available). I added my journaling to my templates before printing them out. I simply copied and pasted from my Word document and adjusted the font/spacing/etc.
ADJUSTING THE TITLE TO MAKE ROOM FOR JOURNALING
As you will see, some pages have much more words than others. For these pages I adjusted the height of the title on the Story of Today template to make room for the journaling (this means my photos on these pages will be smaller).
Here's a look at how to change the height of the title to adjust for your journaling (images are from Photoshop CS3):
1. Type or copy and paste your journaling on a new layer (on top of the template).
2. Select/activate the template layer. Using the rectangular marquee tool, draw a box around the title, line, and days of the week. Be careful not to cut into the border as you are selecting this area.
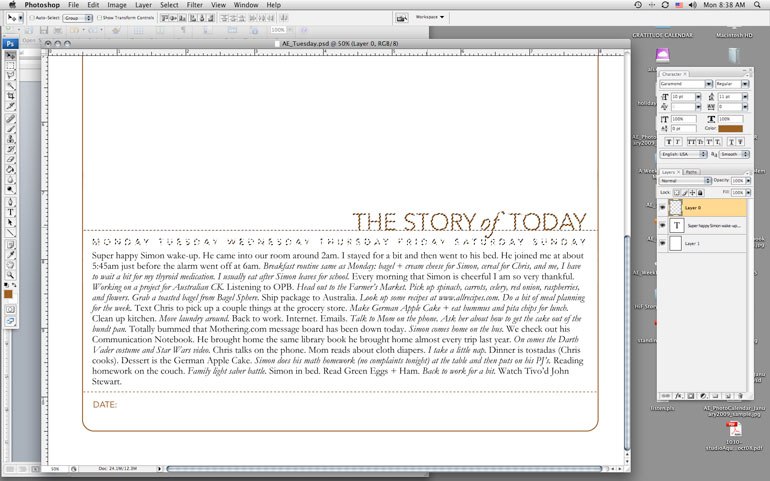
3. Switch to the Move Tool (the black arrow) and the selected area should just include the title, line, and days of the week. Use the up arrow key to move the entire piece farther up the page to accommodate your journaling.
4. Print.
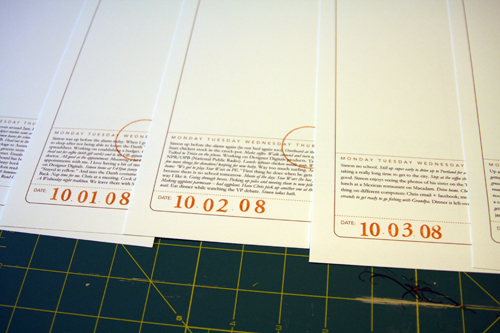
2. Add a stamped date and circle the day of the week on each of the
first page templates. Circle stamp from savvy stamps. Letter stamps are
unknown. Ink is from Stampin Up.
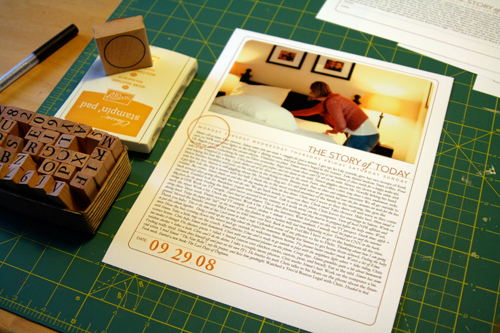
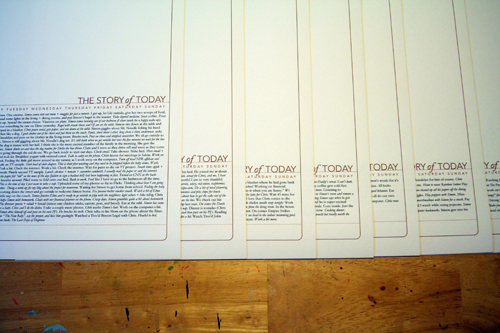
3. Order photos or print out at home. I ended up printing all mine at home today once I established my design formula. I printed photos for the opening page of each day. If you are using the 8.5x11 templates the width of my photos were 7.25 inches (the height varied by the amount of journaling - Monday had the most).
Before adhering I rounded the corners of the photos on the top to mimic the frame from the template.
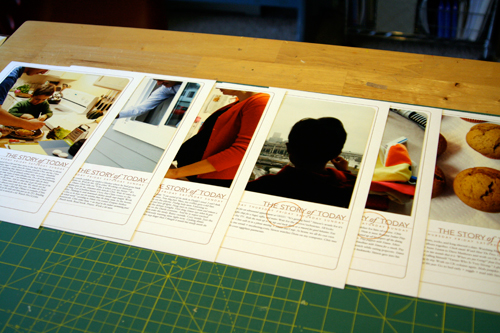
There's seven pages finished (six are shown - the seventh is in the album already).
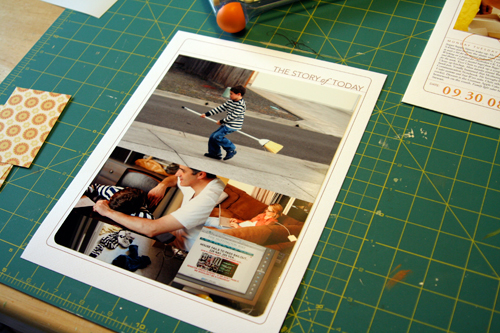
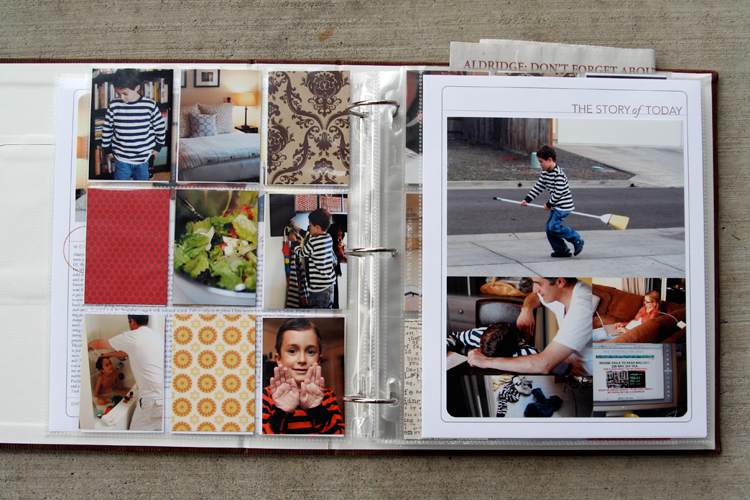
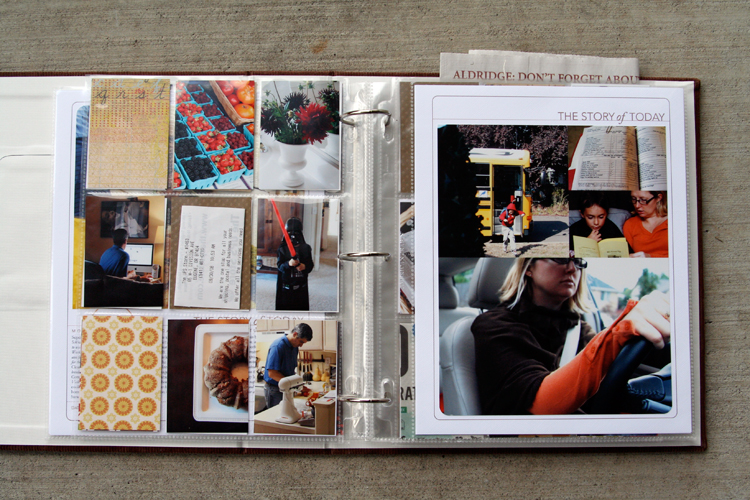
4. For the other full-page part of my spread I decided to do a gathering of photos that would fit into the same Story of Today template frame as the first page. Again, I followed the steps above to move the title to the top of the page (I removed the line and date at the bottom and the days of the week). I printed out seven of those onto white cardstock.
My photo gathering (created in Photoshop but could be easily done by cropping and arranging printed photos) is 7.25 inches wide by almost 9 inches tall. I varied the placement of the photos (large vs. small, etc) from one day to the next depending on the number of photos. Print, trim, corner round the bottom edge, and adhere to the white cardstock.
14 pages done and in page protectors (even though I plan to go back in and add a few embellishments - most likely word stickers, felt pieces, etc).
DIVIDED PAGE PROTECTOR PAGES
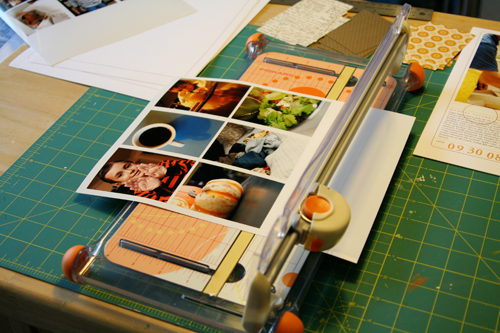
1. Print photos 2.5 inches wide x 3.5 inches tall. I chose to go with twelve of these size photos for each day - six for the front of the page protector and six for the back. The other pockets are filled with patterned paper (see below) or pieces of stuff cut to 2.5 inches x 3.5 inches.
Here's a look at the canvas of photos in Photoshop:
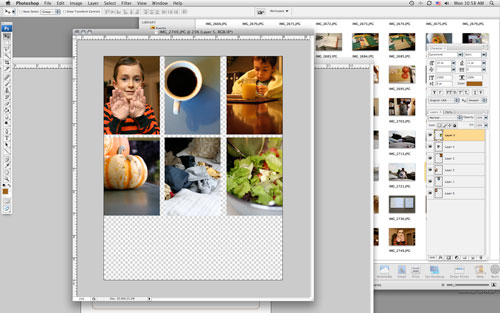
To do this and any other sort of gathering I create a new canvas (usually something like 8 inches x 10 inches at 300 dpi) and then open photos I want to use. Each photo is re-sized before adding to the canvas: in this case to 2.5 inches x 3.5 inches (which requires portions of the image to be cropped). I usually set my photo to 3.5 inches tall first which gives me a width of over 5 inches (if you have the proportion lock checked).
From there I use the crop tool to crop the image to 2.5 inches wide. I get to keep a lot of the image that way. After sizing the image I drag and drop it onto the new canvas and print after filling it up.
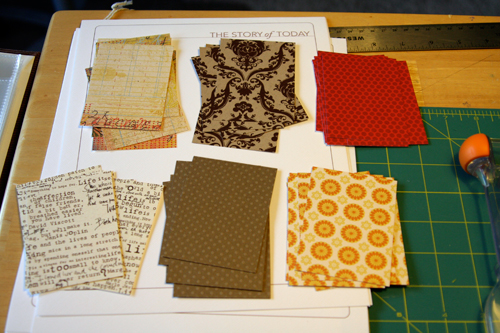
2. Cut up patterned paper rectangles for the divided page protectors: 2.5 inches x 3.5 inches. I cut seven of each pattern. Here's what I went with (from top left: Basic Grey Recess, Hambly Studios, Scenic Route Claudia Street (this one has big numbers on the back), 7gypsies Life Creme, Bazzill Basics Dotted Swiss Cardstock, and Scenic Route Sonoma Napa Street. Any six papers you have at home will work.
3. Slip a combination of photos and patterned papers into the divided page protector pockets. If you have many more photos you could skip the patterns and go with all photos or if you have a lot of stuff cut up pieces of those things to 2.5 inches x 3.5 inches to fit. Consider adding more pages if you need more pockets.
Some days I had less than 9 photos to crop after doing the photo gathering for the second page. For those places I will be adding more stuff/patterned paper rectangles.
These patterned paper rectangles will be embellished over the next few days.
Make this project as simple as you can for yourself so you will actually DO IT! You have already done so much work in taking photos, gathering stuff, and documenting life. Give it a home.

The pumpkin muffin recipe can be found here at allrecipes.com.

A complete list of posts related to the week in the life project can be found here.


Comments
Sign in or sign up to comment.
157 comments
this is FANTASTIC ali, thanks for the continued inspiration! mine will all be digital but i will probably add to my (the year i turned 40) album.
Replies
Sign in or sign up to reply.
Kat - what sort of program do you use to print at home? I would guess there is some way to set the width and height of the photo.
Replies
Sign in or sign up to reply.
Thank you so much, Ali, for the fantastic inspiration and ideas!! I have loved reading (and seeing) the daily modeling of your album. I know it took oodles of your time and it has been very appreciated. It's such fun to see a project from beginning to end... and sooooo helpful.
I did an innovation on yours... "A Year of Tuesdays". I volunteer in a friend's 1st grade classroom every Tuesday. As a retired Reading Specialist I am having fun doing a story with a response to it in the form of a class Mini-book that each child contributes to.
Using your album format... I'm journaling through words and pictures about each Tuesday. I'll send you some photos when I have the past 5 weeks completed.
The mini-albums are on my current post on my blog.
Merci to you!
Joni
Replies
Sign in or sign up to reply.
WOW - you have been busy, looks fab!
I took in total 653 photos. Can't believe it. It took me ages to sort through them all. I finally got down to under 200 for the week and now just waiting for them to arrive. On Monday i really had a problem not taking photos all day, my outlook as the family photographer is now for sure a lot different.
I now can't wait to scrap them all.
Thank you so much for such a great challenge and sharing a bit of you with us all.
Kristin
Replies
Sign in or sign up to reply.
I defiantly missed my camera yesterday and by noontime I had to bring it out! I can't wait to get started. I'm thinking I'll do an 8.5x11 also. We'll see. Thanks again.
Replies
Sign in or sign up to reply.
You rock, Ali! Fantastic album. I so love the way you concentrate on the photos and the words. My "Week in the Life" album from CKU-Anaheim 2007 is my most prized.
Thanks for the daily inspiration. You truly are my creative hero.
Replies
Sign in or sign up to reply.
Another winner! Love this formula. And all the photos of everyday life are fabulous.
Thanks again for sharing this with us and working through it step by step.
Sharon F.
Oakland, CA
Replies
Sign in or sign up to reply.
It has been so much fun to play along with this project.
After (or on) the last day's spread, I am going to do a 'lessons learned' page. Such as... (start) I hate this new P&S camera - too slow, too few options, etc. (end) This new camera takes nice clear pictures and I managed to capture a good idea of our week in the life shots. (start) It was harder for mommy than Matthew to say goodby to his bedtime bottle this week. (end) I am so proud to see my little baby growing into such a happy little boy.
I can't wait to finish the project. Thanks again for the inspiration, Ali.
Replies
Sign in or sign up to reply.
Wow, wonderful album! Love how the album is not filled with lots of decorations but more focused on telling the story.
After seeing this and other very inspirational mini albums by you I have started to make my own little minis. I will definitely have to make "a week in the life" album too. So many ideas so little time.. but next up is a travel mini of my recent trip to Iceland.
Thank you for such an inspirational blog.
Liz
Replies
Sign in or sign up to reply.
Ali-
I used all of the information I gathered for the "Peek into my Week" class at CKC-Hartford and made an awesome mini-album which, thanks to all of the homework I did beforehand, I was able to complete while I was there. Woo-hoo!
But now I have another question --- how do you store your minibooks? I am usually a 12x12 scapper, and have just recently started making some smaller books with chipboard/acrylic and alternative bindings. The new books don't really sit well on a shelf and I have two small kids so I don't want to leave them on a coffee table. I want them to be handy for sharing with others, but I don't think I have a suitable place. Any suggestions?
Thanks,
~Kristin
PS - so funny that you took 247 photos while taking photos 24/7.
Replies
Sign in or sign up to reply.
this is amazing. thank you so so much. it's the first project I've done in awhile and needed just your inspiration to keep me going.
question: when you have done your photo gatherings and resized your pictures - have you had any problems with them printing darker than the original photos? I've had this problem a couple times and not sure how to correct it. (I have been printing at Costco.) Sometimes the results were ok and usable but sometimes just too dark. Just wondering if anyone has any tips. thanks :)
Replies
Sign in or sign up to reply.
Okay, you are brilliant! I have been following your week but have yet to commit to doing the project. I worry that my life is too boring to fill a whole album, lol! But you have really inspired me.
Replies
Sign in or sign up to reply.
I really love the look of your album. I was wondering where you purchased the Avery Baseball Card Protectors? Thanks!
Replies
Sign in or sign up to reply.
Kristin - I store my minibooks in a basket that is either in the living room or the dining room depending on time of year, etc.
Replies
Sign in or sign up to reply.
Kimberly - and Staples, Office Max, etc should have them :).
Replies
Sign in or sign up to reply.
I love your album. I did this project. Taking pictures is not a natural thing for me - so even though I took probably less than 100 photos in the week, it was WAY more than I would typically take. I ended up printing pix off each day and just sticking them - along with memoribilia from each day - in my journal. I just wanted to complete the project. I love the way it turned out. I'd like to try it again in the future, making an album of it all. Thanks for your great ideas!
Replies
Sign in or sign up to reply.
Annette - you can lighten the entire group by using the "curves" tool or adjusting the "levels" in Elements or Photoshop (or whatever editing program you are using). I do this between my computer and home printer - I know the photos need to be lighter on my screen to come out better on my printer.
Replies
Sign in or sign up to reply.
I really love this and am so inspired to do it next week. I wasn't yet ready this week, but after seeing the result...I can't wait to get started!
Replies
Sign in or sign up to reply.
Love how you put things together so quickly. The template for journaling is fantastic. Thanks for sharing!
Replies
Sign in or sign up to reply.
You are a genius! This is wonderful. You've done so much in so little time. I've nearly given up on this project as I get distracted and forget to take photos, even though my camera has been with me each day.
Replies
Sign in or sign up to reply.