Video Tutorial | Printing Two 3x4 Images On A 4x6
Tags: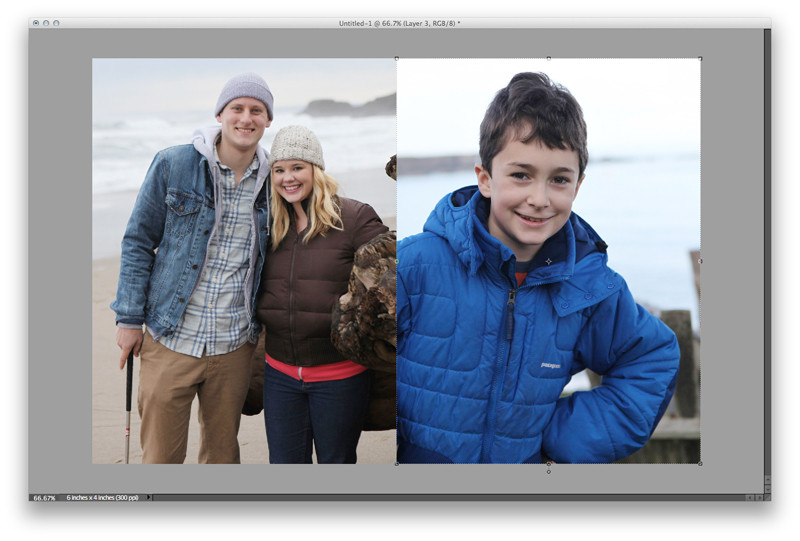
I've had some requests over the last couple of weeks for help with how to print 3x4 photos (specially for use in the smaller Project Life page protector pockets). I put together a quick video tutorial that walks you through the steps to put 2, 3x4 images on a 4x6 canvas in Photoshop Elements.
You could definitely adapt these steps to put more 3x4 photos onto a larger background canvas (such as an 8x10).
Ali Edwards | Printing Small Photos for Project Life from Ali Edwards on Vimeo.


Comments
Sign in or sign up to comment.
126 comments
I love that you take the time to teach people like me... thanks this was sooo helpful I can now use my photoshop elements package a lot better! I have even managed to print some of my december daily pages... One question I have is do I have to save the files as something in particular in order to get them printed by the store? Or do I just take the default format to them?
thanks
Replies
Hi Judith - yes, save them as a JPG.
Sign in or sign up to reply.
Thanks so much for the tutorial. I got PSE 10 recently and am sloooooowly learning. This tutorial will be great for me to use. I normally print my photos once a week at a local store and their collage options are about the most I have to choose from. As a result I end up with a ton of space around the images that I don't really need or want. Thanks so much!!!
Replies
Sign in or sign up to reply.
Okay, I was so excited to try this, but I have PSE 5.0 and when I went into windows to float all images that was not an option for me. So am stuck trying to figure out how to do the two photos together. Right now it places the first photo in the center and I can't add the other.
Replies
Sign in or sign up to reply.
Thanks so much for doing this tutorial, Ali!
I'm going to give it a try this weekend.
I remember you posted (or replied to a comment?) about lightening your photos before you print them but I can't seem to locate it now. I was wondering if you have a tutorial for that? I'm having issues with many of my photos being too dark - would love a tutorial or a little re-cap of your process if you have the time.
thanks so much!!
Replies
Sign in or sign up to reply.
I have an older version of PSE and use it for lots of stuff but I find that doing a "collage" photo in Picasa is easier (for me) and it includes the option of adding in the white border with a slider bar. So simple!
Replies
Sign in or sign up to reply.
Thanks so much Ali. This tutorial, and the tutorials you have been offering on the Silhouette have been so timely and awesome. I appreciate your generosity so much!
Replies
Sign in or sign up to reply.
Thank you very much Ali. It shoud have been obvious to me how to do this but it wasn't. I appreciate your making the video. :)
Mary
Replies
Sign in or sign up to reply.
Hi Ali,
I wondered what you think about using actions for all photos? I thought of using the same action for all the photos through out the year to make them all look similar in style (e.g. "Lomo" look or similar). Do you think it could work or will I find out pretty quickly that it doesn't work for all sorts of photos and I need to shoot in a very special way to make it work?
I really would appreciate your opinion, I can't find anyone who would talk about their way to take/process photos to achieve a sleek look for the entire album
Replies
I think you could totally do that if it's what you want for your project. Set up an action with a filter and apply that to all your photos - sure.
For me personally I'm totally fine with a variety of different photo looks - from Instagram on my phone, from my big camera, black and white, etc. I think that just goes along with my more eclectic style (and I might get tired of a certain filter before the year was up).
Sign in or sign up to reply.
Hi, thanks so much for the tutorial. Do you have a tutorial on organizing photos in Aperature?
Replies
Sign in or sign up to reply.
For those who are not so Photoshop savvy and don't have the top-notch home printers, I suggest printing your mini photos, like me, at the Kodak picture kiosk at CVS stores (they're not exclusive to CVS though). I often print 2 3x4's, 4 2x3's, a 9 ~1x2's on a single 4x6 photo. It's SUPER easy too! Just select "Collage" on the initial print options screen. (I think it's one up from the bottom) Then it gives you the option to make "Mini-prints". Select that, and it asks you which size- 2 pictures, 4 pictures, or 9 pictures- per 4X6 print you want. Then you just check the pictures you want and print. It automatically rotates the photos to landscape or portrait so they fit in the template. It's still only ~$.25/$.27, just like full 4x6 photo prints, even though I'm getting say 4 pictures on a print.
*Note, this is not a collage print with the creative background and framed images on one print. This is a collage in the sense of multiple photos on one print. They don't usually advertise this option, as most non-scrappers have no reason to print mini images.
Replies
Sign in or sign up to reply.
Hi Ali!
My goal for 2012 is to master PSE 10, which I just got for Christmas. My husband even bought me the book PSE10 for Dummies...HOWEVER, not even the Dummies can help me with this one.
When I try to float my windows - I see the option there, but I cannot click on it to make it happen.
Any suggestions?
And I just bought your beginners class. I am looking forward to it! I love your tutorials. They are very helpful. I think you are a rock star!
Replies
Jessica,
See my reply to Maria in Post #35. It sounds like you had the same issue I had.
Sign in or sign up to reply.
For folks having problems with the 'Float' option see my reply to Maria in Post #35. In addition, I was thinking that maybe it is only available in the 'newer' versions of PSE (it's in 9 & 10, but not sure about previous to that). If that's the case, here's something you might try that works for me in an older version of Photoshop (no promises, as I don't have an older version of PSE to try this on). When you are in PSE with your first layer/photo open look up to the top right of the project window. Do you have the minimize/restore down (looks like 2 overlaping squares)/close buttons in the project frame (NOT the min/restore/close buttons for the actual program at the very top right)? If so, try clicking on the restore down button (which changes to a 'maximize' button when it is clicked - looks like 1 big square) and see if that doesn't 'float' your current window. If that works, try that with successive windows. I hope this helps. Clear as mud, right? ;-)
Replies
Sign in or sign up to reply.
Hi Ali,
I saved this video for today, my first ever day working on project life for my first week :)
It is so useful, thanks so much for sharing.
Replies
Sign in or sign up to reply.
oh, ali, how i love you.
i feel like i'm relearning everything now that i'm on the PL bandwagon. this just made my brain NOT hurt. thank you.
xoxoxo.
Replies
Sign in or sign up to reply.
Great tutorial! Thank you for doing this.
Replies
Sign in or sign up to reply.
Hi Ali! Thanks so much for the tutorial. As someone who is just starting out using PSE 10, I really appreciate all the help I can get! I'm hoping you might be able to answer another question. I know that you use an Epson Wide-Format printer. I just bought an Espon myself although it's an all-in-one WorkForce printer. I also have a new laptop that I got for Christmas as my old one was on its last leg. My question is this: your printed pictures always seem to come out so nice and crisp and true to life, but when I print my own 4x6 pictures with my Epson, I'm not getting that "what-I-see-is-what-I-get" from my computer screen. That is, after I have PSE automatically correct my picture for color, brightness, sharpness, etc., I don't get that same screen quality on my prints. Did you somehow calibrate your printer and screen? I've tried searching for an answer on the internet but keep popping up with confusing calibration instructions for actual stand-alone monitors as well as colorimeter hardware. Anyway, I was just wondring if you had a trick as to how you get your pictures to print so nicely. Thanks in advance!!
Replies
Sign in or sign up to reply.
I haven't read all of the posts but I am wondering how to do this in Picasa...can anyone help?
Replies
Juli,
The closest thing is creating a collage. You don't have as much control, and you would need to crop your pics before you collage them if you need to crop. The collaged pics save to the Picasa > collages folder.
Sign in or sign up to reply.
Thank you- this was so helpful! I'm using your method (in Photoshop CS4) to make all kinds of sizes- 2x2, 2x3, 3x4- to print on 4x6 paper.
Replies
Sign in or sign up to reply.
Hi! I am using PSE 10, and each time I try to drag and drop the photo into the transparency, it places them in the middle. I can't move them over. Not sure what to do? I tried adding both photos but when I dragged and dropped the 2nd one it just covered up the first one. Help! Thanks so much!
Replies
Thanks Ali...I figured it out. I am so new to PSE 10 that I confused the Hand Tool with the Move Tool. I followed each step and paused your video with each one. That's when I noticed it. It is all working now, Thanks so much! I feel silly...but that's how you learn, right?
Hi Antoinette - off the top of my head I'm not sure what's happening. Are you selecting the photo layer in the layers palette before trying to move it? You also might want to see if your layer is locked (look for the lock symbol in the layers palette). I use Elements 9 for my tutorials - not sure if there is something different with 10? If I come across an answer I'll let you know -
Sign in or sign up to reply.
Hi Ali, I commented earlier but am still having trouble. I am using Elements7. When i drop the croipped photo onto the canvas the photo is about 1 inch x 2 inch in size?? can you please help!
Replies
Hi Jess - make sure that both the photo and the new canvas are 300dpi - you can find that under Image Size - it's the resolution.
Sign in or sign up to reply.