Video Tutorial | Printing Two 3x4 Images On A 4x6
Tags: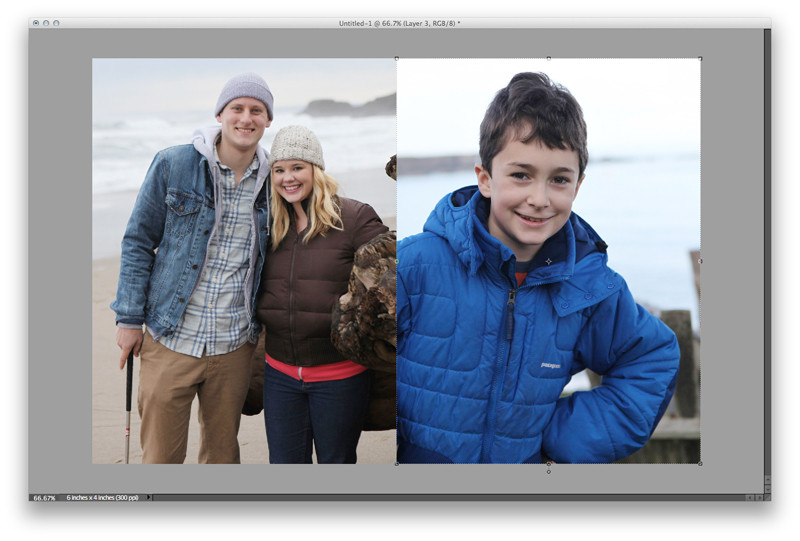
I've had some requests over the last couple of weeks for help with how to print 3x4 photos (specially for use in the smaller Project Life page protector pockets). I put together a quick video tutorial that walks you through the steps to put 2, 3x4 images on a 4x6 canvas in Photoshop Elements.
You could definitely adapt these steps to put more 3x4 photos onto a larger background canvas (such as an 8x10).
Ali Edwards | Printing Small Photos for Project Life from Ali Edwards on Vimeo.


Comments
Sign in or sign up to comment.
126 comments
Thanks, Ali! Your video was a huge help. Now, printing 3 x 4s will be a little easier for me.
Replies
Sign in or sign up to reply.
[...] loved doing the little 4×3 photos (tutorial available here) and including a couple vertical photos. I almost never take vertical shots (just not how I look [...]
Replies
Sign in or sign up to reply.
Thanks SO MUCH for this tutorial! You don't know how many hours I've wasted trying to find a tutorial to just this! I kept finding tutorials to mash the pics together - but that's not what I wanted!
Replies
Sign in or sign up to reply.
thank you so much for this! i was having such a hard time figuring out how to get the correct resolution for printing. awesome tutorial.
Replies
Sign in or sign up to reply.
i did this last week without any problems, and now, i can't get it to work. my cropped photos keep showing up tiny on my new canvas and i don't know why. both the canvas and my photos are 300 dpi.
Replies
Sign in or sign up to reply.
[...] doing it! If you want to learn how to put multiple images onto one picture, Ali Edwards has a good tutorial. I already know, but am proficient at photoshop, but YOU too can do it! Insert: The kids and I [...]
Replies
Sign in or sign up to reply.
[...] inches). They are a fun size to work with. I also love learning new things so this week I used this tutorial by Ali Edwards to learn how to print 2 3×4 pictures on a 4×6. I had these cute pictures of the girls [...]
Replies
Sign in or sign up to reply.
[...] combined two pictures into a 4×6 using this tutorial by Ali Edwards that I’ve mentioned before. I also used another one of these flip up protectors to add a [...]
Replies
Sign in or sign up to reply.
Thank you so much - very easy! :)
Replies
Sign in or sign up to reply.
Thank you soooo much. I used Photoshop, and your directions worked for me there as well.
Replies
Sign in or sign up to reply.
Ah! Now I get it! Thanks so much for this. It's a great help for newbies like me.
Replies
Sign in or sign up to reply.
[...] The bottom photo is two 3×4 photos on one 4×6 piece of paper. Learn how to do that here. [...]
Replies
Sign in or sign up to reply.
I have struggled with the same problem as Carolyn and Kelly and finally figured out the solution. When you make your canvas (6X4 or 4X6), put it in the bin. Don't leave it on the main workspace. Next, resize your image to 3X4 or 4X3. Move the image from the main workspace on top of the canvas that is in the bin. The canvas with image will then pop up in the main workspace with everything correctly sized. Repeat this procedure for the second image. Sounds strange, but it is what worked for me. Good luck.
Replies
Sign in or sign up to reply.
Thank you!
Replies
Sign in or sign up to reply.
Thanks for this Ali! Ive been trying to figure out the easiest way to get my pics into 3x4 format for PL, and this was totally it! This will make my life so much easier from here on out! :)
Replies
Sign in or sign up to reply.
I have the PSE version 11 and it is not like the tutorial at all. There is no option for floating the levels, even in the expert style. I can't see the icons that you are clicking on for most steps.
Can someone recommend a tutorial with step by step panels of every click? This is so frustrating for me because I know this should be easy. Perhaps I need PSE for Dummies?
Thank you Ali for your tutorials. Most of them are very helpful!
Replies
Sign in or sign up to reply.
Thank you so much for this tutorial! I did it as I followed along with my own pictures! I hope that some of this becomes second nature for me in the not too distant future!!
Replies
Sign in or sign up to reply.
Thank you so much for this! Has solved my printing problem. Love Project Life. x
Replies
Awesome! Happy to help.
Sign in or sign up to reply.
More than a year later this post is STILL VERY helpful, I have the Adobe version of photoshop and have yet to do ANYTHING with it! This is my howework for the night! Thank you :) I also re-posted on my blog so that it will be a help to those that stumble across my blog :)
http://wp.me/p1ZIVa-7o
Love your blog and everything that you share!
-thejensspin
Replies
Awesome!
Sign in or sign up to reply.
Hi Ali. I was playing around with some photos and some of your files last night. How can I add the "love" brush from your "Hello Life" collection to a photo. I first brought in the png file but when I stretched it, it got distorted. Then I realized it had to be a brush. I imported the brushes from that set but I can't figure out how to size the brush to fit the 3x4 photo. Can you help?
Thank you,
Teri
Replies
Hi Teri - actually you can use the PNG file to add to the photo (vs. the brushes - I almost always just use the PNG files vs. loading the brushes). To not distort the PNG file, hold down the shift key and drag from a corner to resize on the photo.
Oh that is awesome!! Thank you for the fast reply. I just purchased some new ones yesterday and I'm in love with them. Have a wonderful week!! Hugs and blessings, T
Sign in or sign up to reply.