Revisiting A Favorite Project: Punch Collage
Some of you may remember a Martha-inspired butterfly punch project using the classic butterfly punch I did two years ago (February 08).
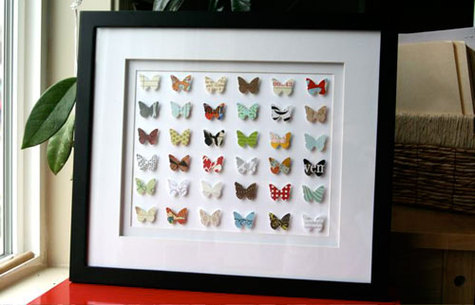
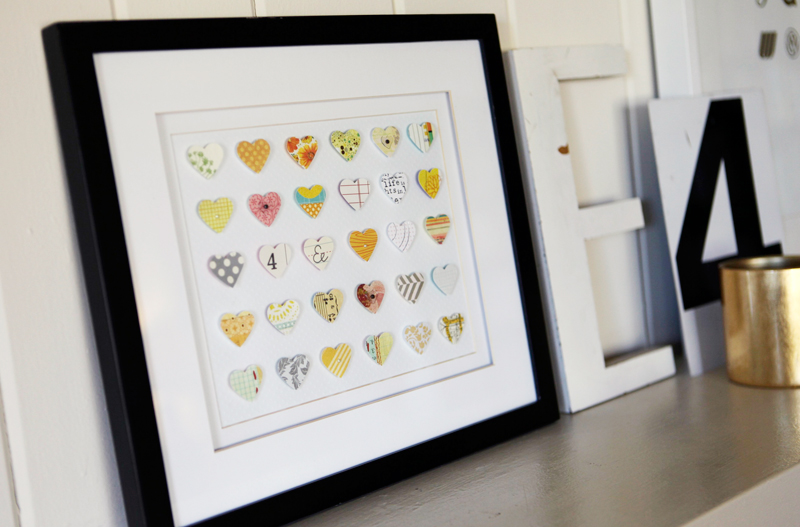
I decided to revisit the project again, this time using a heart punch.
I punched all the hearts from a variety of different patterns and laid them out on a piece of cardstock to figure out where I wanted each one placed. Once I had them all organized I adhered each heart using a foam square.
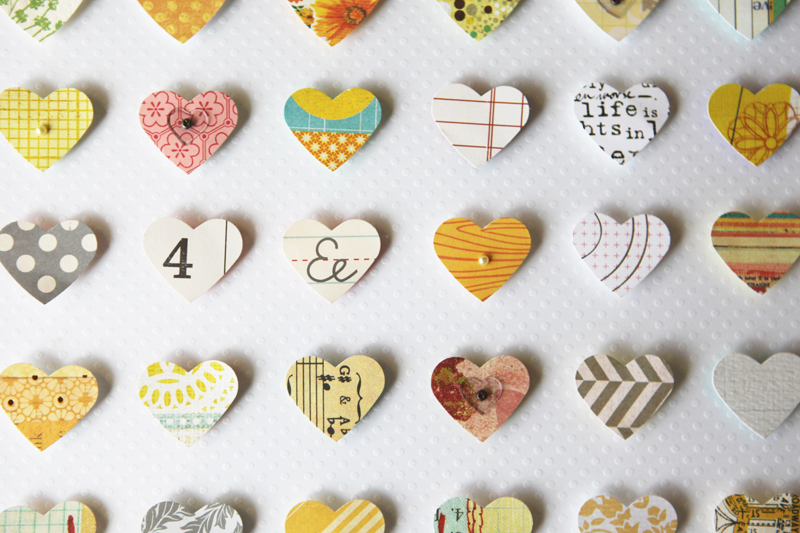
This time I also added a couple little accents: tiny pearls and some acrylic hearts (from an older Fancy Pants acrylic sheet) attached with mini-fasteners from Tim Holtz. Pattern papers came from my scraps. I wanted papers that included primarily yellow, orange, a bit of pink and a bit of gray - thinking a cross between Valentine's and spring.
EDITED : About the frame and mat, I have had this one for years (7+). Most likely I purchased it at either Target or Fred Meyer. The size of the opening is 8x10. A nice thing to look for when selecting a frame for this project is the double mat with the second mat lifted up off the first - it makes room for the dimension of the punches (that comes from the foam squares). I used a piece of swiss dot cardstock for the background.
Simple. Fun. Easy. I love punches.
Comments
Sign in or sign up to comment.
143 comments
This would be a great project for kids to help out with too. I know my daughter always wants to help out and even make her own version of something I am working on .
Replies
Sign in or sign up to reply.
WOW! Yes, it's simple, for SO effective! It is the perfect use for all those scraps I can't bear to part with. Thanks for the inspiration!
Replies
Sign in or sign up to reply.
it is so wonderfull
many thanks to share your creativity with us !!
Replies
Sign in or sign up to reply.
simply delightful!
Replies
Sign in or sign up to reply.
I loved the butterfly project so much, I did one of my own. The hearts work just as well. For anyone on the east coast, I found the same frame at Michael's.
Replies
Sign in or sign up to reply.
I love this project! I want to do something like this for the new apartment I am moving into.
Also- a note for people with inquiries about the frame. I have seen one similar to this one at Micheal's. I think it would work very well for this type of project because the white mat is raised with foam core.
xoxo
Replies
Sign in or sign up to reply.
Great project - I love it!!!
Replies
Sign in or sign up to reply.
I really like these!
Replies
Sign in or sign up to reply.
I LOVE THIS ALI!!!! I have a couple of questions...
1) Is there glass in this frame? So the mat causes there to be room for the foam dots? I've never seen one that deep in person, having a hard time picturing it in my mind.
2) Any tips on lining them up? Yours looks so perfectly aligned!!
Replies
Sign in or sign up to reply.
Punches are my favorite tool. They add so much yet are so easy. This project is so elegant. My daughter-in-law loves butterflies and will be soon moving into their new home. What a perfect little house warming gift this could be. Also thinking how perfect for each season or holiday - hearts for February, snowflakes for winter, etc. Fabulous idea. Thanks!
Replies
Sign in or sign up to reply.
Love this idea, so simple yet very effective & pretty!
Replies
Sign in or sign up to reply.
This is SUCH a cute idea!!! I love the hearts! This would look perfect in a home office or baby's room!!
Thanks for the great idea!
Replies
Sign in or sign up to reply.
Love love love this idea!!!!!!!!!!!!!!! I can't wait to make my own...
Replies
Sign in or sign up to reply.
è bellissimoooooooooooooooooooo!!!!!
Replies
Sign in or sign up to reply.
Ali -
Love this take on a favorite project - SO inspiring! Reminds me to utlilize my stash of scrappin goodies more around the house!
thanks, Ali!
Replies
Sign in or sign up to reply.
This is beautiful and a great idea! I will try it for sure, it would make a great gift.
Replies
Sign in or sign up to reply.
Hi Tracie -
1. Yes, there is glass in the frame. It's not super deep just a bit of depth between the two mats.
2. You could definitely use a ruler and mark out spots for the punched pieces, I did it more by eye (I also use a lined self-healing mat on my table which I think helps me overall). I leave them all on the paper as I adhere one at a time and adjust as I go. I usually start in one corner, then adhere another corner, then do one in the middle of the row and fill in around.
Replies
Sign in or sign up to reply.
Love this. :)
Replies
Sign in or sign up to reply.
I bought both punches after reading this post; I can't wait to do them! Two quick questions...
For some reason, the sharesale links won't open for me. Any ideas?
And a crafty question that I could probably figure out on my own but how did you make sure the hearts & butterflies were so evenly spaced? (I am going to read the original butterfly post now... Maybe I'll find my answer there...)
Thanks, Ali!
Replies
Sign in or sign up to reply.
Hi Ali!
I, too, loved the butterfly piece, and now I love this one too! So glad to see this concept in a different way. I have the MS butterfly punch (and have made a few cards after being inspired by this), but then my punch broke. Sad day!!
Looks like it's time to re-invest :)
Thanks for sharing!
Replies
Sign in or sign up to reply.