Week In The Life™ 2023 | Crafting Live With Krystal 02
Tags:Hi friends, Krystal here! With the launch of the Week in the Life 2023 collection this week, I’m excited to bring you a three day mini-series where I will be sharing sneaks and ideas for how to use the new collection to document your stories this year.
This mini-series is composed of a daily Live video on the Craft the Story Facebook Group. The final live will take place on Wednesday, March 15th at 12:00PM ET.
Today, we are taking a deep dive into the mini kit components and discussing how they, along with some of the shop products, can work inside of the 10x8 album. If you missed the live video, you can check that out below.
Let’s take a closer look at the ideas we discuss in the Live video:
1. 7x8.25 Vellum Quote Page (Mini Kit)
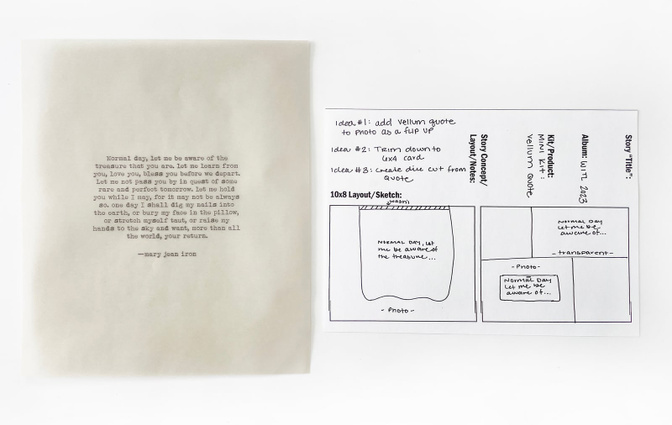
This quote gave me goosebumps as I read it. I can’t wait to find a way to include this piece in my album this year. Looking for some ways to make it work in your album? Here are a few ideas of how to the vellum page in your project:
Attach the vellum page to the top of a full page photo with washi tape. This allows the quote to stand out against the photo… but also lets you flip the vellum page up and gives you the full view of the photo underneath. Trim down the quote page to a 6x4 filler card. You can slip this into a pocket page as a transparent element, or add on top of a photo/journaling card. Fussy cut the quote from the page, or trim into a smaller rectangle, leaving only the quote with a very small border. Then, use the piece as an embellishment.
2. Chipboard Titles (Mini Kit)
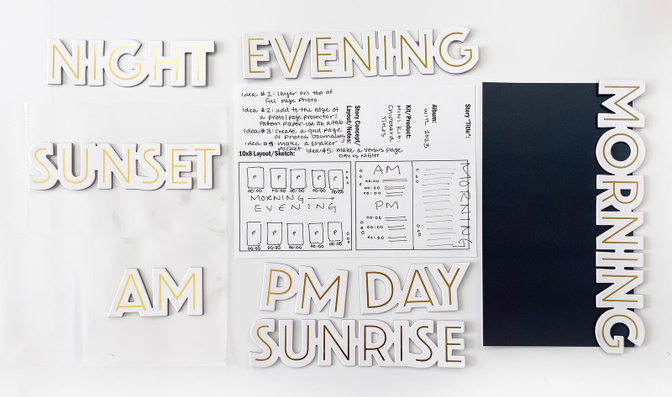
These titles are SO fun and give you a ton of great journaling jumping off points for your Week in the Life album. One of my favorite things about them is you get the opposites for each word: i.e. Morning/Evening, AM/PM, Etc. Here are some fun ideas for adding these to your album:
Layer the title piece on top of a full page photo. (For example, add the Sunrise title on top of a sunrise photo.) Add a title to the side edge of a smaller photo/page protector. The word can act as both a title and a tab, of sorts. This would work great for a 6x8 page or 3x8 page. Create a grid page using photos/journaling to represent the title. I.e. add “Morning” into the center of a 10x8 page. Then, place five photos above and below the word, with small bits of journaling for context. Add a title into a page protector pocket. Turn into a shaker pocket by adding sequins and sealing the pocket shut with washi tape or a fuse tool. Create a versus page: morning vs. evening, AM vs. PM, Day vs. Night, etc.
3. Large Plastic Embellishments (Mini Kit)
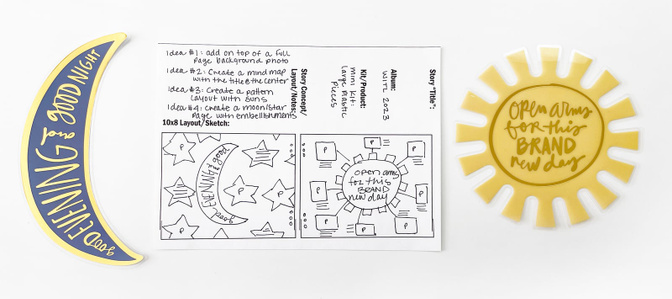
The large sun and moon plastic embellishments are a super fun product with a lot of ways to potentially use them. The large graphic nature of the embellishments will make any layout with them look bold and fun. Here are some fun ways to use these pieces:
Add the large plastic sun/moon to a full page background photo as an opener or closer to a day. Create a mind map with the plastic title at the center. I.e. add the sun into the middle of your page with branches off to photos from your morning and journaling for context (or time stamping). Create a pattern of suns to document a day. Pull out (or create) any sun embellishments you may already have in your stash. Layers these onto a full page for a fun designed look. Then, add photos/words to the centers of the suns. Same as #3, but with the Moon title and stars. Add photos, journaling, etc into star shapes to give your page the “night sky” look.
4. Gold Foil Plastic Titles + Puffy Stickers (Mini Kit)
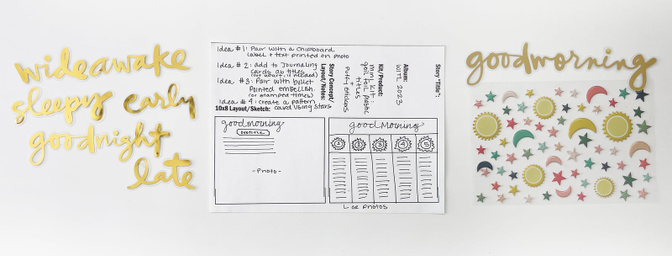
These gold foil titles give us another medium for telling stories this season. The plastic material makes them perfect for adding to a flatter project as well. Here are some ideas for how to use the gold foil titles in your album:
Pair with a chipboard label and pre-typed/printed journaling on a full page photo. These could be really pretty places in the dark sky space of a photo from the morning or evening. Add titles to journaling cards (cutting them apart to fit onto smaller cards, if desired), and use the titles as story prompts. Pair with puffy stickers to create a grid page/bullet pointed journaling page. Create a pattern using the puffy star stickers.
5. Vellum Word Strips (Mini Kit)
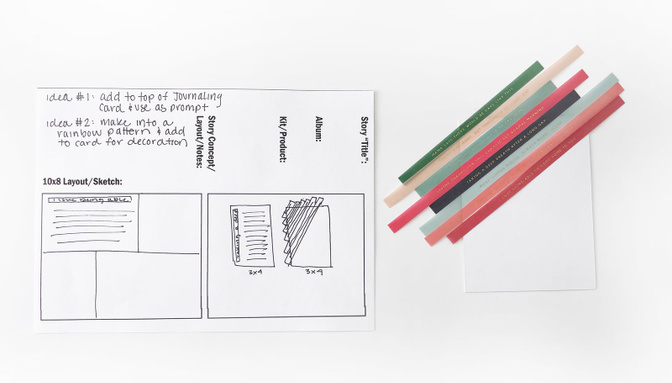
While there are not any tiny phrase stickers in the collection this year, the vellum word strips are a great alternative! Simply add these to any space you would normally add a tiny phrase sticker. OR, here are some other ideas:
Add word strip to the top of a journaling card/page and use it as a prompt for storytelling. Make into a rainbow pattern and add to a blank journaling card as a design aspect.
6. Die Cut Pack (Mini Kit)
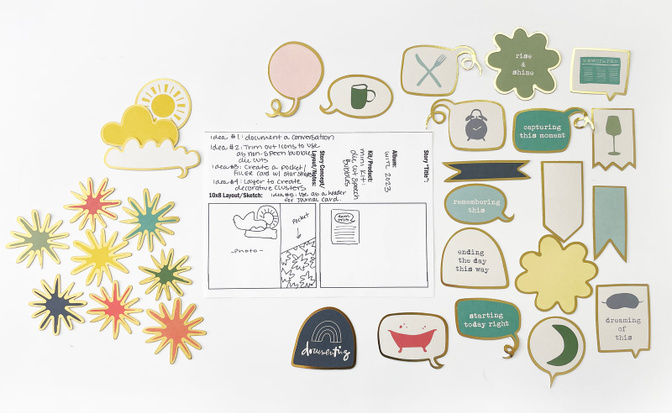
In the die cut pack, there are a whole host of different shaped pieces. From whimsical speech bubbles, to wonky banners, to shaped embellishments and graphic starbursts - this pack is jammed! Here are some fun ways you might want to incorporate these into your layouts:
Use the speech bubbles to document a conversation. Trim the icons out of the die cuts to use as just the image (alarm clock, newspaper, etc.) Create a pocket/filler card using the starburst to make a pattern. Layer the pieces to create embellishment clusters (i.e. clouds and sun). Use as headers on journaling cards + as journaling prompts.
7. Plastic Circle Pack + Alpha Stickers (Shop Items)
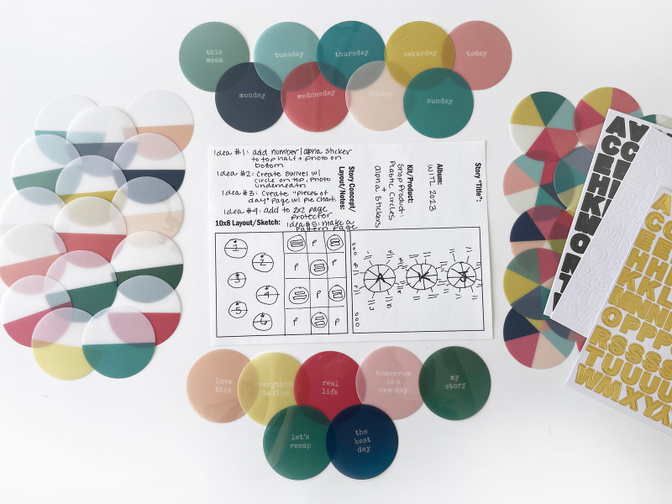
These are another favorite product for me this year. I’m OBSESSED with the pie designs on many of the circle pieces and can’t wait to see these in action. Here are some ideas for using the plastic circles to consider:
Add a number or alpha sticker to the top half of the divided circles. Then, use the blank bottom half to add a small photo. Create a swivel feature by placing the plastic circle on top of a circle photo/journaling spot. Attach with a brad so the plastic can move and the underneath can be fully seen. Create a layout to document “pieces of your day” using the pie designed circles. Add to the 2x2 page protector and intersperse with photos/journaling. Make a pattern page by using many/all of the circles. A full page with all of those pie shapes would be SO fun!
8. Products by Day
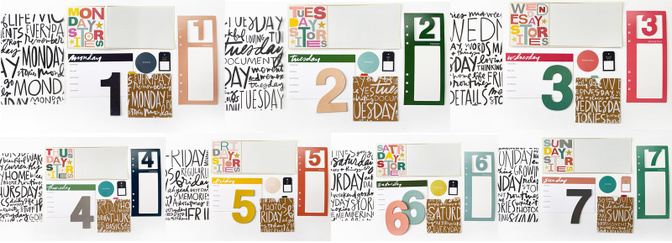
Per the request of a few in our community, I also put together images that feature all of the products by day. These are all of the items from the full collection (main kit, mini kit, shop items) that have the day of the week printed/displayed on the item in some way. This photo can help you see how each day consists of a plethora of colors and gives you a wide variety of colors to work with and more flexibility in choosing which products to use in your album as a whole.
This concludes our second set of ideas for using the WITL 2023 collection to document your life this April! I hope you enjoyed talking through a bunch of ideas and seeing these sketches come to life. Thank you so much for stopping by today and please let me know if you have any questions. If you have more ideas for ways to use the supplies discussed today, let us know in the comments below. Don’t forget to tune in on Wednesday, March 15th at 12PM ET to see ideas for the WITL Notebook. Until next time, let’s tell stories together!


Comments
Sign in or sign up to comment.
2 comments
You always have such creative and fun ideas Krystal! Thanks for sharing!
Replies to ScrappinMyHeartOut
Thank you so much! It's my pleasure to share all the ideas I possibly can! lol
Sign in or sign up to reply.