Day In The Life™ | July 2016
Tags: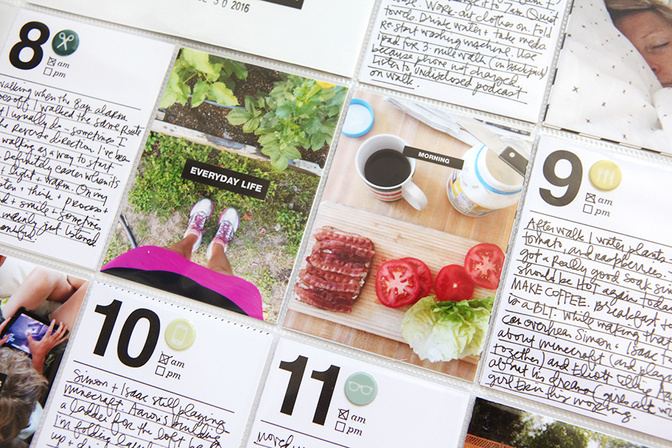
This past Saturday I documented my day by taking a photo and doing a bit of journaling each hour for Day In The Life™. Today I'm sharing how I brought those photos and words together using Project Life® Design F page protectors (I'm adding these into my Project Life® album).
First off I have to say that I really, really loved setting the hourly alarms on my phone as the reminder to take a photo and journal each hour. I've never approached this project that way before and it was a totally different experience. Usually I'm just taking photos whenever I feel like it throughout the day with the goal of simply capturing the real life routines of a regular day. I actually loved the limit/restriction of just taking a photo when the alarm went off. I ended up with 15 photos and 15 journal cards ( I used the cards that came with the Day In The Life™ Mini Kit No. 2) that represent the day I lived. It was also super easy to just have the cards out on the kitchen counter to fill them in as the day went along.
Another thing I loved about the process this time was that I took all vertical photos. I did this because I knew I was using the Design F page protectors with the 3x4 pockets. Generally almost every single photo I take is horizontal - it's just what I've always done and since I religiously use the Design A page protectors for Project Life® with seven of the 4x6 pockets for photos it just makes sense (when I do use an occasional 3x4 photo I just crop it before printing to adjust the orientation). It was a fun creative challenge for me personally to play with the vertical orientation - all it takes is a simple thing like that to ignite a different part of my creative lens.
Yesterday I printed out the photos, created the title card, added the stickers and slipped everything into the pockets. Voila.
Simple and easy for the win.
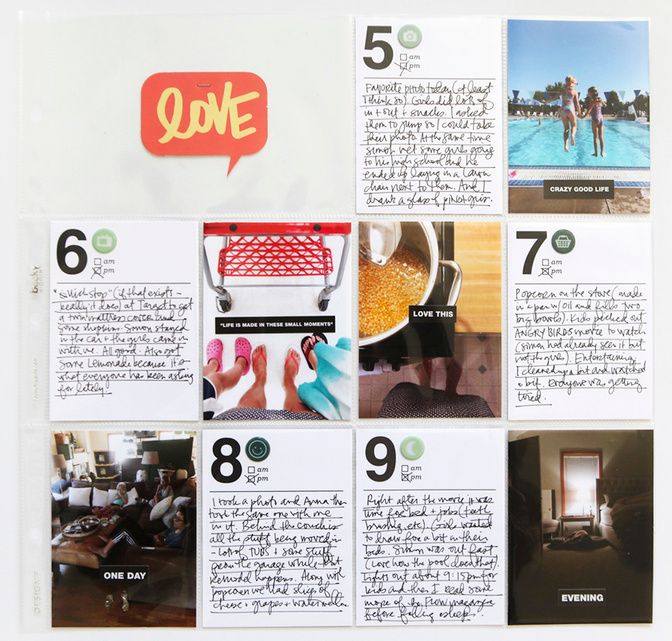
Here's a look at how my day came together with a video overview below that includes information on using the new silkscreens in my shop (what I used for my title card):
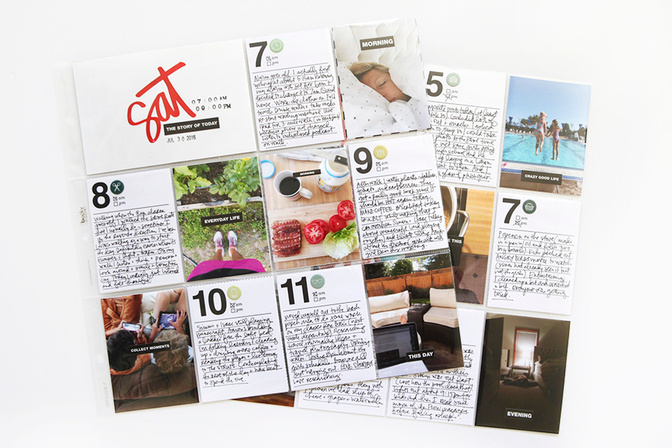
I ended up using two sheets of the Design F page protectors (all of one and 1/2 of the other - on the back of the second one I'm just planning to tell a different story).
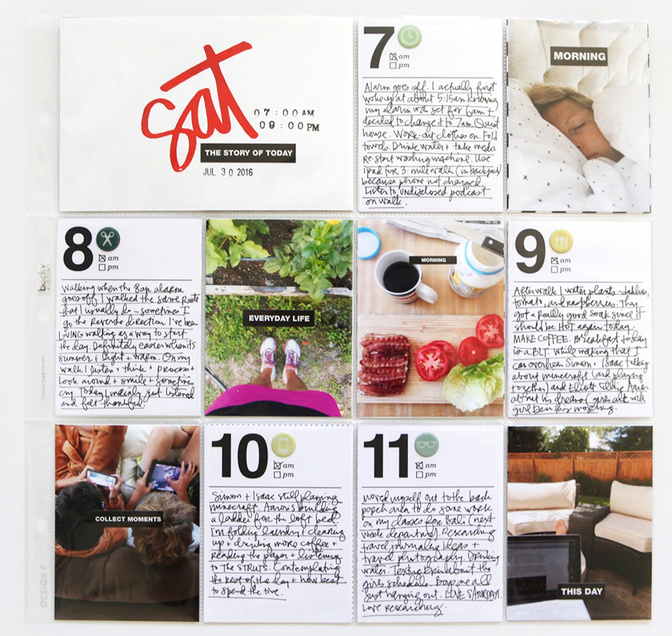
I varied the placement of the time cards and the photos - sometimes to the left and sometimes to the right - just for some visual variety.
My formula was simple: on top of the journal cards I added one circle icon and on the photos I added one black & white phrase sticker.
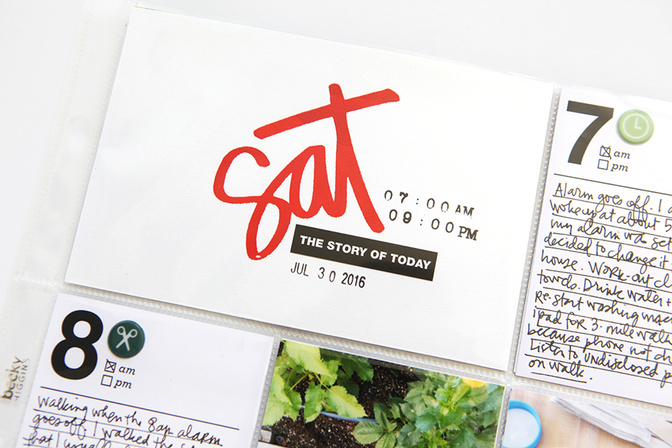
For the title card I used one of my new Days Of The Week silkscreens + some of my Pendleton (red) paint. I've included the how-to for using those silkscreens in the overview video below.
In addition I used the Time Roller Stamp and a rolling date stamp to add both of those onto the title card.

On the back of the first page I continued to add my photos and journal cards. On the back of the title card I paired a fun number pattern paper ( this was from a past Studio Calico kit but they have the pattern available as part of a 4x6 paper pad here) with one of the speech bubbles from the Day In The Life™ Mini Kit No. 2. I didn't end up using most of those speech bubbles on this project but love that they are "everyday" enough to use in future Project Life® spreads.
For the third page of content I repeated what I had done on the first two. In the 4x6 pocket I added a "love" speech bubble and simply stapled it to the front portion of the page protector to keep it in place. The back side of this page is currently empty and waiting to be filled with another story (maybe one about all the stuff around here related to Aaron and kids moving in).
Overall, I loved this different take on the process and will definitely do it like this again another time in the future.


Comments
Sign in or sign up to comment.
22 comments
Love this! I loved having the alarm set and taking a photo at the point. I would never have taken some of the photos I did, if it wasn't for the alarm. Thanks so much for the inspiration. Love the look of the silk screens too.
Replies to Deb
Sign in or sign up to reply.
Brilliant! Love that you eat a BLT for breakfast.
Replies to SusanBowers
Sign in or sign up to reply.
Super great!!!
Just a suggestion for the back side: you can do an overview of all of you now living in your house: 7 people and some pets: you have just the amount of pockets you'll need.
Something like name, age, favorite thing at the moment... You're better at this than me, you'll come up with something great, I'm sure.
Replies to an3_
That's an awesome idea - thank you :).
Sign in or sign up to reply.
I really loved doing it this way, too. I may have 1 or 2 extra journal cards, my son was packing up to leave on a scout trip on Sunday, at some point that day, and I had a few extra errands to do. Frank was on the phone with his dad, too, which is normal for a Saturday, but I may write something extra about how lucky we are to have his dad in our life as he helped us out tremendously while I was out of commission a while back. Things like that. I'm working it into my PL, which is 6x8, and I'm still happy to say I have a PL. Anyway, thanks for sharing your day. I followed on Instagram here and there and loved seeing many others, too. Enjoy your trip coming up! Michelle t
Replies to mtercha
Sign in or sign up to reply.
I LOVE your approach to this project Ali! I was traveling on Saturday, so I'm planning to pick a random day next week to play along. I will definitely be using your hourly alarm and journaling on the spot idea! Couldn't be any easier than that : D
*I can't wait to get my hands on the new silk screens! I foresee using them a TON in my PL and other projects*
Replies to kathleen
Sign in or sign up to reply.
I really, really loved doing it this new way, too! It was super laid back, but in the end, ended up documenting our day just wonderfully. I'm so excited to put it altogether! I love the way you used DESIGN F page protectors and thought I had some, but don't! Darn! So - I'm going to have to get me some and THEN I can finish it up. Looking forward to it! You always inspire me and make me want to stop what I'm doing and create right away! Thanks so much, Ali! XO!
Replies to KProffitt
It's pretty easy to make your own DESIGN F page protectors if you have DESIGN A page protectors on hand and a fuse tool or a sewing machine. If you dont want to wait, that may be a good option. :-)
Sign in or sign up to reply.
Love this! I'm doing mine next Saturday so this is great inspiration. And it might work out even better because I alway have regrets when I see what everyone else is done. Now I can use those as ideas!
Replies to gina200
Sign in or sign up to reply.
This totally looks doable for me! I really like this layout. I will have to give it a try before the kids go back to school.
And I love your screens. I hope you come out with many more!!
Replies to MadSky
Sign in or sign up to reply.
I really loved doing it in this new way as well. Super simple and perfect for this day - you know we were just back from our vacation.
Love the title card with the silkscreen. Love this red. I'm not a red lover but I should have bought this one ;)
Thanks for sharing, it's awesome as usual.
Virginie
Replies to virginiegoujon
Sign in or sign up to reply.
I loved this kit just so much! So do-able and super cute too. I loved documenting one picture at the top of the hour and the ease of filling in the card FOR that hour. thanks!
Replies to lkfisher
Sign in or sign up to reply.
I've done this project before and loved it....but this was so easy! And fast! Fit so perfectly into my life while on vacation. Will definitely use this method again! Thanks for the inspiration!!
Replies to DebbiG
Awesome - love that.
Sign in or sign up to reply.
Was so easy to do this way, loved it. What will you do on the back of the bubble die cut?
Replies to Lwills54
I think I will probably add a word/phrase sticker or something along those lines. It won't happen until I know the actual story I'm going to tell on the back.
Sign in or sign up to reply.
WishesChoice is the perfect platform for you if you are looking for some great wishes-ideas. We mainly focus on it to produce as best as possible to help you prepare a crispy wish on a special day, event, occasion etc.
wisheschoice
Replies to wisheschoice
Sign in or sign up to reply.
The website is lovingly serviced and saved as much as date. So it should be, thanks for sharing this with us.
40 sunday wishes and quotes 2016
Replies to yasir
Sign in or sign up to reply.
Good job. http://www.bisnisbiospraygold.com/
Replies to resepmasakan
Sign in or sign up to reply.
I really impress your work and thanks for sharing this amazing post.
http://newstatusnquotes.com/
Replies to newstatusnquotes
Sign in or sign up to reply.