Love The Way You Shine | Project Using The Light Story Stamp™
Tags: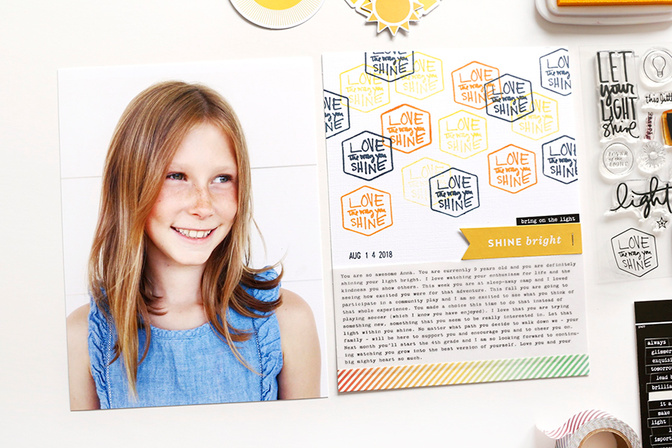
I put together a quick layout using the Light Story Stamp™ and a few of the Add On options from both the Story Kit™ and the Story Stamp™ to share with you guys today along with a process video.
Repeated stamping is a quick and easy way to create a pattern and help support your story. For this project I paired the "love the way you shine" stamp with three ink colors: orange, yellow, and navy blue to create a custom pattern at the top of my 6x8 sheet of white cardstock. Along the bottom I added a die cut, a word/phrase sticker and a date stamp directly above journaling printed on vellum. To adhere the vellum I used some of the fun rainbow washi tape that was offered as an Add On for the Light Story Kit™.
The Light Story Stamp™ and Light Story Kit™ are available until September 11th (or when they sell out).
Here's a short video showing my process for this project:
THE STORY
You are so awesome Anna. You are currently 9 years old and you are definitely shining your light bright. I love watching your enthusiasm for life and the kindness you show others. This week you are at sleep-away camp and I loved seeing how excited you were for this adventure. The fall you are going to participate in a community play and I am so excited to see what you think of that whole experience. You made a choice this time to do that instead of playing soccer (which I know you have enjoyed). I love that you are trying something new, something that you seem to be really interested in. Let that light within you shine. No matter what path you decide to walk down we - your family - will be here to support you and encourage you and cheer you on. Next month you'll start 4th grade and I am so looking forward to continuing watching you grow into the best version of yourself. Love you and your big mighty heart so much.
SUPPLIES
Inks: Tillamook Crafters Ink, Deschutes Crafters Ink, Memento Luxe Dandelion Ink
Canon MG7720 Printer (for both the photo + the journaling)
Want more inspiration like this? Become a subscriber to myStory Kit™, Story Stamp™, or Digital Story Kit™ and get access each month to a new classroom that includes 4 process videos using products from the Kit and Stamp and story ideas specific to the theme.


Comments
Sign in or sign up to comment.
6 comments
What an incredible spread! The photo and words are perfect. Just awesome!
Replies to hgauvin
Sign in or sign up to reply.
Is there a particular brand of vellum that can be used with an inkjet printer? I used to use it for journaling all the time when we had a laser printer at home, but all we have now is an inkjet, and the vellum surface is so hard that the ink just sits on top and smears. Thanks!
Replies to ConnieS
Sign in or sign up to reply.
I love how you kept the photo naked of product (I would never have considered that!!) making sure the photo took center stage over the product.
Replies to SusanBowers
Sign in or sign up to reply.
This is SO awesome!! Im definitely going to use my stamps to make a background! I used vellum with typing on it for the first time for one of the Story Challenges...I couldn't get the words to print on the vellum..the paper would go right through the printer..so I adhered the vellum to a piece of typing paper with a tape runner, around the edges..it worked great, then I cut away the typing paper.
Replies to laura_g_
Sign in or sign up to reply.
Awesome and simple layout! And I have to say I just LOVE that photo of Anna. Such a beauty and she really shines in that one. 🌟
Replies to Klimperklein
Sign in or sign up to reply.
Love this layout and they way you used the stamp. Pretty picture of Anna too!!
Replies to justlisa
Sign in or sign up to reply.