Day Four | Keep It Simple Scrapbooking Week
Tags: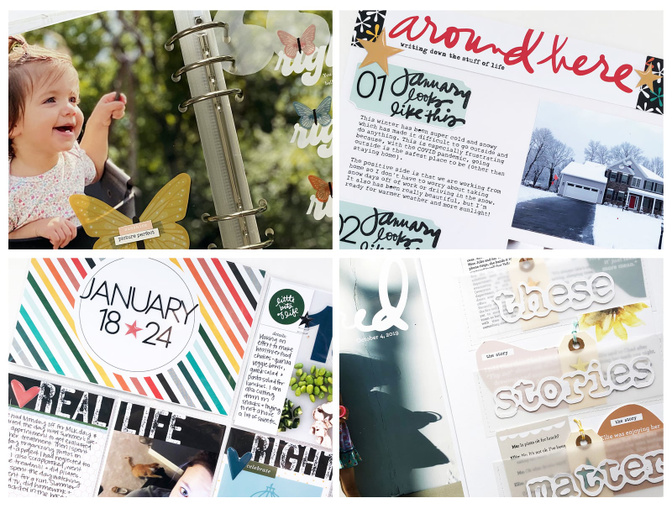
Good Morning and welcome to day four of Keep It Simple Scrapbooking Week (KISS Week). Today we are welcoming Laura Wonsik and Linda Jordan, both Ali Edwards Design Inc creative team members, as they share their favorite tips to help document their stories. And since this week is all about getting back to basics, we've decided to put our entire physical basics collection on sale! From now till March 31, get 15% off the basics collection using the code BACKTOBASICS15. Enjoy! *Digital products are excluded from this sale.
Laura Wonsik // Story Compilations
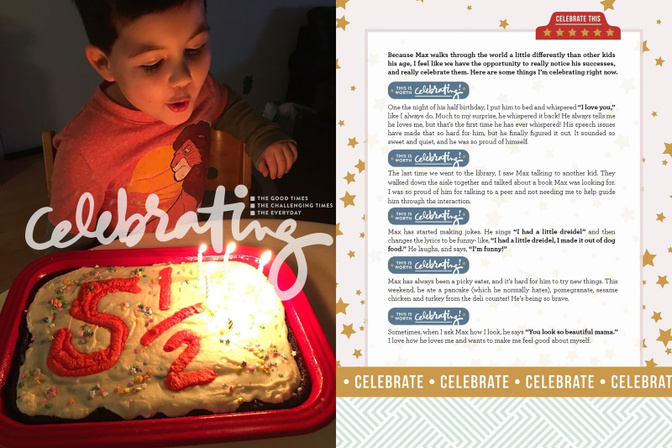
Hey there! It’s Laura Wonsik here and I’m so excited to share my very favorite way to tell stories- Story Compilations!
If you are feeling overwhelmed by lots of little stories and details that you want to capture but don’t know how to bring it all together, then the concept of story compilations is for you.
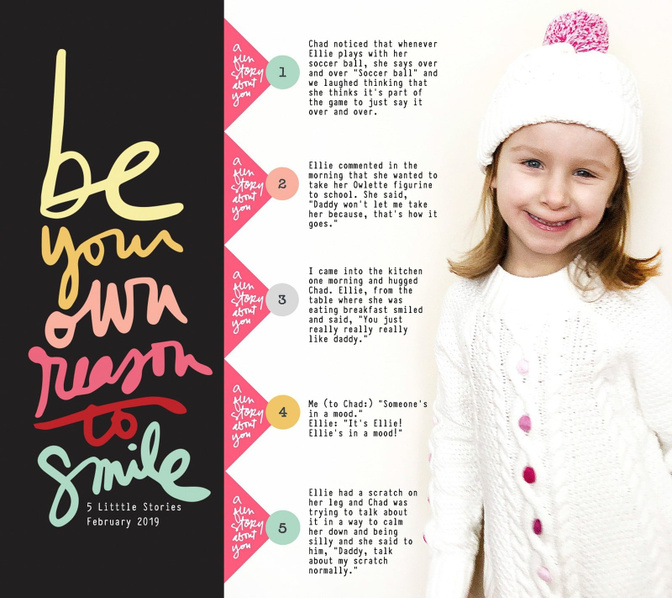
A few years back, I started finding myself writing little snippets of stories in the iPhone Notes app throughout the day as my daughter would say or do cute little things. I wanted to remember the little details; things she said, things she was interested in, etc.
Not being sure how to incorporate them into my albums, I started pairing a few different stories, usually with a repeated design element, with a photo of her around the time of the stories.
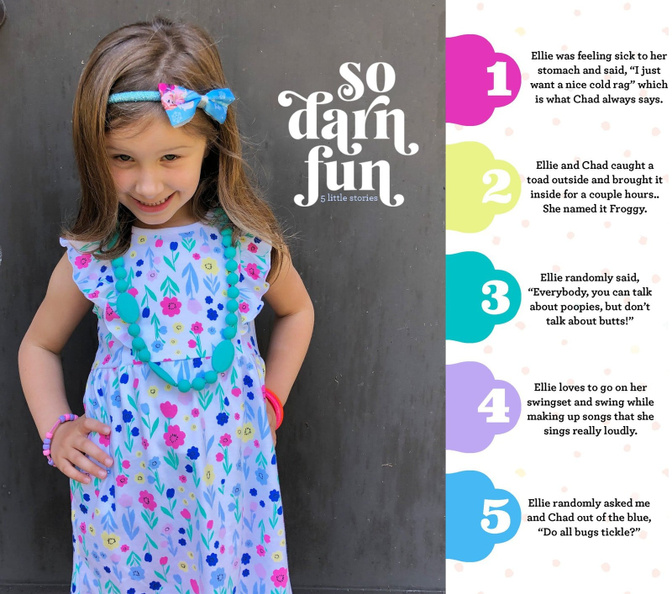
As she grew a little older I had the idea to pair the quantity of stories with her age. So, I would do three little stories at 3, etc. (This is also a great way to use those number stickers/plastic pieces, etc that you have laying around!)
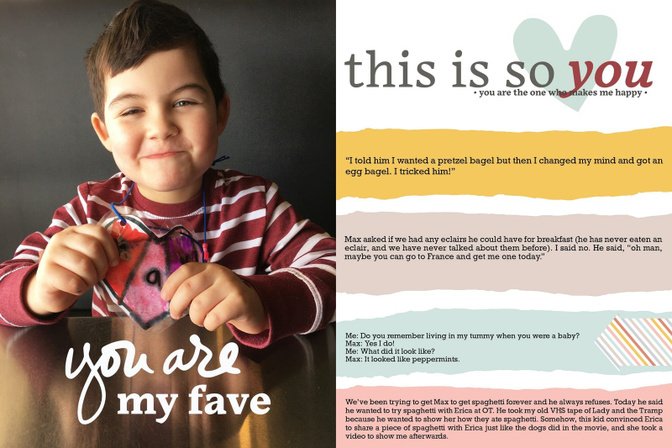
There really aren’t any “rules” about what kinds of stories could be included in story compilations. Sometimes it’s quotes, sometimes it’s what she is interested in, sometimes it’s a mixture of lots of different things. The most important thing is just to get the stories told.
This is a storytelling method that could apply to anyone- I have done them for myself and of husband as well! It’s a great way to capture snapshots of us at various times. I have even started doing them for my best friend’s son every year on his birthday, random stories that she remembers about him from the year.
If you want to learn more about the method, check out my Story Compilations class with Big Picture Classes!
Linda Jordan // Cut Up Your Cards
Hello! I am excited to share one of my favorite simple scrapbooking design tip for getting the most out of your 3x4 and 4x6 cards. Sometimes the cards don’t work for the stories you want to tell as is—maybe the journaling space is too small, you don’t have an extra pocket to devote to a “filler” card, or you just want to get outside of pocket pages altogether. The easy solution is, cut up your cards!
Using supplies from Ali’s storytelling basics collection and this technique, I created both a pocket page spread and a traditional 9x12 spread to share with you today. Here are a few of the 4x6 cards from the Stories by the Year kit sorted by type and some ideas for what to do with each.
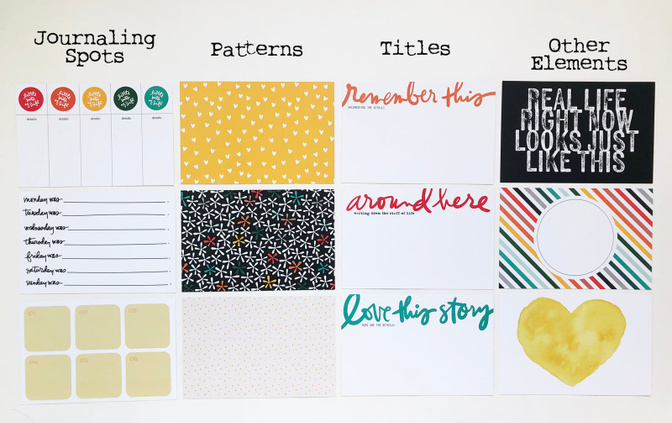
Journaling spots // These cards are great to cut out each individual journaling spot and pair it with a photo. If the journaling spots are too small for the words you want to include, consider using these pieces to hold your title and pair it with longer journaling. You could also use these spots to hold photos or embellishments.
Patterns // Patterned cards are great for cutting out shapes, using to mount your photos, or creating borders.
Titles // Cut the title off this style card to pair it with longer journaling or a photo.
Other Elements // You can cut out various elements from cards to create spots to hold your photos, journaling or embellishments.
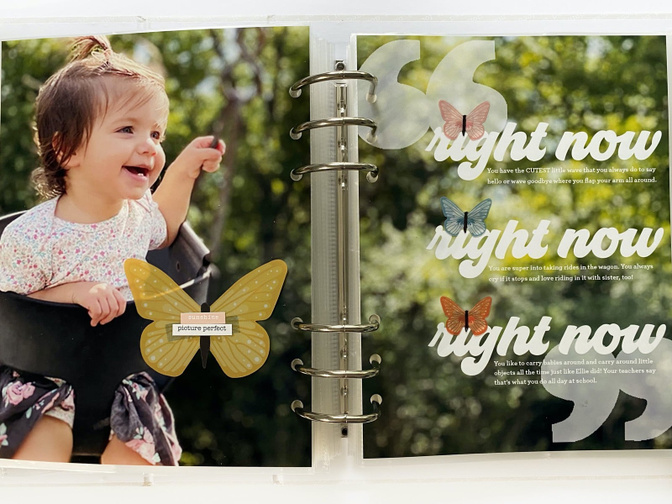
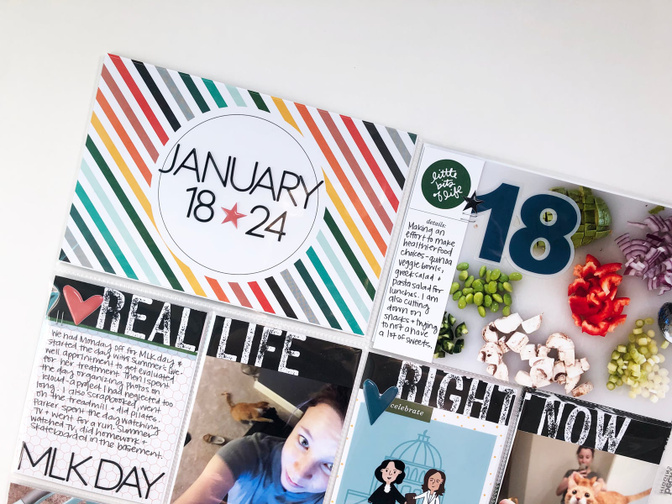
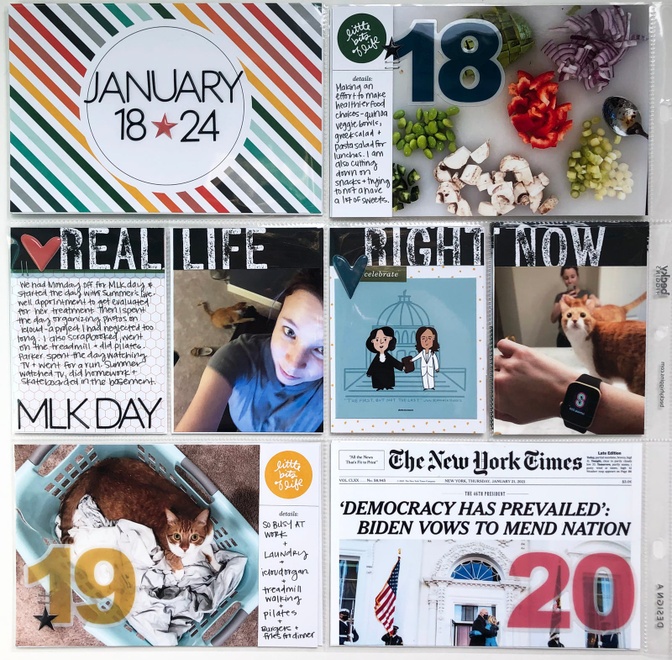
I used the top left “journaling spots” card & the top right “other elements” card to create a weekly spread in my project life album.
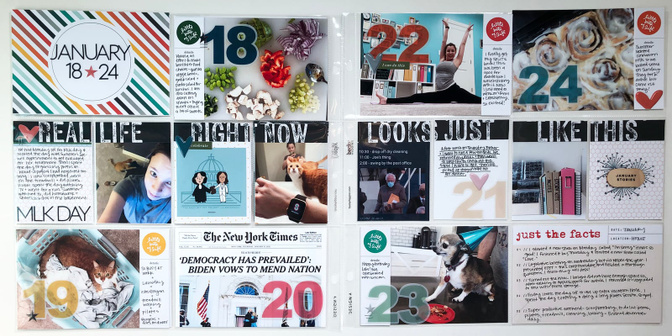
For the journaling card, I cut each of the “little bits of life” segments apart and paired them with 4x6 photos. This way I was able to add a bit of journaling to each photo, rather than have all the journaling spots together, and I had a cohesive design element across the spread. (Tip: If I wanted more space to journal, I could’ve cut out just the circles that said “little bits of life” and pair them with larger cards for more journaling space.)
I loved the 4x6 card that said “Real life right now looks just like this” but I didn’t want to devote an entire 4x6 pocket on my spread to that card. So, instead, I cut it into strips leaving the words intact. Then I laid them across my spread on the 3x4 pockets and paired them with photos, journaling and other elements. Doing this allowed me to include the card without sacrificing a 4x6 pocket and create a bold cohesive element across the entire page.
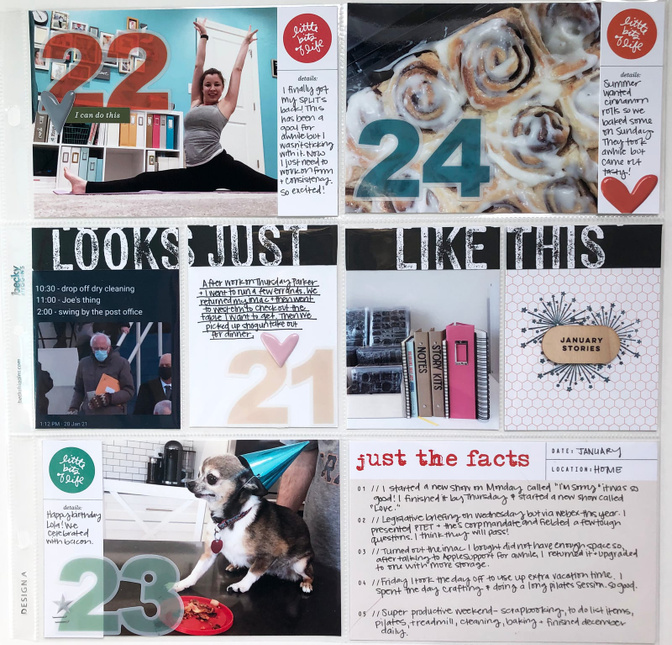
Here are some more detailed images of the spread:
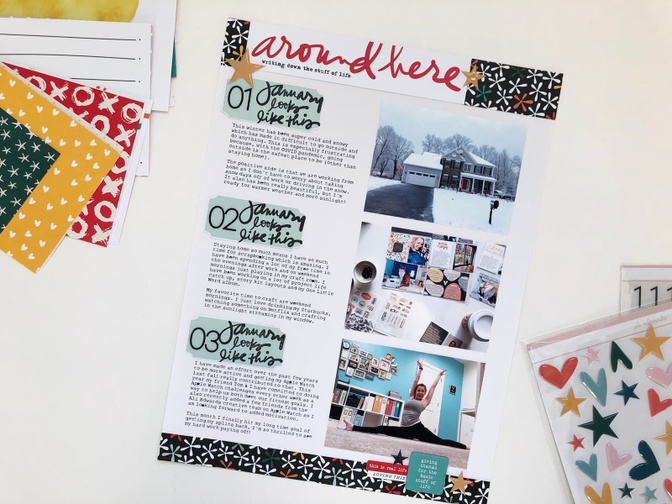
For my second project I wanted to create a traditional 9x12 spread. Just because 3x4 and 4x6 cards are sized to fit in divided page protectors doesn’t mean you have to use them that way! This project was inspired by the “around here” title card (pictured above) that came in the Stories by the Year kit.
I knew I wanted to tell a collection of stories from January 2021, but I didn’t want to be confined to a 4x6 size. So, instead I simple cut the title portion off of the card and used it to add a title to my 9x12 spread.
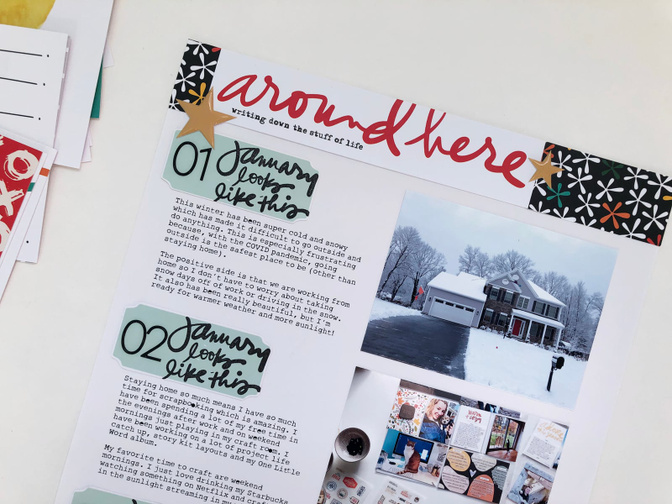
To create this spread, I typed up my journaling in photoshop and printed it on matte photo paper. To add decoration to the page, I paired the title with one of the patterned 4x6 cards from the kit. I simply cut the 4x6 card into strips to add a border to the top and bottom of my page.
I also pulled a 3x4 card from the kit that included 3 journaling spots in a pretty light blue color. I knew these weren’t going to be large enough to hold my journaling, but they would make perfect title spots! I cut them out and added a number + stamp to each one and adhered it above my typed journaling. [tip: stamp on the journaling spots BEFORE you adhere them to your background so that you don’t have to worry about stamping off the edge].
Then I paired a photo with each of my stories and finished off the spread with a few embellishments from the basics collection and my stash.
Cutting up your cards can seem intimidating at first but it gives you so many more options for how to use the products you have. A few tips I have for cutting up cards:
Use a paper trimmer or punches when possible to cut straight/smooth edges
If cutting with scissors, find a pair that has a small sharp tip and a comfortable handle
Never use the same scissors for fabric and paper, they will quickly dull!
When trying to cut intricate details, hold your scissors steady and turn the paper, not the scissors. This will give you more control over what you are cutting and you will be able to get a smoother edge and finer detail.
Finally, cutting out a lot of details out takes time, but don’t rush it! This is a great activity to do while watching TV or Ali Edwards’ Craft the Story series.
Here are a few more examples of past projects I have created by cutting up my cards:
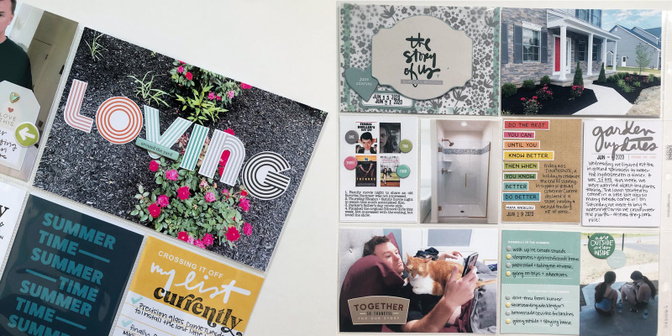
Left // The “loving” text was originally on a 4x6 card. I loved the style, but wanted the pocket on my page for my photo. As a solution, I simply cut out the text and adhered it on top of my photo.
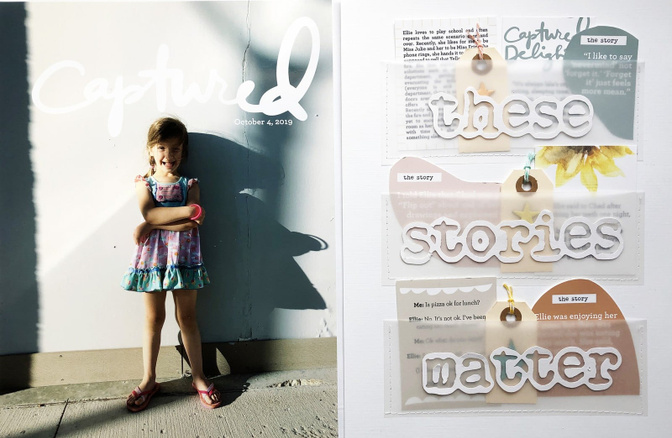
Right // This spread has two examples of cards I cut up. First, for the title card in the top left corner, I cut “the story of us” out of a 4x6 card. The shape was part of the original design, but I wanted to pair it with a different background. I used foam adhesive to pop the cut out portion from the background to give it some extra dimension.
Secondly, I absolutely loved the Maya Angelou quote and knew I wanted to include it in my spread to tell the story of Juneteenth becoming a state holiday. The only problem is that it was originally centered on a 3x4 card that didn’t leave room for journaling. To make it work for my spread, I simply cut the text out around the pattern and adhered it onto a piece of kraft paper, aligning the pieces to the left of the card to leave room to journal.
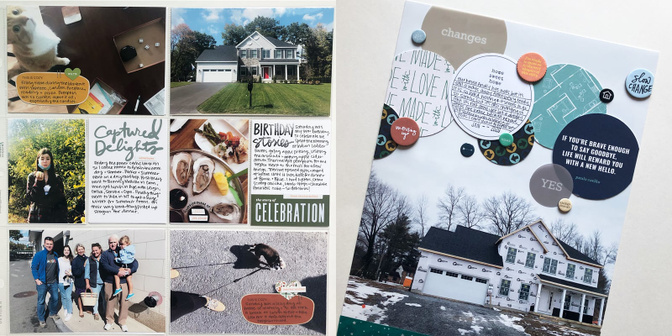
Left // For this spread, I cut apart a 3x4 card from the cozy story kit that included 3 wonky shapes with the prompt “this is cozy.” I adhered these shapes onto some of my photos to add journaling and a cohesive element across the spread.
Right // For this traditional page, I used the repeated shape of circles to add my journaling and embellishments to my photo. I used a variety of sizes of circle punches to punch patterns and a quote out of a few 3x4 and 4x6 cards.
Thanks for reading my tips and I hope this gives you some ideas for how to use your 3x4 and 4x6 cards!
We hope you enjoyed Laura and Linda's tips. Find more inspiration from them both on instagram! Laura can be found at @Laura_wonsik and look for Linda at @lindalovescreating. Make sure to check back tomorrow for some great advice from Pam Baldwin and Krystal Idunate!!


Comments
Sign in or sign up to comment.
4 comments
Ali & team,
I have been LOVING these posts this week. I’ve been taking notes but I was wondering if there was any plans of putting together a little pdf (similar to your classes) that we can print out and flip through whenever we are stuck or want to do something different. No worries if not, I’ll put my notes in my binder. Thanks again!
Replies to libbysmeyer
Sign in or sign up to reply.
So enjoy reading these! Thanks for the inspiration!
Replies to justlisa
Sign in or sign up to reply.
This has been so fun this week. So many great ideas! Thanks to all!
Replies to mcbce
Sign in or sign up to reply.
Love love love this! So inspired. Great info and examples. Thank you!
Replies to Danieleserhan
Sign in or sign up to reply.