Week In The Life™ 2015 | Tuesday In Album
Tags:
Bringing it together one day at a time.
I actually like breaking it down into chunks and spreading it out and working on the album one day at a time (vs. attempting to tackle it all at once in one sitting which can be super overwhelming).
Tuesday follows pretty much the same design flow that I shared for Monday, with a couple different things added in that I'll share below. All my Tuesday journaling can be found in my previous post here.
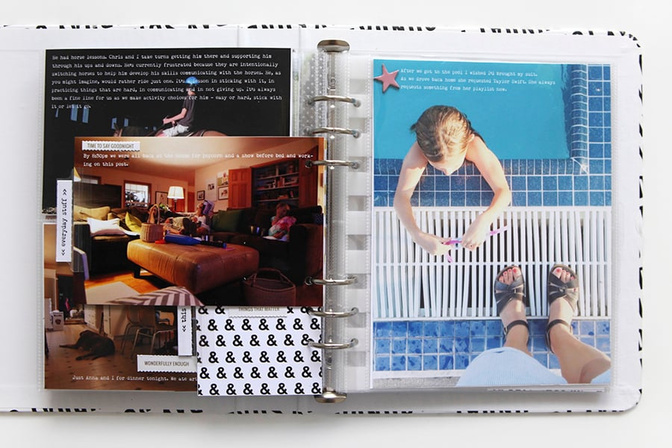
Here's a look at my Tuesday in the album:

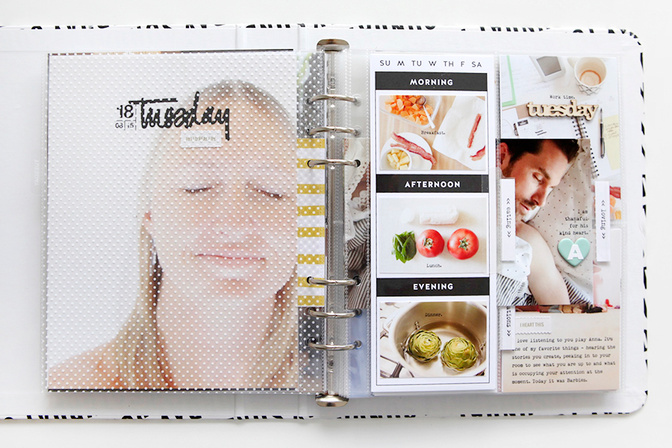
Again, the pattern divider is going right in between my main full page photo and the 3 inch x 8 inch page protector. I don't have food photos for every day so it's likely some of these spots will just be filled with additional photos from the day during those time periods.
I'm totally into the layers - loving the mix of things both inside and outside the page protectors.
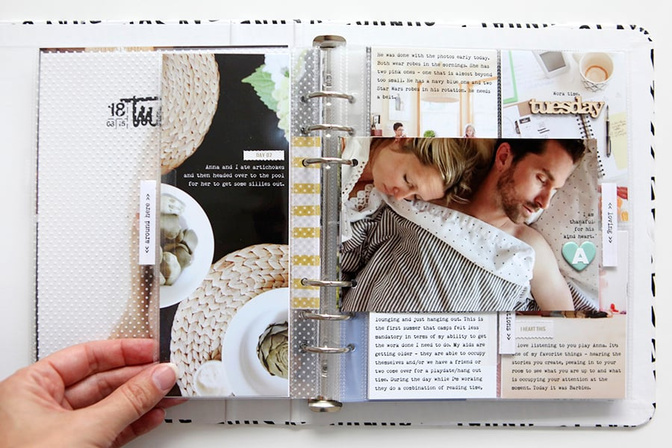
Yeah, the artichokes were from dinner but I still wanted that photo cropped to 3 inch x 8 inch. It's all a part of my Tuesday.
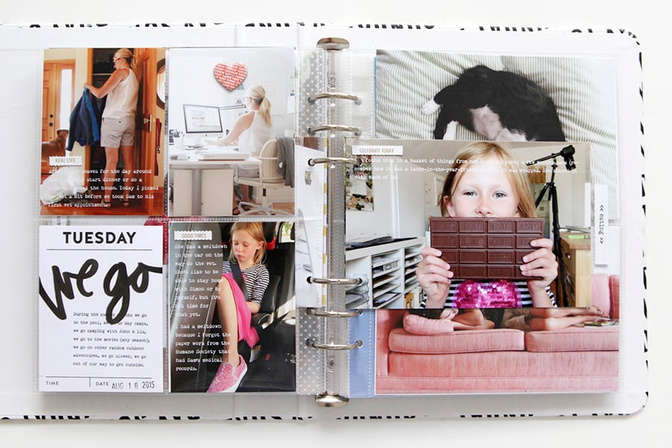
One difference you might notice is that I added my back to back 4x6 photos to the middle two holes vs. using the three top or the three bottom. It made sense to me to add them right to the middle when it was only one back to back set.
As you can tell I'm still overusing the Avery Index Tabs. The stamps from the kit continue to provide me with sentiments that fit within the tab.
The "squeeze you tight" black and white sticker is from my Gatherings Story Kit™.
The "tuesday" wood veneer got added to the upper right 3x4 pocket.
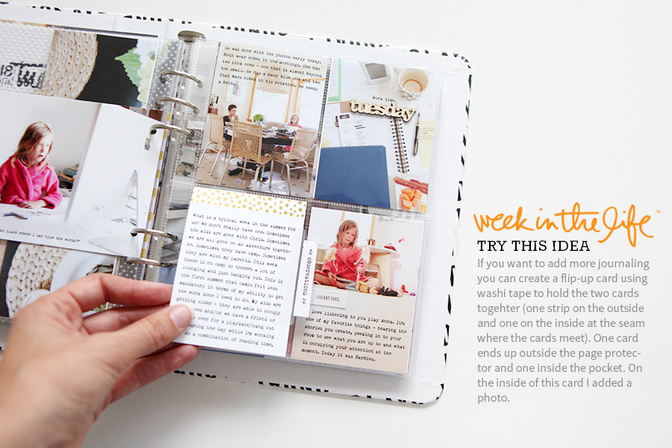
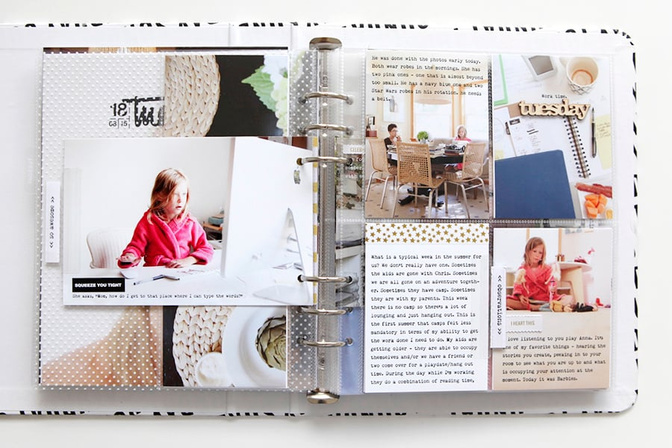
In my journaling for Tuesday I had added in a paragraph about our general schedule in the summer. I wanted to include that whole thing so I created a flip-up card that consists of 2, 3 inch x 4 inch journal cards with a washi tape added at the seam to create the flip. That gold star washi from the kit is awesome.
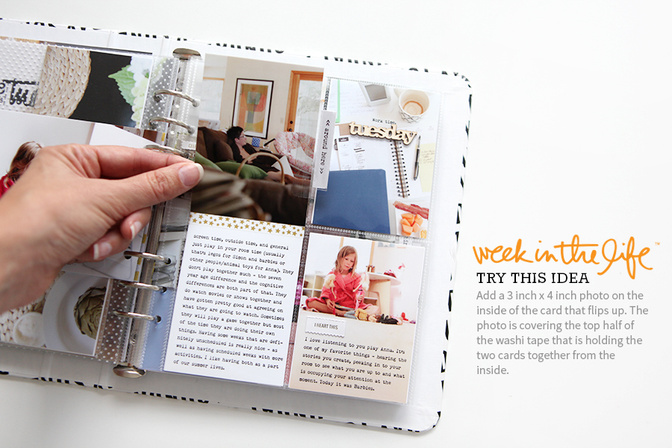
When you flip-up the card you see the rest of the journaling and a photo that I attached to the underside of the card that lives outside the page protector. Super simple and easy way to add more words.
I switched the wood veneer day of the week and the 3x4 day card this time - the card is on the backside.
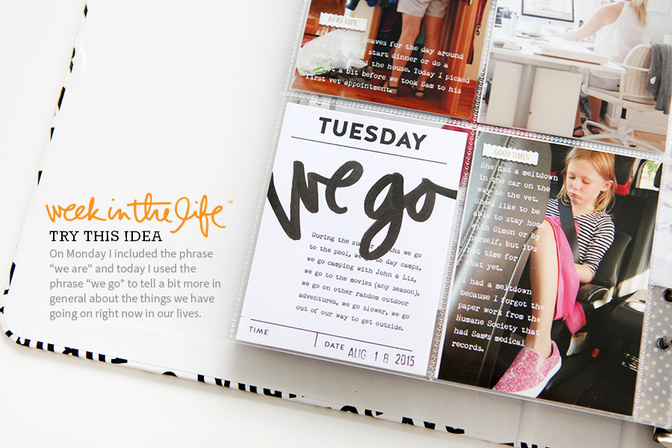
Again I used the Faber-Castell PITT Artist Big Brush Pen to write "we go" on the card and then ran it through the printer to add the extra bit of journaling.
I did receive a request to make some "we are" (the sentiment I used for the Monday card) word art available - grab that set here.
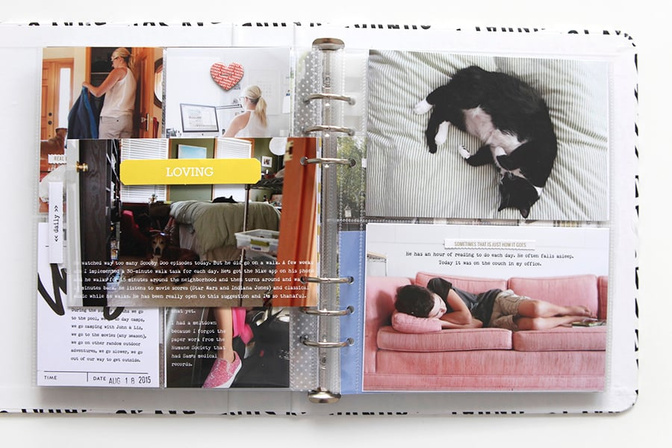
The "loving" label was added onto a photo using foam squares.
When I look back through my photos at this stage of the process I often look for patterns - like sleeping people and pets. Remember that it's not all about chronology - it's also about letting the stories that want to emerge come forward in your project.
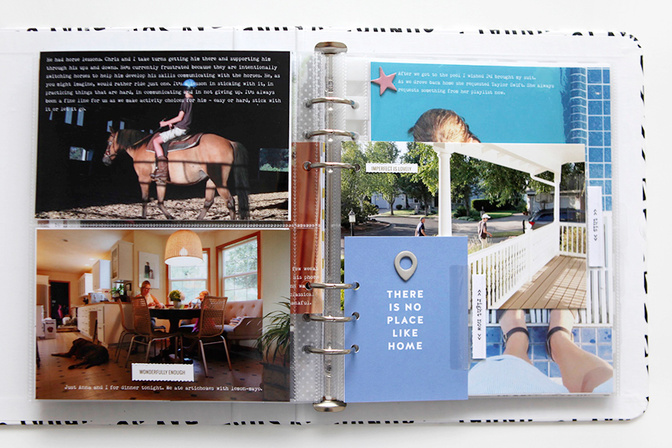
The last portion of Tuesday includes a couple inserts. I really liked the pattern card insert I added on Monday so I followed that lead and did the same for today, this time adding one of the geotags above the sentiment.
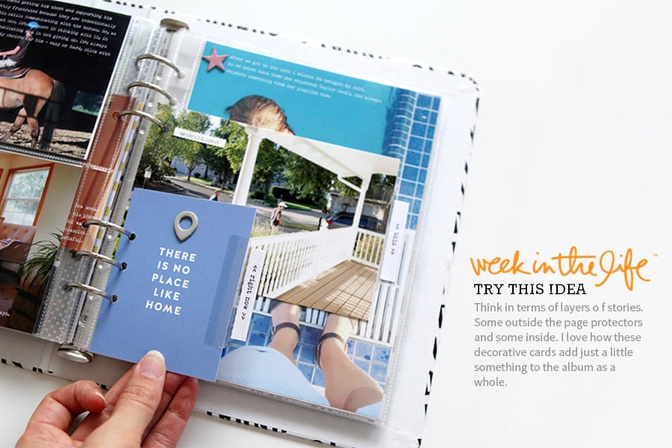
Yes. Layers. Yum.
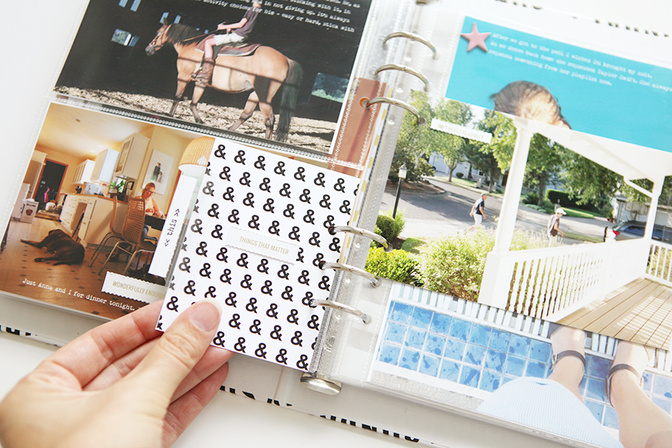
The back uses the ampersand pattern paper + a perforated sentiment "things that matter."
I included most of the journaling that related to Simon's horse lesson and Chris picking him up on the photo of the horse so I added this one in without any words.
Full page photo again to wind up the day.
SUPPLIES
Week In The Life™ Album Kit (includes album, page protectors, stamp set, pattern papers, cards and embellishments)
Epson R2000 Printer (for anything larger than 4x6)
Epson PictureMate Show Printer (for 4x6 and smaller)
Font is a free font called Remington Noiseless
MORE INFORMATION
Other posts from the album creation portion of Week In The Life™ 2015 so far can be found here:
Monday In Album (with a video overview)


Comments
Sign in or sign up to comment.
43 comments
Beautiful. Thank you for sharing your ideas. Michelle t
Replies to mtercha
Sign in or sign up to reply.
Fantastic, I love it.
Replies to JenHart
Sign in or sign up to reply.
Loving the inside + outside of page protectors. And those tabs, I'm sold. :)
Replies to lime
Sign in or sign up to reply.
I love this Ali, especially the layers!
Replies to Jobo74
Sign in or sign up to reply.
so inspiring! Any chance you'll add the avery index tabs or similar to your shop (I haven't found anything similar yet in germany)?
Replies to scrappyHeike
We tried to source them in the past with no luck. I'll look into it again.
I got them at Staples. Maybe an office supply store in Europe may have them?
I BOUGHT THEM VIA THE LINK ALI POSTED FROM AMAZON AND THEY CHARGED ME IN TOTAL FOR TWO PACKS OF THE INDEX TAPS INCL. SHIPPING ONLY 14€!!! I HAD TO HAVE THEM !!!! SCRAPPYHEIKE, YOU SHOULD GO AND TRY IF YOU STILL GET THIS PRICE!
If you can source them, I'd be very grateful. None of the office supply chains I've researched in Canada seem to carry that product, and the Amazon.ca seller wants three times the price ($15 U.S.) plus $5.00 for shipping! Those tabs would make a great addition to December Daily albums as well....
I also really liked the tabs, but couldn't find a supplier that would ship to New Zealand for a reasonable price... So I made my own using wide clear sellotape :) It worked out pretty well
Staples appears not to carry that product in Canada. :(
I caved and bought them from Amazon.com. No free shipping to Canadian addresses, and there's an import tax, but I bought 7 packages and the shipping and taxes were under $9. Not bad.
Sign in or sign up to reply.
This is great! I especially love how you used the index tabs.
Replies to JulieCampbell
Sign in or sign up to reply.
I really like your layers, especially how you have Aaron's face peeking out.
Your text placement works so well, I'm wondering if you plan your photo composition as you're taking the photo for text? Or do you crop to make room for the text? Or do you decide to use the pictures that text works on? Just wondering your thought process.
How long do you think you spend putting a day together? I agonize over so much of the process. I need to learn how to say it's good enough sooner!
Thanks Ali!
Replies to KarenC
Ali mentioned in one of her previous blog posts (about prepping for WITL and things to consider - don't know the exact post, sorry.) that she does plan for the journaling on her photos by considering "white space" as she takes her photographs. Leaving more sky, more ground, more counter, more floor - whatever space and she adds her journaling to it. She planned to journal on her photos, so she took her photos with "white space" in mind.
And I like those layers, too!
Yes - thank you @mollymoo951 - exactly.
I wrote a post about Week In The Life™ photo tips that you might want to check out: http://aliedwards.com/2015/08/week-in-the-life-photo-tips
Putting Tuesday in my album probably took 4-5 hours including photographing it and writing the blog post. All my journaling is already done because I do that during the week - for working on the album it's just copying and pasting the words onto my photos and printing.
Excellent photo tips; my mind is mush sometimes because now I do remember reading them. Thank you! (both of you :)
And I'm going to try giving myself a 4 hour limit/day and see how I do. I'm not writing a blog post or photographing the pages and I also have my journaling done but I'm not at your skill level so I'll see how I do.
It really is a great project. I did it once before when my son was in high school and now this time in summer while he was home from college. It's a nice contrast.
Thank you!
Sign in or sign up to reply.
Wonderful - thank you for the inspiration...I saw a couple of things I can include in my album. I'm enjoying following along as you prepare you album. I agree, it's more relaxing to prepare the album a day at a time VS in one sitting.
Replies to mollymoo951
Sign in or sign up to reply.
Love it! I said it on your Monday post, but I love the small pictures on that 3x8 card. Very cool. Lots of great ideas - thank you!
Replies to abragg79
Sign in or sign up to reply.
love the mixed layers! I've been doing that in my regular albums for the past 2 years and love all the texture. It's sorta like an old-school scrapbook that's pieced together. Awesome!
Replies to papergoddess
Sign in or sign up to reply.
Love this, Ali. This is my favorite project of yours. I have all of my pictures chosen, I've decided how I'm going to incorporate this into my regular PL finally, now it's just a matter of printing and getting it done! Thank you for sharing your process.
Replies to patowle
Sign in or sign up to reply.
I love your ideas! I'll definitely be using some of them in my album!
Replies to Cutestains
Sign in or sign up to reply.
I think I took way too many pics but going to use the rest for August project Life. Everyday I get my coffee and read your blog. Great inspiration to me and others.
Replies to simple
Sign in or sign up to reply.
Hi Ali! LOVE is the only word that I have for EVERYTHING that you do when it comes to your classes and your style of scrapbooking. I am looking at purchasing the Epson R2000 printer, but what kind of paper do you use to print out a 12 x12 photo if you are going to be printing that big? Also is there anything else that I would need right away that I can order with the printer? Like more ink cartridges, etc.? Is there only one kind of ink that is used or paper? THANKS!!!
Replies to peggy1958sue
I print on 13x19 Epson Photo Paper and then cut down to 12x12. You might want to consider more ink just to have on hand (I like always having an extra). It has a 8 ink cartridges. I go through the Gloss Optimizer the most. Have fun! I love that printer.
I'm sorry....what is the Gloss Optimizer and THANK YOU for the feed back!! APPRECIATE IT!
The Gloss Optimizer is one of the 8 ink cartridges.
Sign in or sign up to reply.
Hi
Is there a way to change the color of the layered templates from black to white using something other than photoshop? I'm using my iPad but not having much luck finding an app that will let me change the color. Thanks!
Replies to sunnybrook494
Sign in or sign up to reply.
So beautiful! I'm starting to be able to "think outside the box" now with my memory keeping, thanks to your posts! One thing I'd love to know - when you add the wood veneer elements, do you tend to add them to the inside (directly on the card/photo) or the outside (on the pocket itself)? I never can seem to decide which looks "right". ;)
Replies to JenBradshaw
Those are added right onto the photo.
Sign in or sign up to reply.
What kind of adhesive did you use on your photos when you stuck them back to back? Scrapbook newbie here! :)
Replies to granolagirl
I use Scotch rolling adhesive - it's my favorite: http://bit.ly/1KsOBTu
Thank you Ali!!
Sign in or sign up to reply.
You are amazing! This looks fabulous as usual! I was so excited to see this post this morning, thanks for taking the time to share with us.
Replies to Bellaa75
Sign in or sign up to reply.
Love this!! I have a bunch of Avery index tabs but darn if I can find where they are! I really like how you have used them.
Replies to pinksoup
Sign in or sign up to reply.
I love seeing how you put this together. But after I see this post, I have a page finished and I think, I could add more, and more. Where does it end. This is the second time that I have done this and the years in-between have changed a lot. I saw a book that I put together in 2007 at a daughter's, and I thought how meaningful. If there are kids or family this is a good thing to do.
I want to say that you are a really good photographer of everyday life. Likely it is my strong suit. Your photography is not only technically good, but your assessment of what is a good photo is very good. I might do the December Daily if I can figure out what what to capture when there are not kids around.
Replies to Radish38
Sign in or sign up to reply.