December Daily® 2022 | Crafting With Krystal 05
Tags:Hi friends! Krystal here, back again with a recap of my final Crafting Life with Krystal - December Daily® Edition recap!
This mini-series is composed of a weekly Live video on the December Daily® Facebook Group. This live event takes place each Thursday at 12PM ET throughout the month of September 2022.
This week, our product topic was the Paisley Press Mini Kit + Misc Shop Items.If you missed the video this week, you can check that out below.
LET’S RECAP
In today’s video, we discussed different ways to use the Paisley Press Mini Kit - both physically and digitally, and brought out a few miscellaneous items from the shop to design layouts with as well. Let’s go through each product individually and talk about design ideas.
My hope is to give you ideas that you can translate into your own projects this year - helping you to love + use all the beautiful components of the 2022 December Daily® collection.
1. 7x8.25 PATTERNED PAPERS
Starting off, let’s talk about the five patterned papers included in the kit. These papers are sized to fit in a 6x8 album - outside of the page protectors. Here are some fun ways to think about using these papers:
One of my favorite ways to use a variety of patterned papers is to cut them up into smaller shapes and piece them back together to create a feature image. I love the idea of creating a star pattern or an interactive stocking using paper-piecing.
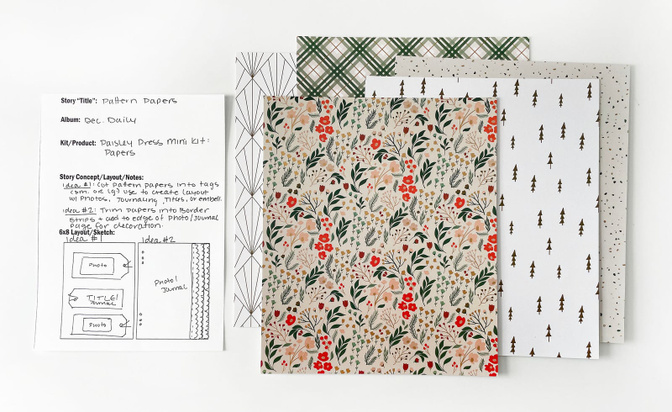
Cut the patterned papers into large tag shapes. Add photos, journaling, titles, or embellishments on top of the tags, then place the tags in a column on a full page.
Cut the papers into strips of fancy border edging. Layer a few of these on the side edge of your photo or journaling for a textured yet classic look.
Use a mix of the patterned papers to back cut files. This helps to make your cut files match the kit/look you are using this year.
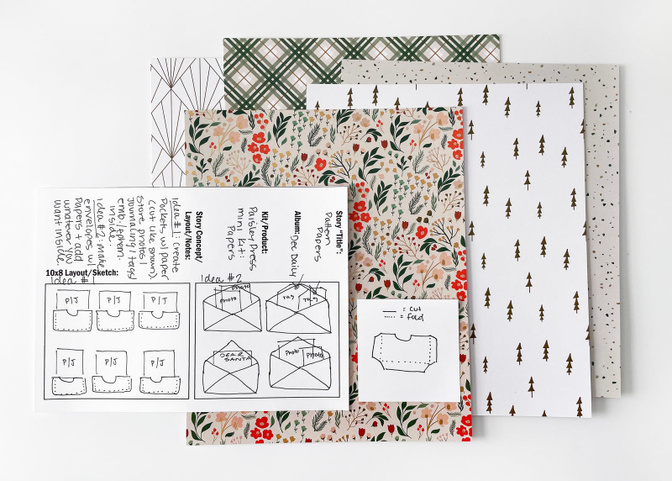
Cut patterned paper into pocket shapes. Fold sides and bottom to create a pocket with a bit more wiggle room. Add a bunch of these to a page with tags/journaling/photos/ephemera tucked inside.
Cut and fold patterned papers into envelopes. Add as an insert with a story inside… or place a bunch on one page for repeat elements and additional storage for photos/journaling/etc.
2. 7x8.25 JOURNAL PAPERS
Along with the full pattern papers, the Paisley Press Mini Kit also include 4 journaling papers. These are also sized at 7”x8.25”. Whether you are using these physically or digitally, there are so many options for design/story with these four pages. Let’s take a look:
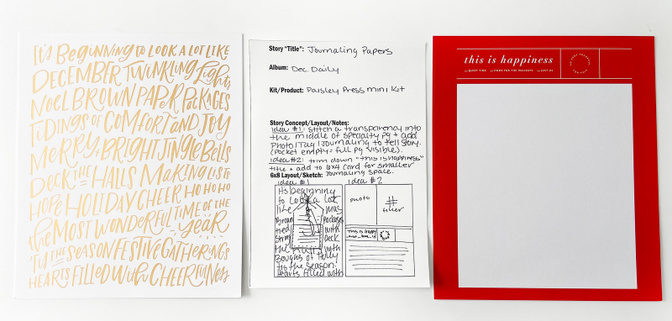
Want to make the hand lettering page functional without covering up the beautiful gold foil text? Stitch a clear transparency into the middle to act as a pocket. Then, add your photo/journaling into the pocket with the number dangling from the punched hole/twine. When you pull the tag out, the full background paper will be visible.
Use the handwriting page to create a stencil with your electronic cutting machine. Use ink or texture paste to add the text to a page. You can also minc your own gold foiled hand lettered page.
The “This is Happiness” title is actually the perfect size to go at the top of a 6x4 journaling card or at the top of a notebook page. Trim out the title from the 7x8.25 paper and use it to create your own journaling element.

Trim down the DECEMBER paper to create an insert. Add as a 4x8.25 page and place a photo/journaling on the back. Or, add trim to the edge to create more texture. You can also stitch it onto a full page photo/journaling as a title.
Use the December Calendar page to document your advent calendar this year. Take photos each day of what you open up and place the small photos into the boxes.
Other ideas for the calendar: document one photo from every day in December, use it to keep track of bigger events throughout the month, put one sticker (or tiny phrase sticker) to represent the day into the daily squares.
3. JOURNALING CARDS
Next up, let’s dive into the journaling cards. I began this process by dividing the cards into like-categories. There are a few of each type of design: journaling cards, filler cards, patterned cards, etc. After getting my cards organized, I could then determine how to use the different ones. Here are some ideas for the cards:
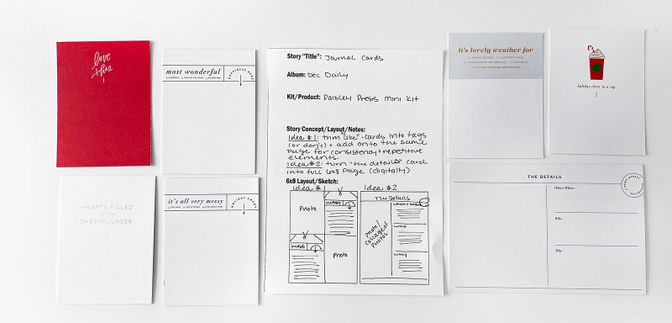
Use similarly designed cards on a single layout to create a sense of consistency. Could cut into tags OR leave as they are.
Use a digital program to redesign cards to fit a larger scale. “The Details” would make an amazing 6x8 page to document a special holiday event.

Fussy cut the word JOY from the 6x4 card and add it to a wreath. You could use a holly die or cutting machine to get the leaves/berries cut from cardstock. You could also cut the shapes from the rest of the patterned papers/cards from the kit too.
Cut the word MERRY from the 3x4 card and reassemble it as a title at the top of a page.
Use a Minc machine to print and foil any of the sentiments included on the cards.
4. TRANSPARENCY OVERLAYS
The single 6x4 and three 3x4 transparencies in this mini kit are absolutely gorgeous! I especially love the floral and handwriting patterns. Here are some ideas for how to use these in your album this year:

Use the transparency, layered on top of a photo or journaling, to create a flip up. Attach with washi tape and embellish the top.
Use as a peek-a-boo filler card. Put an embellishment into the center of the transparent card, then slip into a pocket for a simple yet elegant look.
Use the digital version to print + minc the beautiful designs.
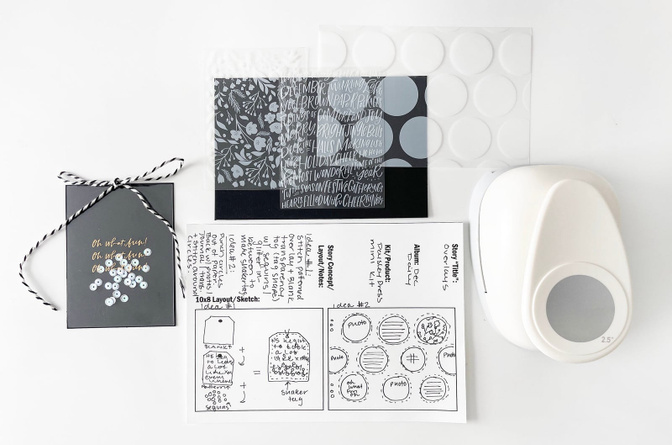
Create a shaker tag by layering the patterned transparency on top of a blank transparency. Cut and stitch into a tag shape with sequins or glitter sandwiched in-between the two layers.
Create a circle (or any shaped) page. Punch out the shapes and back with photos, journaling, or transparency. Can have the transparency visible on both sides of the page, showing a peek at what comes next.
Pair the transparency with simple tags and embellishment for a layered embellishment look.
5. EMBELLISHMENTS
The Paisley Press kit comes with a variety of embellishments: wood veneer, chipboard, and puccy stickers. Here are ideas for ways to use these:
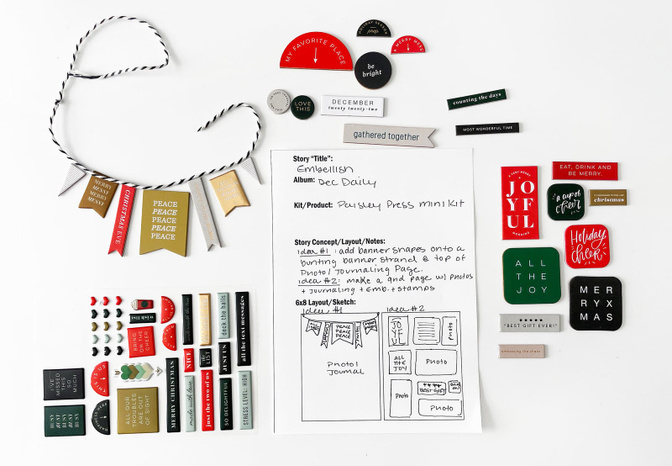
Pull out all of the banner shaped embellishments and create a bunting banner to place at the top of a full page photo/journaling/card. The banner will create dimension + extra texture through the use of the different materials.
Gather the square/rectangle embellishments, along with small rectangle/square images and journaling. Create a grid page with the combination of all the elements.
Use all of the half-circles to make journaling spots on a full page photo. Print journaling on the lower half of a circle and add the embellishment to the top. Then, create a downward flowing column of circles on a large photo.
Use the tiny heart stickers as bullet points, or the tiles as journaling separators.
6. WINDOW CARDS
I love the larger scale of the Window Cards this season. I think these will be so fun to include and LOVE that they are decorative and functional at the same time. Here are some ideas of what you can do with these:
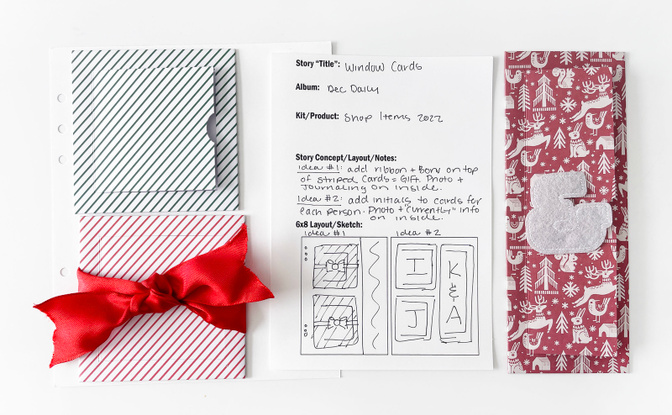
Add ribbon/twine/bows to the top of the diagonally striped 4x4 window cards. This makes them look like gifts. You can add tags/numbers dangling from the ribbon, and add your photo/story inside.
Add a few onto a page with large alphas on top - initials for each person in the family. Inside, include a current photo + info about each person. You could come up with 5 questions to ask everyone and add the answers inside.
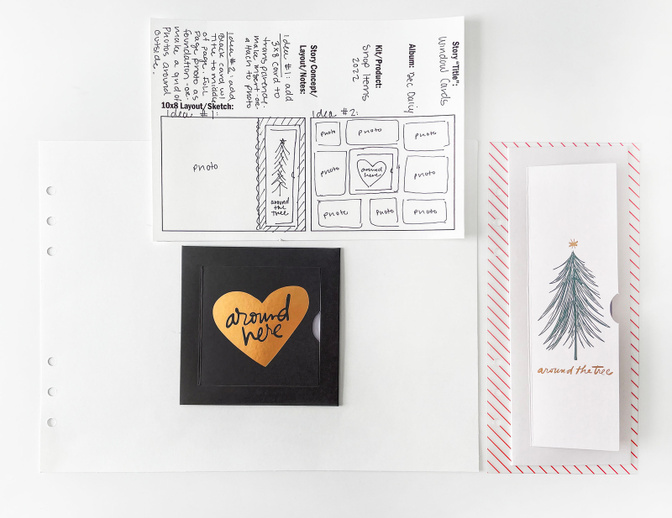
Place a 3x8 window card on a 3x8 transparency. There will be a small patterned border around the outside edge. You can add a photo/journaling on the back side. Add as an insert or stitch to a photo to create a full page layout.
Add the “Around Here” or “What Matters” 4x4 window card into the middle of a full page photo OR in the center of a grid of photos. Story goes inside!
7. CARDSTOCK INSERTS
The Cardstock Inserts are another favorite product of mine this month. Since I’m still debating between 6x8 or 10x8, I wanted to come up with ways to use all three of these in both albums. The full quote page was the trickiest, but I think I’ve got some fun ideas for this one! Here are a few ideas for page designs including these cardstock inserts:
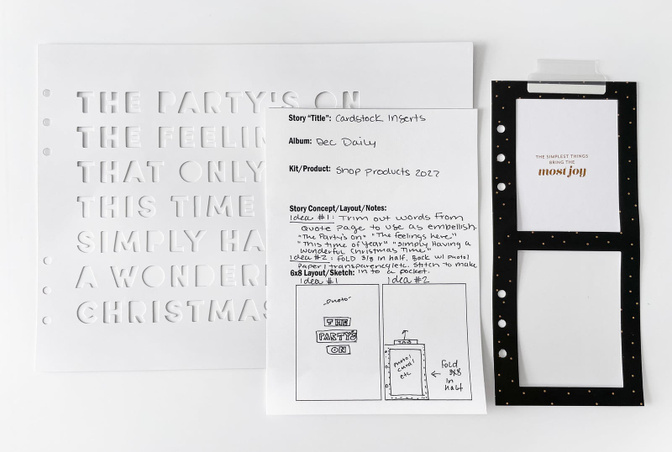
Cut down the quote page into word tiles. Reassemble them onto a smaller page - using the full quote or just a sentence or two. You could space out the different sentiments and have a few pages with these on them!
Use the quote page as a stencil and ink/texture paste the sentiment onto a new page.
Fold the 3x8 window card in half to create a 3x4 pocket insert. Back with paper/photos/transparency and slip additional photos/journaling inside.
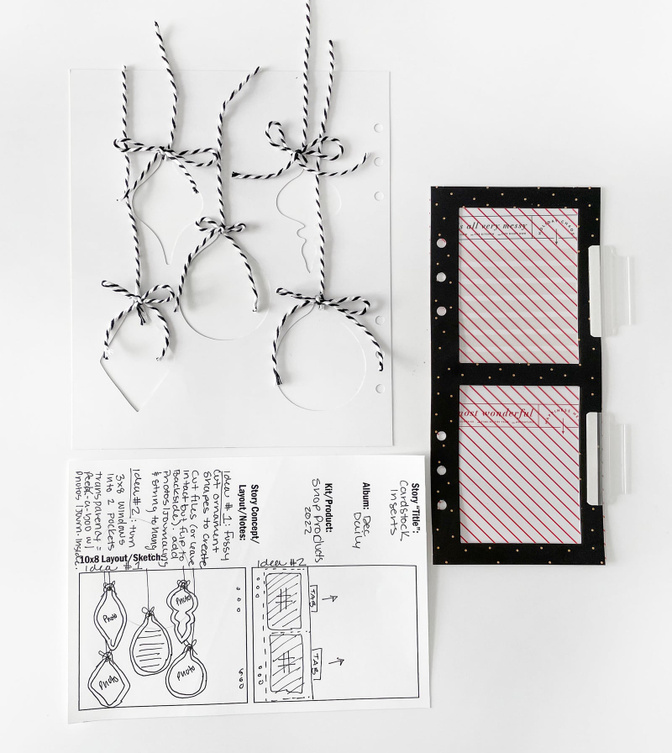
Use the ornament page as is and back with photos/journaling.
Cut the ornaments out of the page leaving a small (¼”) border around the outside. This makes them into smaller cut files. Back with photos/journaling/papers/etc. Add to a page via tying on or pop up on foam. Tie bows at the top and string from the top of the page to the top of the ornaments.
Use the backside of the ornament page. Paint it or add texture paste to create your own patterned page.
Back the window 3x8 insert with transparency. Stitch to a piece of cardstock to make into two pockets. Add numbers into the windows and place photos/journaling inside the pockets.
8. ENVELOPE BUNDLE
Envelopes are products that are always handy to have around for projects like December Daily. They can come in handy as extra storage, or can be deconstructed/reconstructed into their own album covers. Here are a few ideas for how to use this year’s Envelope Bundle:
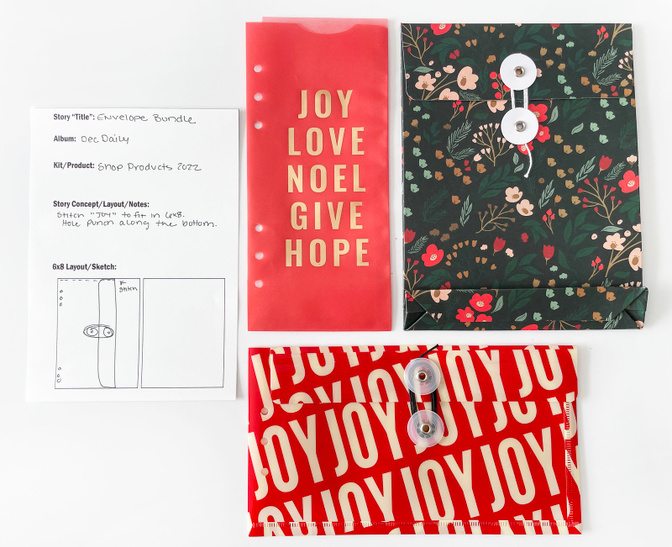
Stitch around the outside of the plastic JOY envelope, keeping the side stitches at the same level as the opening flap. Trim off the excess on the left side and hole punch the bottom. This will allow you to fit the plastic pocket into the smaller 6x8 album.
Use the envelopes to hold letters to Santa or a place to keep your Christmas ephemera collected throughout the month.
Create a DIY mini-album from the envelopes.
Deconstruct the envelopes and create different supplies you can use: Plastic/Transparent cards from the JOY envelope, vellum tags/cards from the vellum tag, cards/embellishments/tags from the cardstock envelope.
Use the floral kraft envelope to store cards you receive this year for the holiday season.
9. LARGE PENNANT FLAGS
The Large Pennant Flags were a product I knew would be a little tough to design a layout with. After doing some research on Pinterest, I found an idea that translates super well using the pennants from the collection. Here’s an idea for these:
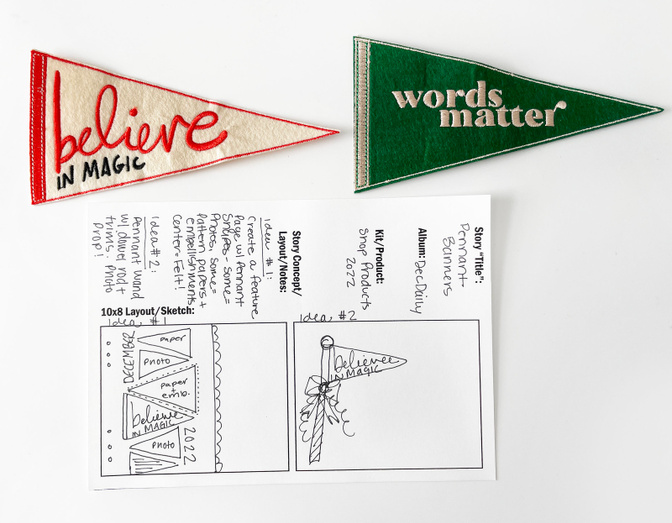
Create a stack of pennant shapes using different textures: felt, chipboard, patterned paper, photos, etc. Alternate which way the pennants face and add a title along the sides.
If nothing else, these pennants would make the most adorable pennant wands. Add them to a dowel with some trims, bows, and a washi covered dowel (plus maybe a pom pom at the top). How adorable would this be sitting in your utensil cups or used as a photo prop!?
CONCLUSION
Friends, we have come to the end of this mini series for the 2022 December Daily collection. I have super enjoyed going through this process with you and can’t wait to implement some (or many) of these designs in my own December Daily project this year. Thank you so much for following along on this series and I hope these ideas have helped to get you thinking about ways you may use your products this year.
In the comments below, tell me one design idea you are most excited to try out this year! And, if you have any additional ideas for these products, I’d love to hear those too!
Thanks again friends for being here and I can’t wait to see what you create this December.
Until then friends, let’s tell stories together!


Comments
Sign in or sign up to comment.
5 comments
These tutorials have been the best. Thx so much.
Replies to minkaclark
Sign in or sign up to reply.
You did an amazing job and gave me tons of ideas. I hope this becomes an annual tradition. Thanks for all the hard work you but into the series.
Replies to Untiedt
Sign in or sign up to reply.
This series is so jammed packed full of ideas! It was could have easily been a paid for class! I can't wait to return back to the posts once I receive my DD box! Almost too many amazing ideas! Thank you Krystal!
Replies to hursts
Sign in or sign up to reply.
Krystal, you are so creative and inspiring! Thanks for the fabulous ideas
Replies to Shift2thrive
Sign in or sign up to reply.
Thank you Krystal for all the fantastic ideas. I'm making some foundation pages now! Yippee!
Replies to Meltex
Sign in or sign up to reply.